**CIS 1920 Homework 6: Web dev 🐦,!🐦**
**Due Friday April 14, 2023 11:59 pm EST**
(#) Learning objectives
- Familiarization with 3rd party modules:
- Pytorch
- Flask
- Using Python as a web backend
- Basic familiarization with HTML templating
(#) Starter files
- [hw6.py](hw6/hw6.py)
- [imagenet_class_index.json](hw6/imagenet_class_index.json)
- [bird_synset.txt](hw6/bird_synset.txt)
- [upload_template.html](hw6/upload_template.html)
(#) Bird or not bird?
Inspired by the [TV show Silicon Valley](https://www.youtube.com/watch?v=ACmydtFDTGs):
As well as the following [xkcd](https://xkcd.com/1425/):

We'll be using modern deep learning along with Flask concepts we have covered the past two weeks to build an application where users can upload an image and our app tells us whether the image is a bird or... not a bird.
(##) Setup
We'll need the `flask` package as well as the `torch` and `torchvision` packages for this homework assignment. You can install them with `pip3` like normal.
We recommend that you install the packages in a virtual environment, so that they are downloaded into a "clean slate" and potential package conflict issues are avoided. You can create a virtual environment with the `venv` command, as follows:
~~~~~~bash
$ python3 -m venv your_env_name # create the virtual env
$ source your_env_name/bin/activate # activate it
# begin installing packages
(your_env_name) $ pip3 install flask
Collecting flask
...
Successfully installed Jinja2-2.11.2 MarkupSafe-1.1.1 Werkzeug-1.0.1 click-7.1.2 flask-1.1.2 itsdangerous-1.1.0
(your_env_name) $ pip3 install torch
Collecting torch
...
Successfully installed dataclasses-0.6 future-0.18.2 numpy-1.19.4 torch-1.7.0 typing-extensions-3.7.4.3
(your_env_name) $ pip3 install torchvision
Collecting torchvision
...
Successfully installed pillow-8.0.1 torchvision-0.8.1
~~~~~~
Check out the Week 11 lecture for more information on how to create a virtual environment.
You'll also need to set up a Flask project file structure, which is necessary to run a Flask app. To do so, you can create two directories: one called `static` and one called `templates`. Additionally, you should place the `upload_template.html` file that we provided in the `templates` directory--Flask will know that since this HTML file is in the `templates` directory that it should be used as a webpage to display.
Your project directory structure should like something like this:
~~~~~ bash
(your_env_name) $ ls -l
total 16
-rw-rw-r-- 1 tliu tliu 7183 Nov 12 12:35 hw6.py
drwxrwxr-x 2 tliu tliu 4096 Nov 12 12:35 static
drwxrwxr-x 2 tliu tliu 4096 Nov 12 12:35 templates
~~~~~
(##) Loading a production-level deep learning model
We'll use one of the pretrained models loaded in Pytorch called [MobileNet](https://ai.googleblog.com/2018/04/mobilenetv2-next-generation-of-on.html), which is an image classifier trained on the [ImageNet](http://www.image-net.org/) dataset specifically tailored for lightweight deployment on mobile devices. At the top of the `hw6.py` starter file, we provide the following code to initialize the model:
~~~~~python
mobilenet = models.mobilenet_v2(pretrained=True)
# tell PyTorch we are evaluating, not training the model
mobilenet.eval()
~~~~~
We provide the `transform_image(image_file)` function which takes a local file path to an image and transforms it into a *standardized* `torch.Tensor` that can be fed into the model.
**Your task**: implement `get_prediction(img_tensor, model)`, which returns the most likely class label predicted by the model. This will use the same concepts from our `compute_accuracy()` function from HW 5.
(##) Tailoring our model output for bird classification
The ImageNet classification task as defined in PyTorch has 1000 (!) image labels. Pytorch provides a mapping between the label id (from 0 to 999) to the name of the class in the `imagenet_class_index.json` starter file. You'll find that there are numerous bird labels scattered across the indices:
~~~~ python
{
...
"11": [
"n01531178",
"goldfinch"
],
...
"99": [
"n01855672",
"goose"
],
...
}
~~~~
The key of each element in this JSON object is the output label index from the PyTorch model. The first element in the list is the unique ID for the image class in the ImageNet database called a *synset ID*, while the second element of the list is a human-readable label of the class. Below are some example images from ImageNet:


We need a mapping of these labels to the broader category of "bird." ImageNet used to provide a taxonomy API of their images, but recent [privacy concerns](https://www.wired.com/story/researchers-blur-faces-launched-thousand-algorithms/) over the dataset has led to that functionality removed. Here we provide a list of all the synset IDs for the concept of "bird", which we have provided in the `bird_synset.txt` starter file.
**Your task:** use the `imagenet_class_index.json` and `bird_synset.txt` starter files we've provided to implement `is_bird(torch_label)`, which takes as input the label prediction from our PyTorch model and returns whether that label corresponds to a bird class or not.
(##) Homepage redirect
When the user navigates to the homepage of your app (the `/` route) via a GET request, we want to redirect them to the `/upload` route so they upload their image.
**Your task:** implement `home()` to redirect to the `/upload` route and specify the appropriate Flask route decorator.
(##) Handling file upload
The `/upload` route should handle both GET and POST requests, with the GET requests rendering the `result_template.html` starter file.
POST requests will first check whether the user specifies a filename and an accepted file extension (sending flashes and redirecting back to `/upload` if they do not), then will upload the user's file to the `static/` directory. We put user uploaded files here as Flask knows by default to serve static files out of this directory.
**Your task:** implement `handle_upload()` and specify the appropriate flask route decorator with the following behavior:
(###) GET request
1. render `upload_template.html`
(###) POST request
1. Flash an appropriate message and redirect back to `/upload` if the user clicks "Upload" without choosing a filename
2. Flash an appropriate message and redirect back to `/upload` if the user does not choose a valid file extension according to the `ALLOWED_EXTENSIONS` global
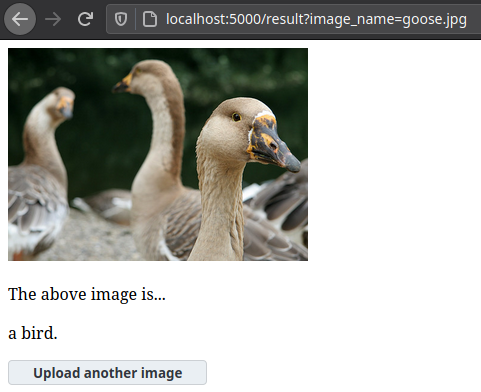
3. If user specifies a valid file, upload file to `static/` directory and redirect to `/result` with the **filename as a [query parameter](https://en.wikipedia.org/wiki/Query_string#Structure) `image_name`** e.g. `/result?image_name=goose.jpg`
Refer to the week 12 lecture recording on how to send flashes and handle uploaded file inputs.
We have provided Jinja expressions in the `upload_template.html` starter file to display your flashed messages, with some examples shown below (you do *not* have to exactly replicate these messages):


!!! NOTE
Make sure you place `upload_template.html` in the `templates/` directory, and create the `static/` directory so that Flask can save user uploads.
Feel free to write any helper functions to aid in your implementation.
(##) Handling results
The `/result` route will accept GET requests and be expecting a query parameter called `image_name` with the uploaded image name, and will flash an error message along with a redirect back to `/upload` if the request does not have that query parameter specified. It will then render a template with uploaded image and text stating whether or not the image is a bird.
**Your task:** implement `handle_upload()` and specify the appropriate Flask route decorator with the following behavior:
(###) GET request
1. Flash an appropriate message and redirect back to `/upload` if the query parameter `image_name` is not present in the request
2. Use `transform_image()`, `get_prediction()` and `is_bird()` to determine if the image is a bird
3. Render the `result_template.html`, passing in any context variables you need (e.g. the image path and whether the image is a bird)
Refer to the week 12 lecture recording on how to access query parameters from a user request and pass context variables to a template.
!!! NOTE
We will be making a close read of `handle_upload()` to check for code style.
(##) Result template
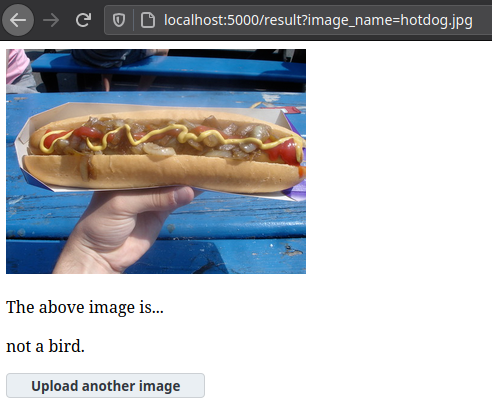
**Your task:** Write your own `result_template.html` Jinja template file to render from the `/result` route. Your `result_template.html` file will receive **full credit** if it uses at least two Jinja [Statements](https://jinja.palletsprojects.com/en/2.11.x/templates/#list-of-control-structures) and/or [Expressions](https://jinja.palletsprojects.com/en/2.11.x/templates/#expressions) (e.g. one for the image source and one to display a bird/not bird message). Pictured below are examples of what your Flask app should display on the `/result` route (your template does *not* have to exactly match this):
**Optional**: If you are interested, the HTML to create a button that navigates to another URL is below:
~~~~ html
~~~~
!!! NOTE
Make sure you place your `result_template.html` in the `templates/` directory.
(#) Rubric
| Section | Points |
|---------|--------|
All functions implemented | 0.5
Pennkey, name, and hours estimate | 0.5
`get_prediction()` | 1
`is_bird()` | 1
`home()` | 1
`handle_upload()` | 2
`handle_result()` | 2
`result_template.html` | 1
`handle_upload()` close read | 1
**Total** | 10
(#) Submission
You will upload your `hw6.py` and `result_template.html` files to [**Gradescope**](https://www.gradescope.com/courses/477992) for submission -- **be sure to upload all files at the same time!** We encourage you to work iteratively, implementing functions one at a time to verify their correctness before moving on to the next function. To facilitate this, you are welcome to submit to Gradescope to verify your code against the autograder as many times as you would like before the submission due date without penalty.
Please keep in mind that any submission made **after the due date** will be considered late and will either be counted towards your alloted late days or penalized accordingly.