Updated on 1/29/2015
Note:
1 Check-in
2 Vent Chamber
3 Load Sample and Materials
3.1 Load Sample
3.2 Load Materials
4 Pump Down Chamber
5 Deposition without FTC-2800
5.1 Rotation of the sample chuck
5.2 Open the substrate shutter
5.3 Deposition
6 Deposition with FTC-2800
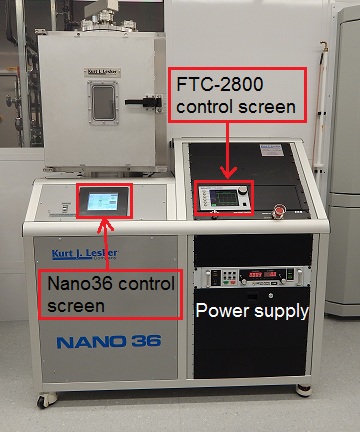
6.1 Switch from Nano 36 to FTC-2800 controller
6.2 Defining Film
6.2.1 Load/Create Film file
6.2.2 Film Conditions
6.2.3 Deposit Controls
6.2.4 Configure Sensor
6.3 Defining Process
6.3.1 Load/Create Process file.
6.3.2 Defining Layer
6.4 System Menu
6.5 Run Process
6.5.1 General
6.5.2 Manual
6.5.3 Auto
7 Vent Chamber
8 Unload Sample and Materials
9 Pump Down Chamber
10 Check-out
11 Supplemental Documents
1. Log-in on the ISIS scheduler
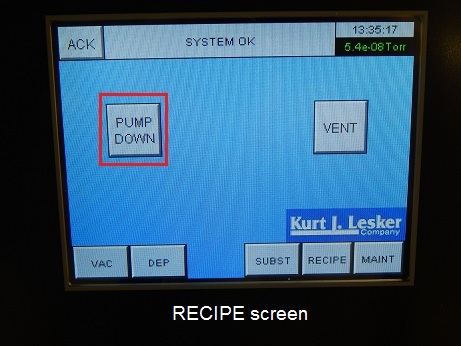
1. Touch the "RECIPE" button in the Nano36 control screen.
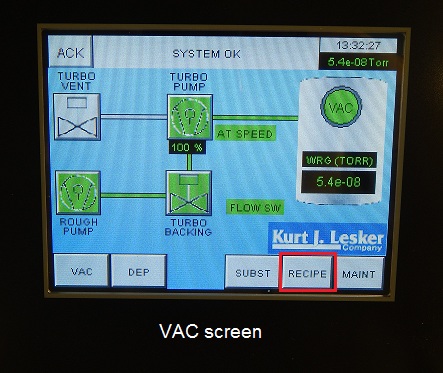
2. The "RECIPE" screen appears.
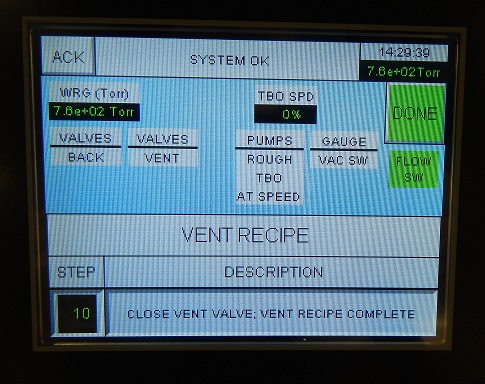
3. Touch the "VENT" button.
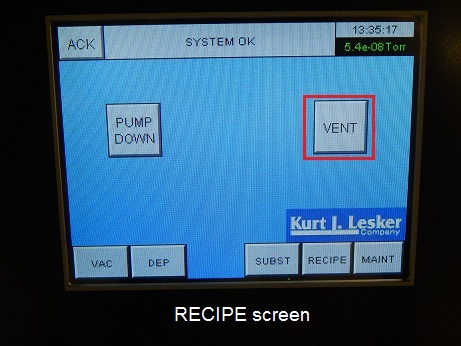
4. The following screen appears.
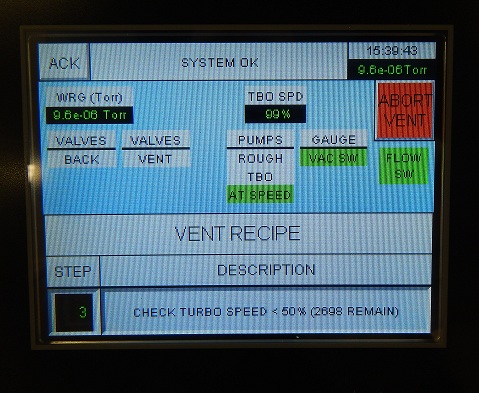
5. The following screen will show up when the venting is done.
6. Touch the "DONE" button.
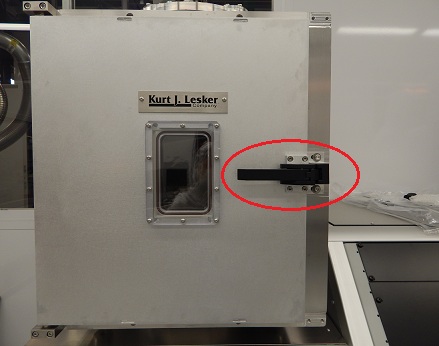
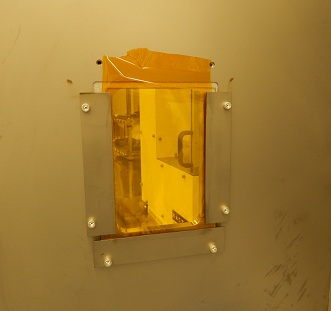
1. Open the door.
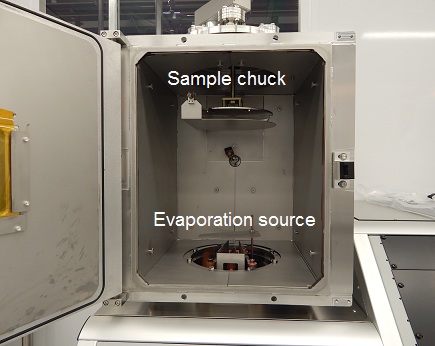
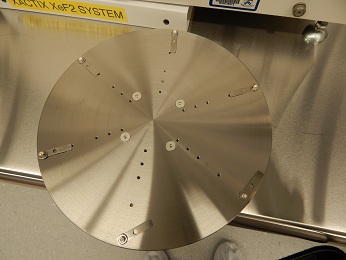
2. Remove the sample chuck from the hook.
* Note: The sample chuck should manually be rotated for the removal.
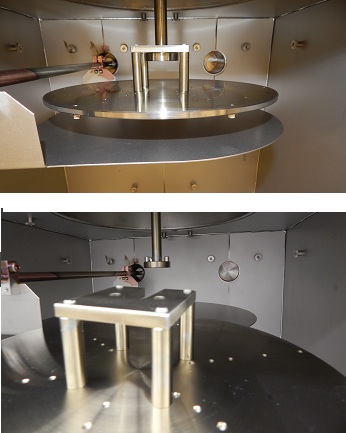
3. Hold your sample on the chuck, using the clumps or Kapton tape.
4. Put the sample chuck back to the chamber.
1. Touch the "DEP" button, if necessary.
2. Touch the "1" button in the "DEP" screen to open the source shutter.
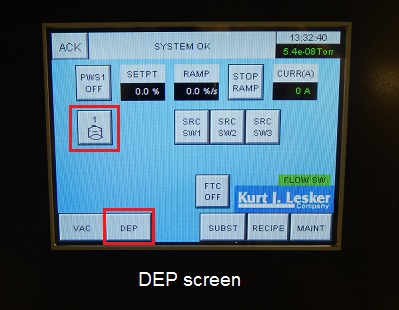
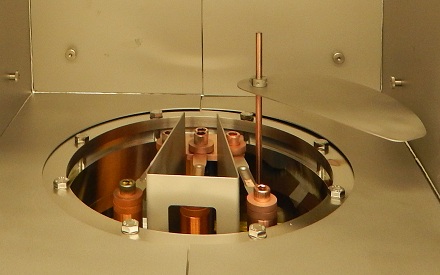
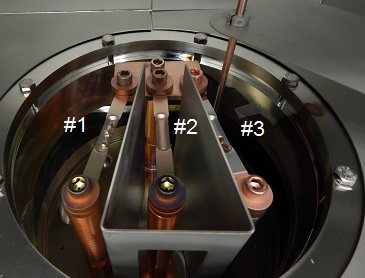
3. Install the evaporation boat(s).
* Note: The source number is shown below.
4. Load the materials on the boats.
5. Close the source shutter, if necessary.
6. Make sure that Kapton film is placed before the window glass.
7. Close the door.
1. Touch the "RECIPE" button in the Nano36 control screen.
2. Touch the "PUMP DOWN" button in the "RECIPE" screen.
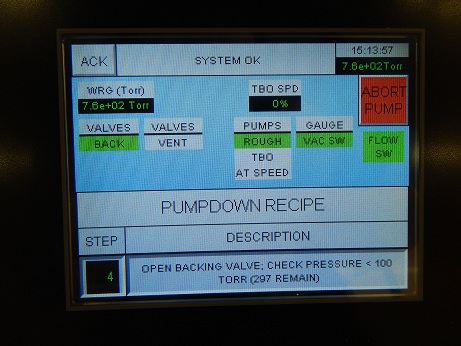
3. The following screen appears.
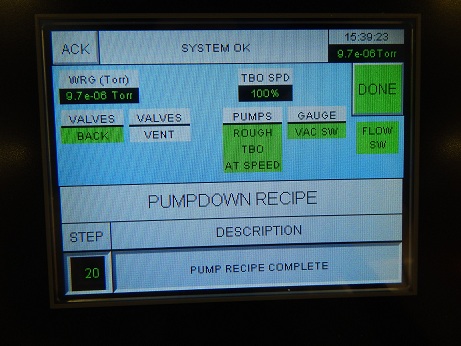
4. The following screen will show up when the pumping down is done.
5. Touch the "DONE" button.
* Note: It is possible to deposit the materials without FTC-2800, BUT the deposition rate and thickness cannot be seen.
1. Touch the "SUBST" button.
2. Touch the "SPEED" button in the SUBST screen to open the input screen. Input the rotation speed of the sample chuck desired.
3. Touch the "MOTOR ROTATE" button to start the rotation.
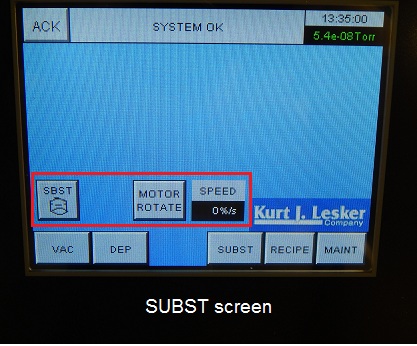
1. Touch the "SBST" button in the SUBST screen to open the substrate shutter, if necessary.
1. Touch the "DEP" button.
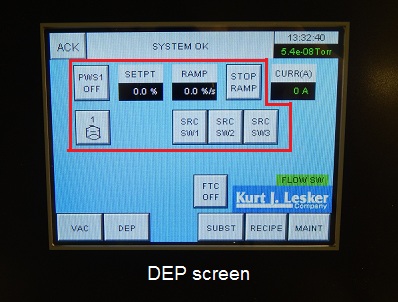
2. Touch the SRC number (SRC SW1 to SW3) at which the source is installed (the button will be turned into green).
3. Touch the "PWS1 OFF" button, and it turns into the green "PWS1 ON" button and the power supply is turned on.
4. Touch the "SETUP" button to open the input screen. Input the power desired. You will see the current in the screen.
5. Touch the "RAMP" button to open the input screen. Input the ramp rate desired.
6. Touch the "1" button to open the source shutter for deposition.
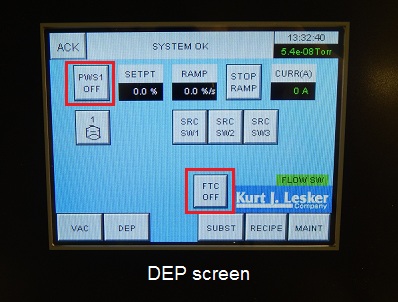
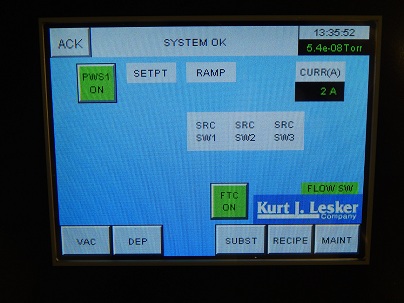
1. Touch the "DEP" button, if necessary.
2. Touch the "FTC OFF" and "PWS1 OFF" buttons, and they will be turned into the green "FTC ON" and "PWS1 ON" buttons, so that the evaporation will be controlled by FTC-2800 controller.
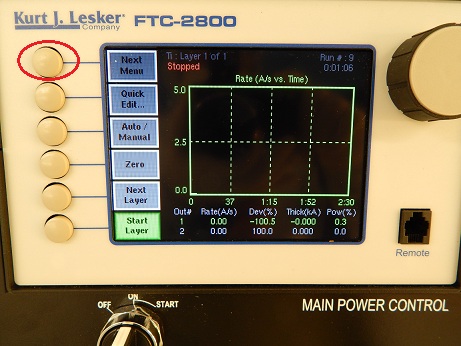
1. The following screen on the FTC-2800 controller is the main menu 1.
1. The main menu 3 will appear by pressing the button for Next Menu.
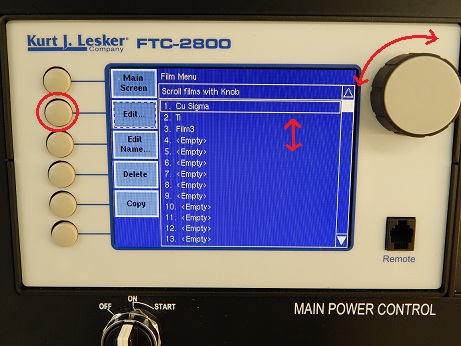
2. Press the button for Film Menu.

3. Film Menu screen appears.
4. Rotate the right knob to choose the film.
* If you choose <Empty>, then press the button for Edit Name to change the name.
5. Press the button for Edit.
6. The following screen appears.
7. Set up PID parameters for computer control, tooling factor, pocket (source) number, Xtal control, density and Z-factor for material by choosing the parameter using the right knob and the button for Edit. When you choose the material, the density and Z-factor are set up automatically.
* Default values of P, I, and D are 25, 5, and 0, respectively.

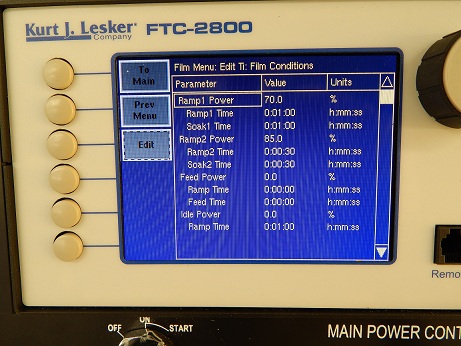
1. Press the button for "Film Conds".
2. The following screen appears.
3. Set up Ramp power, Ramp time, Soak time, and so forth, by rotating the right knob and pressing the button for Edit.
4. After the setting, press the button for "Prev Menu".
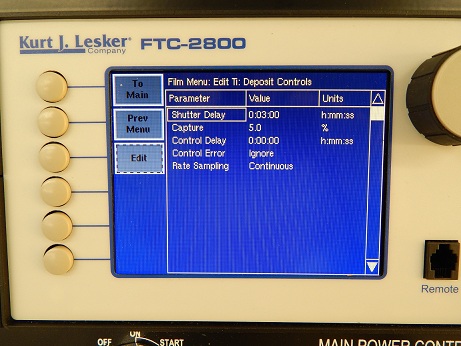
1. Press the button for "Deposit Controls".

2. The following screen appears.
3. Set up Shutter Delay, Capture, and so forth, by rotating the right knob and pressing the button for Edit.
4. After the setting, press the button for "Prev Menu".
* Note: You do not have to touch the "Configure Sensors" screen at all normally.
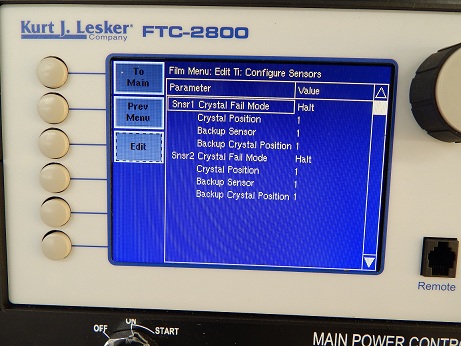
1. Press the button for "Configure Sensors".

2. The following screen appears.
3. Set up Sensor info, and so forth, by rotating the right knob and pressing the button for Edit.
1. Move back to the main menu 3 by pressing the button for "Prev Menu".
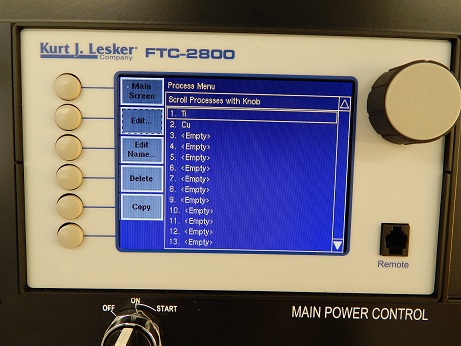
2. Press the button for Process Menu.
3. The following screen appears.
4. Rotate the right knob to choose the Process file.
* If you choose <Empty>, then press the button for Edit Name to change the name.
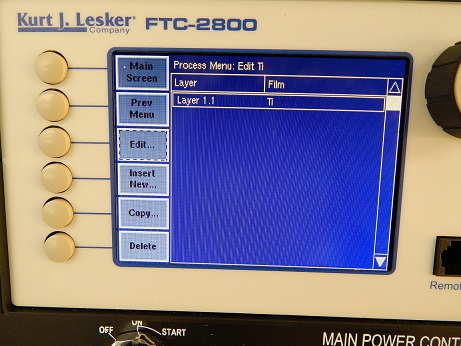
5. Press the button for Edit.
6. The following screen appears.
7. Rotate the right knob to choose the Film file in the Process file, if necessary.
* You can add or insert another Film file in the Process file by the "Insert New" button, if necessary.
8. Press the button for Edit.
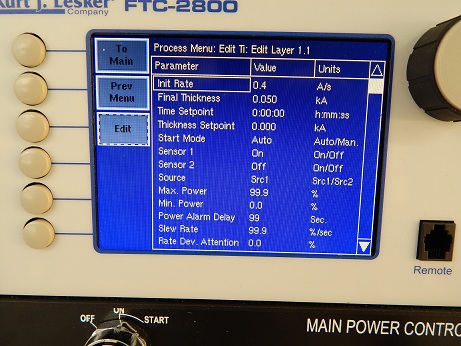
1. The following screen appears.
2. Set up Deposition Rate (Init Rate), Final Thickness, and so forth, by rotating the right knob and pressing the button for Edit.
3. If there is another Film file in the Process file, then edit the parameters in the same manner.
* Note: You do not have to touch the "System Menu" screen at all normally.
1. Move back to the main menu 3 by pressing the button for "Prev Menu".
2. Press the button for System Menu, if necessary.
3. The following screen appears.
4. Set up the parameters by rotating the right knob and pressing the button for Edit, if necessary.
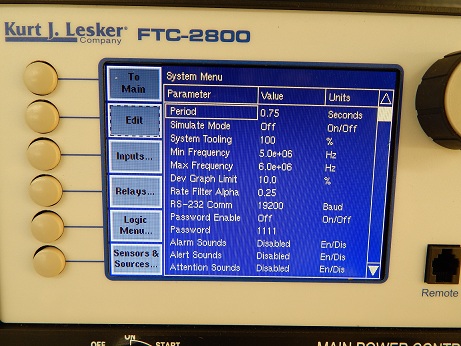
* Note: Make sure that the Process file desired is chosen in the defining Process. The Process name is shown on the left top of the screen.
1. Move back to the main menu 3 by pressing the button for "Prev Menu".
2. Press the button for Next Menu until the main menu 2 appears.
* Next Graph: When you press this button, the four kinds of graphs will be shown.
* Power vs Time
* Rate vs Time
* Rate Deviation vs Time
* Text of Rate, Thickness, and Power
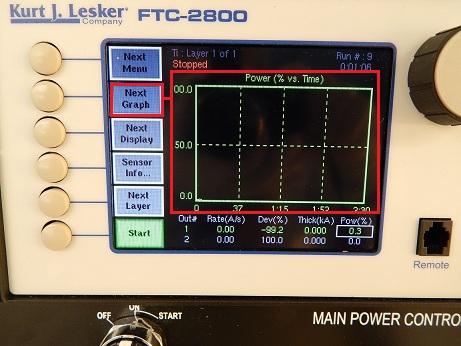
* Next Display: When you press this button, the two kinds of displays will be shown
* Rate, Rate Deviation, Thickness, and Power
* Rate, Rate setpoints, Thickness, and Thickness setpoints
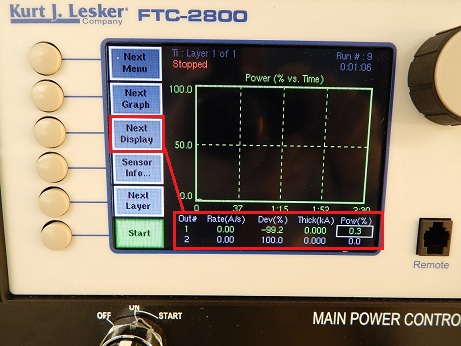
* Sensor Info: Enable, ON/OFF, frequence, and life of the sensor will be shown.
* Next Layer: Sequences through each process layer. Use this key to start or restart the
process at any layer.
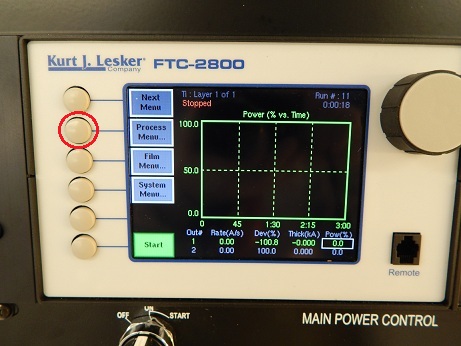
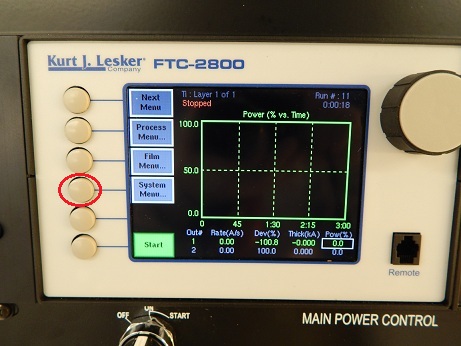
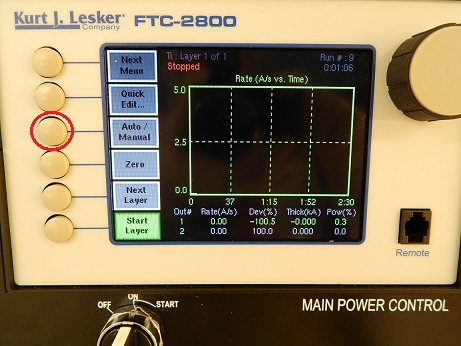
1. Make sure that the display shows Power in the main menu 2.
2. Press the button for Next Menu until the main menu 1 appears.
3. Press the button for Auto/Manual in the main menu 1 to switch from Auto to Manual.
* When the Manual mode is ON, the power in the display will be shown with the white rectangle.
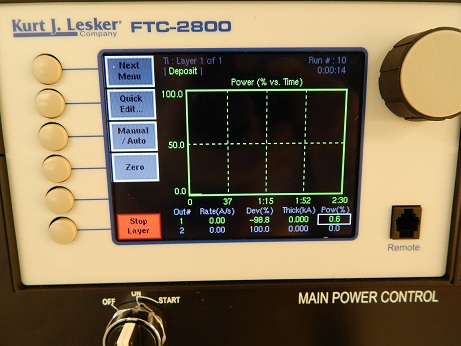
4. Press the button for "Start Layer".
5. Rotate the right knob to increase the power, and you can see the power in the display and the deposition profile in the graph.
6. When you finish the 1st layer, press the button for Next Layer, if necessary.
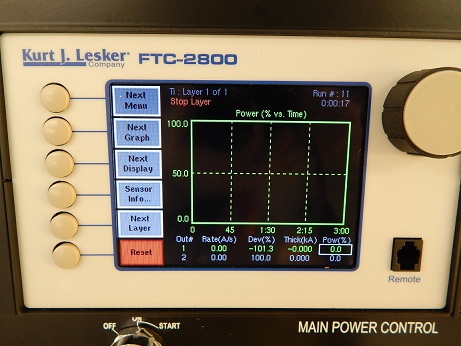
7. When the process is done, press the button for Stop Layer.
8. Press the button for RESET to renew the PROCESS file, if necessary.
1. Press the button for Auto/Manual in the main menu 1 to switch from Manual to Auto.
* When the Auto mode is ON, the white rectangle on the power in the display will disappear.
2. Press the button for Start Layer to start the process.
3. The process should be carried out automatically according to the Process file.
4. Press the button for RESET to renew the PROCESS file, if necessary.
1. When the process is done, touch the "VENT" button in the "RECIPE" screen of the Nano36 controller.
1. Open the door.
2. Remove your sample and materials.
3. Put the sample chuck back to the chamber.
4. Close the door.
1. Touch the "PUMP DOWN" button in the "RECIPE" screen of the Nano36 controller.
1. Log-out on the ISIS scheduler.