Updated on 3/26/2018
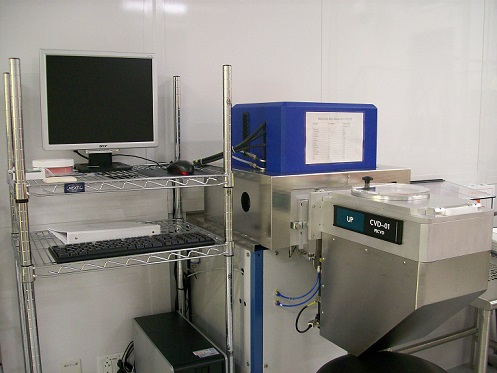
1 Ensure Oxford Software interface is running
2 Ensure log in to the system
3 Ensure the process chamber was properly cleaned
4 Vent the loadlock
5 Load the sample
6 Pump-down the loadlock
7 Load a recipe
8 Edit/review a recipe
9 Run a recipe
10 Unload sample from loadlock
11 Run Chamber Clean
12 Supplemental Documents
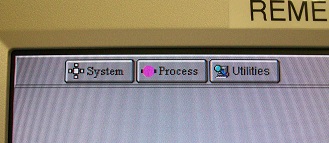
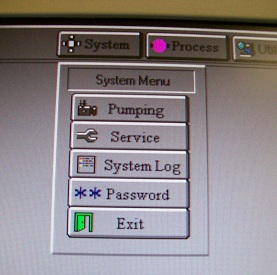
1. Click "System" in the menu bar at the top of the screen.
2. Select "Password" in the pull-down menu.
3. The following dialog box appears.
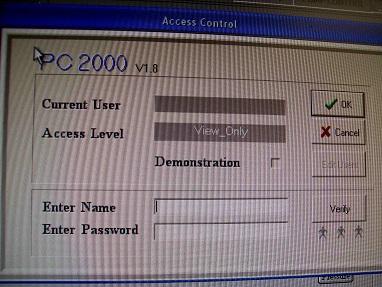
4. Click "OK" IF Current User and Access Level show "user" and "user", respectively, in the upper box in the access control window, and go to section 4, "Vent the loadlock". If not, go to the next step.
5. Enter "user" into both "Name" and "Password" fields in the lower box of the access control window, then click "verify".
6. Ensure that Current User and Access Level show "user" and "user", respectively, in upper box in the access control window. Then, click "OK".
1. Select Log View from the drop-down Process Menu.
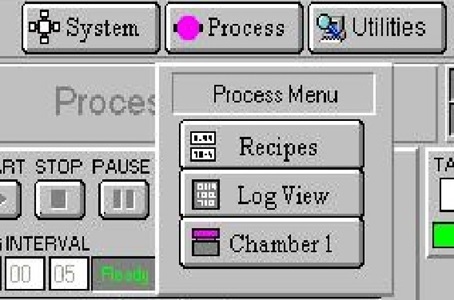
2. The following screen appears.
Note: Make sure that you check the system log files to verify the current condition of the chamber before starting your deposition process.
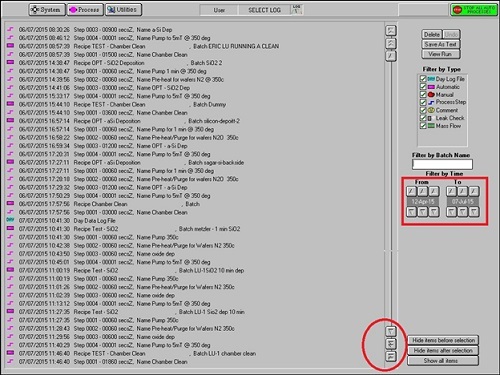
3. You will want to click on the bottom down arrow to get to the most recent activity or you can select by date.
It is important that you verify the current chamber conditions i.e. what are the recent processes that have been run, for how long, was a proper chamber clean conducted?
If the proper chamber clean hasn’t been preformed, please notify staff (Meredith Metzler: metzlerm at seas.upenn.edu or Kyle Keenan: kckeenan at seas.upenn.edu) and include the date and time stamps from the system log of the runs in question. (See section 11 for more information on proper process chamber cleaning.)
4. You will want to make sure that the duration of the final chamber clean from the previous user is equal to the total deposition time plus 15 minutes.
For example, if you do three consecutive 5 minute SiO2 depositions for a total time of 15 minutes, you are required to run the chamber clean for 15 + 15 = 30 minutes total. It is not necessary to load a wafer or piece carrier for the clean process.
5. (a) Close the Load Lock lid, (b) click "Evacuate", (c) enter a name for the clean “PennKey – clean [time]”, and (d) click “OK”.
6. Select the "Chamber Clean" recipe.
7. You can deposit up to 5 microns before a chamber clean is necessary.
It is important to ensure that the chamber is properly conditioned for the process you intend to run.
It is important to have monitor material (blank silicon) that can be used for characterization measurements before running the deposition process on your final device samples.
1. Click "stop", and then "evacuate" in the loadlock pump display.

2. The "load wafer or pump loadlock" window appears.
Note: IF YOU CLICK "CANCEL", THE TOOL WILL ASSUME THE LOADLOCK IS EMPTY AND WILL NOT RUN RECIPES (it will only evacuate the loadlock).
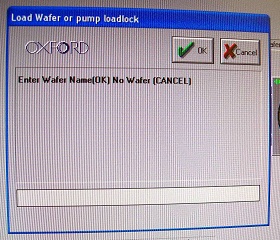
3. Enter the following into the box.
“PennKey” – “film” “time”
NOTE: Your PennKey is the name you use when logging into IRIS, not your PENN ID#. The purpose is to have your name appear in the process log file not just a number.
For example,
PennKey – Test SiO2 15 min
OR
PennKey – clean 25 min
1. Select Recipes from the drop-down Process Menu.

2. The following screen appears.
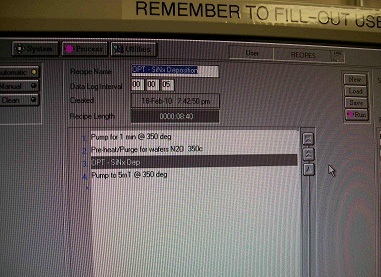
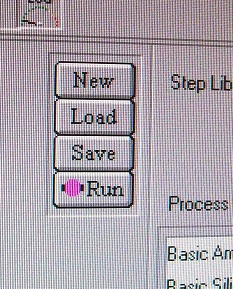
3. On the recipe screen, click "load". If a recipe is already loaded, the loaded window will ask "overwrite current recipe (name)?"
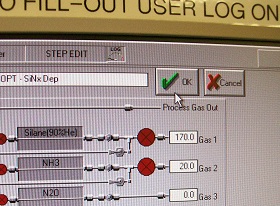
4. If loading a new recipe, select the appropriate one from the recipe popup window & click "OK" (See the recipe parameter summary in PECVD recipes). The recipe name will appear near the top of the screen with a list of its step in the left hand column below.
5. If no edits need to be made to the recipe's time settings, go to section 9, "Run a recipe".
1. To edit/review the given step in the recipe, click on the step and select "Edit Step" from the drop-down menu.
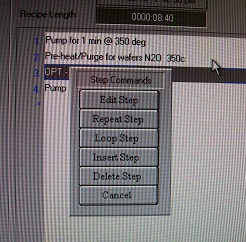
2. Enter the desired time (HH:MM:SS) in the process step editor window.
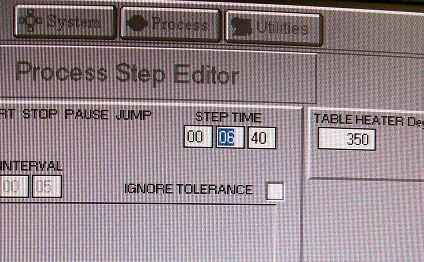
3. Click "OK". (The program will return to the recipe screen.)
1. Click "run" to start the current recipe in the recipe screen. The program will automatically return to the "process control" screen, the wafer will be loaded into the process chamber & processed, then unloaded to the loadlock.

2. When the process completes and the wafer is returned to the load lock, the software will return to the "Pump Control" screen and a "Process Status" dialog box indicating "Process Completed OK" will appear.
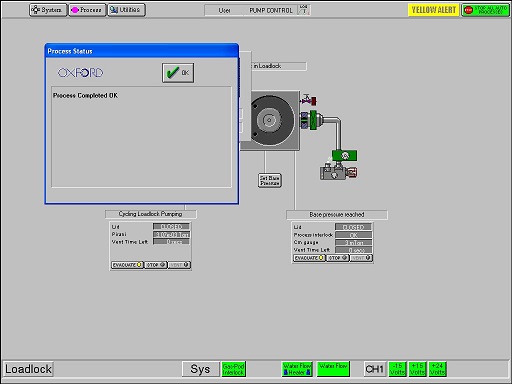
3. Click OK.
4. Now click "Accept" in the "Yellow Alert" window indicating "End of process reached".

1. Vent the loadlock, as shown in section 3.
2. Once the loadlock pump display shows "loadlock finished venting", you may open the loadlock to remove your wafer/carrier wafer with sample piece(s).
3. To process another sample, repeat steps 4-8.
4. If the process is done, close the loadlock lid and go to the next step.
1. Pump down the load lock, and follow the naming convention from section 5.
2. Select the Chamber Clean recipe, and remember total clean time is equal to your total deposition time plus 15 min.
3. When the Chamber Clean finishes, leave the load lock under vacuum.
IMPORTANT: Do not log out of the tool through IRIS before the cleaning recipe has finished running. Logging out prematurely will engage the tool interlock and stop the process gas flow, causing a RED ALERT on the tool. This will leave the tool in an unusable state for the next researcher, until the alert can be addressed by Staff, and the next user will need to perform a chamber clean before they can process their samples.
Revisions:
3/26/18, by Keenan: Moved “notes” section to top of document, moved/retitled section regarding review of previous chamber cleaning, added note regarding premature log-out through IRIS
10/6/15, by Metzler, change made to required chamber clean time - it is now total deposition time PLUS 15 minutes
10/6/15, by Metzler, added note for naming convention to use PennKey (name used for logging into IRIS) and not Penn ID number
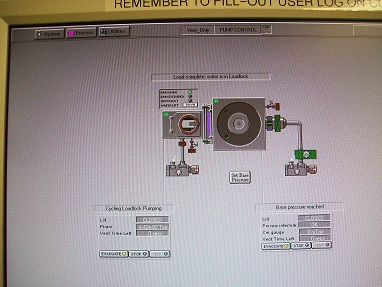
 The loadlock pump display