PVD75 E-beam/Thermal Recipes
Updated on 4/16/2015
Contents
1 Introduction
2 Recipes
3 Tooling Factor
4 Remote Controller
4.1 Start
4.2 Auto/Manual---Auto to Manual mode
4.3 Set Pocket--- Move a crucible pocket
4.4 Set Data---Control e-beam scan
4.5 Save/Load
4.6 Options
4.7 Auto/Manual---Manual to Auto mode
1. Introduction
- An evaporation recipe of the material is made in the "Film Edit", whereas a sequence of each recipe is edited in the "Process Edit" on the SQS-242 screen.
- Settings on the Layer and Rate Ramp tabs must be set for each layer in a process.
- Settings on the remaining four tabs (Deposit, Condition, Source/Sensor, and Errors) in "Process Edit" correspond to those of the Film recipe that was selected (highlighted) on the Layers tab. This allows a Film’s settings to be used in a number of layers, without the need to individually adjust each layer.
- A thin-film deposition process of PVD75 evaporator consists of one or more layers of material evaporated onto a substrate. The diagram below illustrates a complete deposition cycle for a single layer, which can be broken into three distinct phases: pre-conditioning (ramp/soak), deposition, and post-conditioning (feed/idle). Refer to this diagram as we set the remaining parameters.
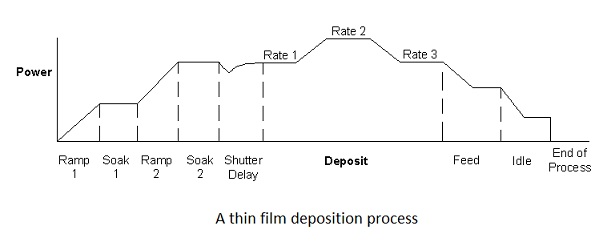
- Pre-conditioning: Power is applied to prepare the source material for deposition.
- The first ramp/soak phase is used to bring the material to a uniform molten state.
- The second ramp/soak phase is typically set to a power that is near the desired deposition rate.
- Deposition: PID rate control of deposition begins.
- Initially, the substrate material may remain shuttered until the desired deposition rate is achieved (shutter delay).
- Once the control loop achieves the desired rate, the shutter opens and deposition begins. Multiple deposition rates (rate ramps) can be programmed.
- Post-conditioning: The evaporation source is set to feed or idle power. At this point the process may be complete, or deposition of another film layer may begin.
2. Recipes
Tip to create a new recipe
- Ramp and Soak 1 and 2
- Find the power to start melting the material to determine the Ramp Power 1, using the manual e-beam scan by the remote controller, as described later.
- Find the power to keep the desired evaporation rate. The Ramp Power 2 should be ~90% out of the evaporation power at the desired rate.
- Ramp time 1 and 2 would be ~30 sec.
- Soak time 1 would be ~20 sec, while Soak time 2 be ~60 sec.
- PID parameters
- LOOP: P (gain), I (time constant), and D (dead time) parameters are used for optimization of the evaporation by feed-back loop between the computer-control of the power output to the source and the deposition rate. These parameters should be changed according to the material. The default values are:
- P = 26
- I = 1.0
- D = 0.01
- Note: An ideal evaporation profile is shown in the graph of the introduction.
2.1 Recipes of the users
- The following table summarizes PVD75 recipes of the users (2/8/2013).
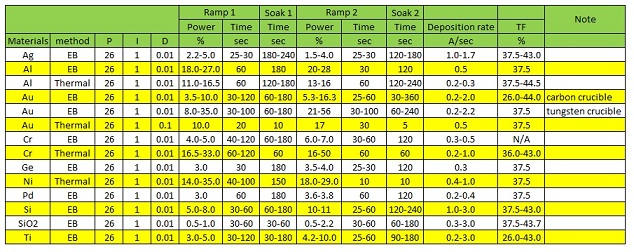
- TF = Tooling factor (see below)
- Tip:
- It is known that molten Aluminum rapidly corrodes and erodes an evaporation source made of Tungsten, Tantalum, or Molybdenum. Some people claim that even carbon crucible is corroded by molten Aluminum. In other words, once Aluminum is melted in the evaporation source, the evaporation source will be destroyed. So, it is important to evaporate Aluminum quickly just after its melting.
- Note: If you deposit an Aluminum film using Explorer14, there is no problem about it. In addition, it is easy to control the film thickness with the constant deposition rate.
- If you want to confirm the exact film thickness, then set a witness sample, on which a resist is pasted and dried at ~100 ºC, next to your sample on the sample chuck. After the deposition, the pasted resist is removed with acetone or stripper, like a lift-off, and the film thickness is measured.
3. Tooling Factor
TF = 27 % on 9/18/2012
- Material: Titanium
- Deposition: E-beam evaporation
- Setting tooling factor: 100 %
- Setting thickness: 100 nm
- Distance from the source: to crystal head, 7”; to the sample, 14”
- Thickness measurement method: P7 stylus profiler
- Note: This is a reference. Please confirm the tooling factor on your own.
4. Remote Controller
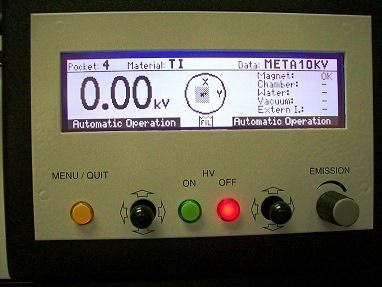
4.1 Start
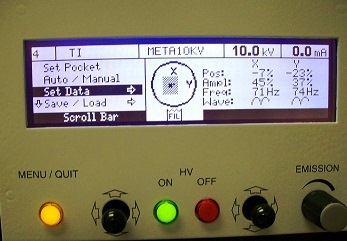
1. Press the "MENU/QUIT" button on the remote control box to turn on.
 --->
---> 
2. The left joystick controls the main menu on the left column, while the right joystick controls the sub-menu on the right column.

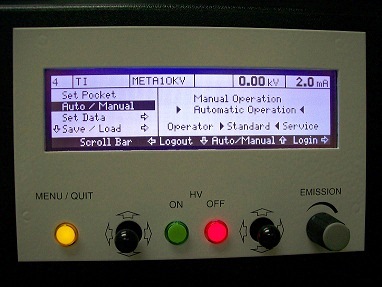
4.2 Auto/Manual---Auto to Manual mode
- Note: You have to change from auto to manual mode to use the remote controller.
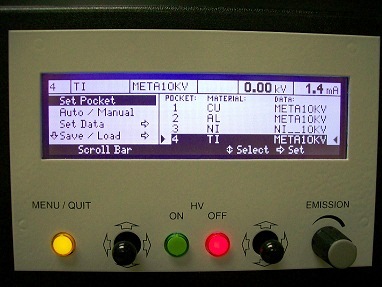
1. Using the left joystick, move the inverse-highlight from "Set Pocket" to "Auto/Manual" in the left column.
2. Using the right joystick, move the pointed arrows from "Automatic Operation" to "Manual Operation" in the right column.
 --->
---> 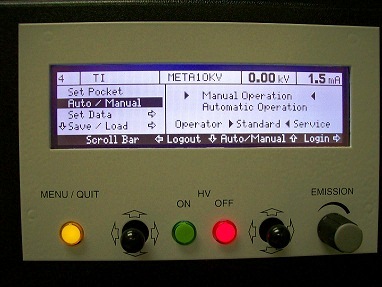
3. Make sure that the LCD screen of the remote control box shows "Manual Operation" by turning off the box. Then, turn on the box again.
4.3 Set Pocket--- Move a crucible pocket
1. Using the left joystick, move the inverse-highlight from "Auto/Manual" to "Set Pocket" in the left column.
2. Using the right joystick, move the pointed arrows to the desired pocket in the right column.
3. Keep holding the right joystick to the right direction until the crucible liner stops moving in the chamber or until the "In Posn" box in the "Crucible Indexer" box of the "Deposition" screen is highlighted.
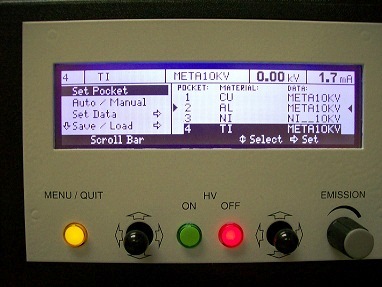
4. Move the crucible pocket back to the original position, which is indicated in the "Crucible Indexer" of the "Deposition" screen.
- Note: Otherwise, the crucible liner will be jammed when the operating mode is changed from manual to auto mode.
4.4 Set Data---Control e-beam scan
1. Turn on the e-beam.
- Make sure that the "EB Off" button in the EB/Evap box of the "Deposition" screen on the computer is off.
- Make sure that the HV power supply behind the right door is turned on.
- Press the "ON" button for HV on the remote control box.
- Make sure that the green light on the button is lit (slowly blinked).
- You can adjust the e-beam current on the right top of the LCD screen by the EMISSION knob.
2. Using the left joystick, move the inverse-highlight to "Set Data" in the left column.
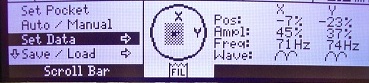
3. Press the left joystick to the right.
4. The sub-menu of the Set Data is shown on the left column. Each function in the sub-menu is described in the following.
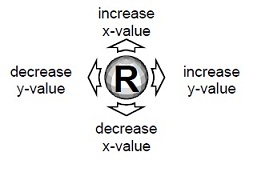
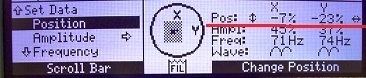
4-1. Position
- Using the right joystick, the e-beam scan position is set up in the value of percentage of the limits that have been set in "LIMITS" from -100 to +100 %.
- A value of 100% corresponds to the e-beam scan limit, while a value of 0% specifies the middle of the e-beam scan.
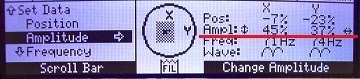
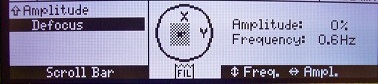
4-2. Amplitude
- The amplitude of the e-beam scan is specified in percent of the limits that have been set in "LIMITS".
- The values can be changed in a maximum range of -100% to +100% with the right joystick.
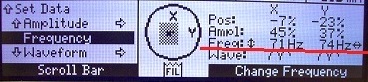
4-3. Frequency
- The frequency of the e-beam scan can be changed in a range of 0.5Hz to 100Hz with the right joystick.
- The step width can be set in the menu OPTIONS.
4-4. Waveform_Edit X/Edit Y
- The following waveforms of the e-beam scan are available as basic functions:
- Square
- Sine
- Delta
- Rectified sine
- The functions can be selected with the left joystick.
- A wave symbol indicates the waveform that has been selected.
- The deflection forms can also be changed in detail in the sub-menus EDIT X and EDIT Y, which are selected by pressing the left joystick to the right.
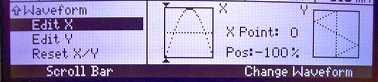
- The EDIT_X and EDIT_Y are used to define the waveform of e-beam scan on the basis of a graphic display.
- The waveforms of a period for x and y-deflection are shown next to each other in a grid.
- The waveform of a period is defined over 32 points. The active co-ordinate is selected with the triangular marker at the edge of the grid.
- It is specified in the data section with the point number "X Point" or "Y Point") and point value ("Pos.").
- The allocated value can be moved in the required direction with the right joystick.
- The value range is standardised and extends from -100% to +100%.
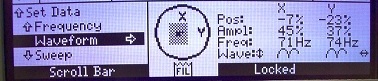
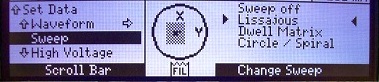
4-5. Sweep
- The SWEEP is used to switch dynamic e-beam scan on and off.
- The selection of different sweep modes is only available in version GENIUS PRO.
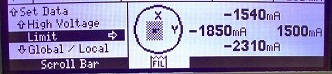
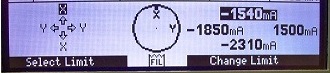
4-6. Limit
- The LIMIT shows the limits for e-beam scan.
- The limits define the maximum current for e-beam scan (position value + amplitude value).
- They typically define the pocket rim and prevent the electron beam from extending on to the copper body of an evaporator.
- The left joystick is to be pressed to the right to change the limit values.
- When the limit value is changed, press "MENU/QUIT" button to get out of the LIMIT screen.
- Note:
- The sweep amplitude is zeroed in the limits menu. This may lead to increased energy density of the beam. With switching into the limits menu the emission is reset to 0 mA.
- The scope of validity for individual or all pockets can be set via the parameter "Global/Local". (see 4-8)
- The active limit is selected with the left joystick. The value range extends from -3A to +3A. The step width can be changed in the menu OPTIONS.
- The direction of deflection can be reversed by intersecting the x and y-limits.
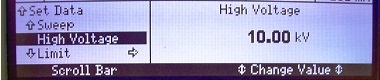
4-7. High Voltage
- DO NOT touch. If you want to change the setting, ask the staff about it.
- The HIGH VOLTAGE is used to set the high voltage.
- Note:
- A change of beam potential influences the position of the electron beam on the pocket. The limits must be adapted accordingly.
4-8. Global/Local
- DO NOT touch. If you want to change the setting, ask the staff about it.
- The GLOBAL/LOCAL is used to define the scope of validity for the high voltage and limits.
- The variable simplifies programming for complex multipocket configurations.
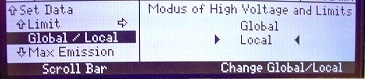
- GLOBAL setting
- The limit settings for e-beam scan (LIMITS) and high voltage are valid for all pockets in the process.
- LOCAL setting
- The limit settings for e-beam scan (LIMITS) and high voltage are only valid for the active virtual pocket.
- The change from LOCAL to GLOBAL leads to the following selection:
- Copy global values to datafile ? - and overwrite actual settings
- Overwrite global values ? - with the actual settings
- Note:
- Changing the high voltage or limits in "GLOBAL" mode changes the values in all the data sets of the process.
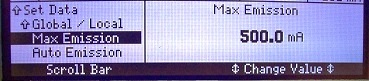
4-9. Max Emission
- DO NOT touch. If you want to change the setting, ask the staff about it.
- The MAX. EMISSION is used to set the emission current limit.
- In this protective function an emission current value that may not be exceeded in manual or automatic mode is defined.
4-10. Auto Emission
- DO NOT touch. If you want to change the setting, ask the staff about it.
- The AUTO EMISSION is used to calibrate the emission current in automatic mode.
- The setting defines the emission current value that should be processed as emission current when +10V is applied to input X111.
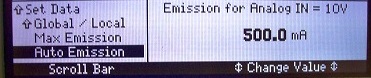
- Note:
- The setting only has an influence in automatic mode.
4.5 Save/Load
4.6 Options
4.7 Auto/Manual---Manual to Auto mode
- Using the left joystick, move the inverse-highlight to "Auto/Manual" in the left column. Then, direct the joystick to the right.
- Using the right joystick, move the pointed arrows from "Manual Operation" to "Automatic Operation" in the right column.
- Press the "MENU/QUIT" button on the remote control box to turn off.
- Make sure that the LCD screen of the remote control box shows "Automatic Operation".