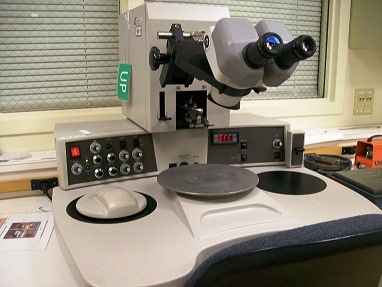
Wire Bonder Operating Procedure
Updated on 10/14/2014
Contents
1 Controls and Indicators
2 Wire Loading
3 Operating
1. Controls and Indicators
1.1 The left control panel
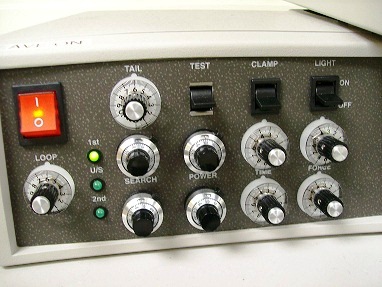
Switches (the up position is ON)
- CLAMP
- Switch for opening the wire clamp for wire loading. The clamp is open when ON.
- TEST
- Pressing this switch tests the tuning of ultrasonic generator.
- LIGHT
- Switch for the area light.
LED indicators
- 1st indicator
- This indicates the start of the first bonding cycle.
- U/S indicator
- This shows that the ultrasonic transducer is active. When TEST switch is pressed up, this indicator turns on, signalling that the ultrasonic circuit is properly tuned.
- 2nd indicator
- This indicates operating in the second bonding cycle. The bonding head is at the Loop height. The indicator remains on until the completion of the second bond.
Dials
- SEARCH
- Control of the search height of the bonding head.
- POWER
- Control of the power level of the ultrasonic energy. A high power setting increases the mechanical ultrasonic vibration of the tool tip.
- 3.0 is recommended to start.
- TIME
- Control of duration of the ultrasonic energy and bonding force.
- 3.0 is recommended to start.
- FORCE
- Control of the downward force exerted by the bonding head during bonding.
- 3.0 is recommended to start.
- LOOP
- Setting the height to which the bonding head rises after performing the first bond.
- TAIL
1.2 The right control panel
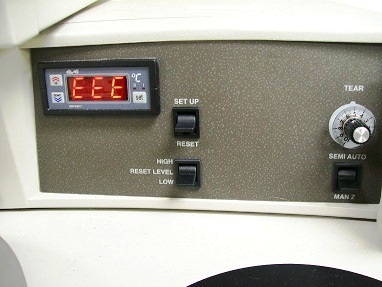
- SET UP/RESET
- Three-position switch used for measuring bond force, for normal operations, and for resetting the system.
- The SET UP position applies the bond force to the bonding head.
- The mid position permits normal operation.
- The RESET position resets the bonder. In addition, pressing this switch to RESET allows you to change the bond cycle mode.
- RESET LEVEL
- Selects the height of the Reset position (HIGH or LOW).
- TEAR
- Setting the length of the tear motion after performance of the second bond.
- SEMI AUTO/MAN Z
- Selects the bond cycle mode to Semi/Auto or Manual Z.
- Setting the switch in one of the positions enables bonding in the selected mode. However, bonding head movement is only activated when the corresponding Mouse button is pressed.
- TEMPERATURE CONTROLLER
- If "EEE" appears in the display, check the electrical connection between the work holder and the panel.
- Setting the temperature of the work holder.
1.3 The mouse
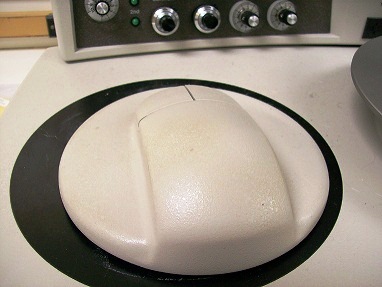
- Control of the x-y movement of the stage under the work holder by sliding it on the pad.
- Left button: SEMI/AUTO
- It operates the semi-automatic bonding cycle.
- Right button: STITCH
- Pressing and holding this button activates the Stitch mode after performing the first bond. The bonder continues making stitch bonds until this button is released (not applicable for ball bonding).
- Pressing the Stitch button displays the bond cycle mode of the bonder when the bonding head is in the Reset position.
2. Wire Loading
1. Power on the bonder. Ensure that the bonding head is in the Reset position (1st indicator only is on).
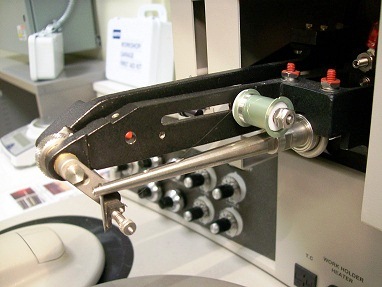
2. Place the spool of wire on the spool holder on the right side of the bonding head.
- If using 30 degree wedge, feed the wire through the 30 degree wire feed hole of the transducer.
- If using 45 degree wedge, feed the wire through the 45 degree wire feed hole of the transducer.
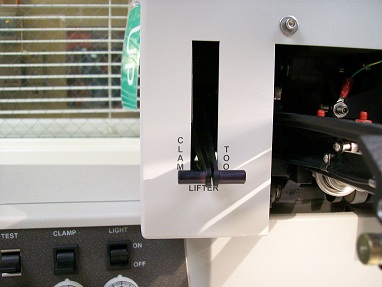
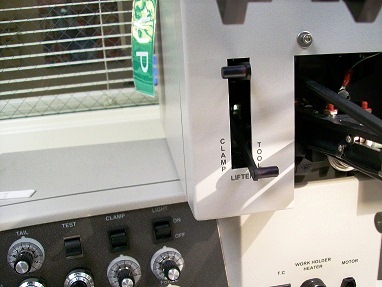
3. Set the CLAMP switch to the up position to open the wire clamp.
4. Lift the clamp lifter handle up.
- Note: If the 2nd indicator is ON, then the wire clamp is not opened.
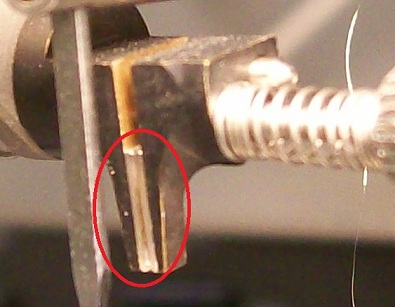
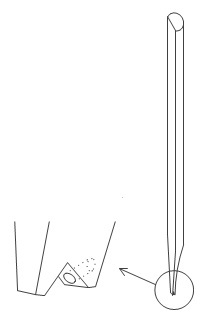
Wire clamp closed
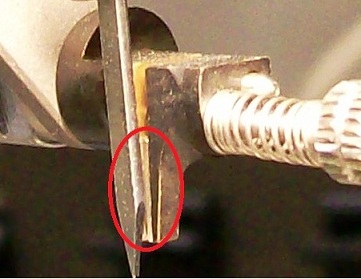
Wire clamp opened
5. Feed the wire through the wire clamp above the wire guide and through the wire feed hole in the wedge.
6. Set the CLAMP switch to the down position to close the wire clamp and push the clamp lifter handle down.
3. Operating
3.1 Set up the parameters
- POWER: Set to be 3.0.
- TIME: Set to be 3.0.
- FORCE: Set to be 3.0.
- LOOP: The LOOP dial on the left control panel sets the height to which the bonding head rises after performing the first bond.
- TAIL: The TAIL dial on the left control panel sets the length of tail produced after tearing.
- TEAR: The TEAR dial on the right control panel sets the tear point of the wire.
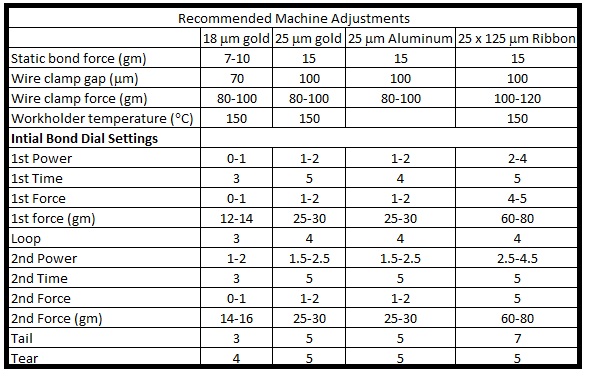
- Note: The following table shows the initial adjustments and parameters for selected wires. Final bonding parameters should be optimized using microscopic analysis and destructive tests.
3.2 Bond Cycles
3.2.1 Semi/Auto Mode Bonding

1. Ensure that the bonding head is in the Reset position.
2. Position the workholder so that the bonding pad is under the wedge.
- Ensure that the wire clamp is closed.
3. Press and hold the SEMI/AUTO pushbutton of the Multi Mouse.
- The bonding head descends to the first Search height and stops.
- While still holding the SEMI/AUTO pushbutton, move the Multi Mouse to position the first bonding pad precisely under the wedge.
4. Release the SEMI/AUTO pushbutton.
- The bonding head descends to the first bonding pad.
- The first bonding force and ultrasonic energy (set by the upper FORCE and POWER dials, respectively) are applied for the time set by the upper TIME dial.
- The first bond is performed and the wire clamp opens.
- The bonding head rises automatically to the Loop height (set by the LOOP dial). As the bonding head reaches the Loops height, the linear motor moves to the feed position.
- Note: Perform wedge bonding in the direction of the wire. If necessary, rotate the device so that the first bond and second bond pads are aligned with the wire feed line.
5. Move the Multi Mouse to position the second bonding pad directly under the wedge.
6. Press and hold the SEMI/AUTO pushbutton.
- The bonding head drops to the second Search height and stops. As the bonding head starts its descent, the wire clamp closes momentarily to prevent the wire from feeding back into the wedge feed hole (helping to create a stable loop).
7. While still pressing the SEMI/AUTO pushbutton, move the Multi Mouse to position the second bonding pad precisely under the wedge.
8. Release the SEMI/AUTO push button.
- The bonding head descends to the second bond pad. The second bonding force and ultrasonic energy (set by the lower FORCE and POWER dials, respectively) are applied for the time set in the lower TIME dial. After the bond is performed, the wire clamp closes and rises (as set by the TEAR dial), tearing the wire.
- The bonding head rises to the Reset position. The wire clamp drops from the Tear position, feeding a wire tail through the wedge feed hole to prepare for the next bond.
3.2.2 Stitch Bonding
1. Press and hold the STITCH pushbutton of the Multi Mouse after performing the first bond.
- The bonder performs the second bond without tearing the wire as in step 8 of Semi/Auto mode bonding.
- The bonder then continues making bonds until you release the pushbutton.
2. After making one or more stitch bonds, release the STITCH pushbutton and make one more bond.
- The bonding head then rises to the Reset position and the wire tail is formed.
3.2.3 Long Tail Length Mode
1. Set the SET UP/RESET switch to the RESET position and release.
2. Immediately press and hold the SEMI/AUTO pushbutton of the Multi Mouse until the 2nd indicator turns off.
3. Release the SEMI/AUTO pushbutton.
- The indicators on the left control panel indicates the Long Tail Length mode as follows:
- 1st: Blinks
- U/S: Off
- 2nd: On
3.2.4 Manual Z Bonding
- Note:
- The available Multi Mouse does not have the MANUAL Z sidebutton.
- The MANUAL button is located on the front side of a 6" tall frame on the right side of the tool.
1. Set the SEMI AUTO/MAN Z switch on the right control panel to MAN Z position.
2. Press and hold the MANUAL Z sidebutton.
- Lower the bonding head as close as you want to the bonding pad.
- Move the Multi Mouse to maneuver the first bonding pad precisely under the wedge.
3. Continue pressing the MANUAL Z side button to drop the bonding head to the bonding pad and perform the bond as in Semi/Auto mode.
4. Release the MANUAL Z sidebutton slowly to raise the bonding head to the Loop height.
5. Move the Multi Mouse to position the second bonding pad directly under the capillary.
6. To perform the second bond, repeat steps 2 and 3.
7. Release the MANUAL Z sidebutton to raise the bonding head to the Reset position.