Updated on 9/14/2021
Note: The maximum power which can be applied to 3" diameter target
Overview Screen
1 Check-in
2 Vent the chamber
3 Load samples
4 Pump down the chamber
5 Run a recipe
5.1 Automatic operation
5.2 Manual operation
5.3 Create a deposition recipe
6 Vent the chamber
7 Pump down the chamber-Stand by
8 Check-out
9 Supplemental Documents
1. Login Explorer14 on the scheduler of the IRIS system before use. Otherwise you cannot use Explorer14.
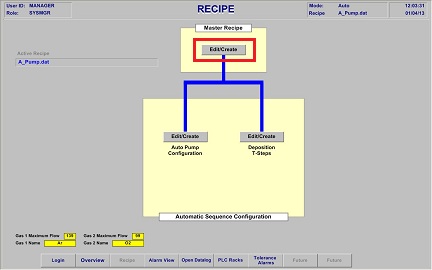
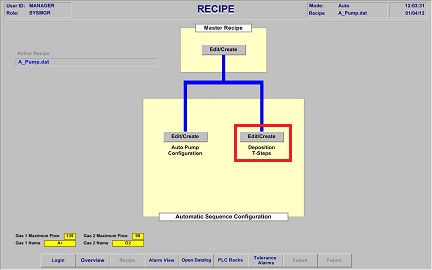
1. Click "Recipe" on the bottom of the overview screen to open Recipe screen.
The bottom of the overview screen
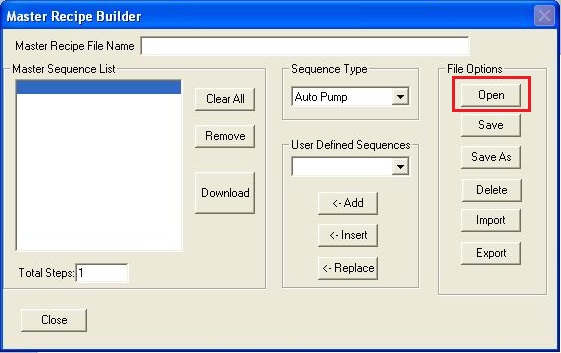
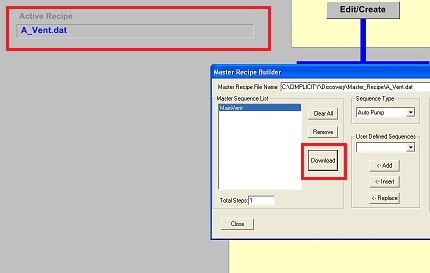
2. Click "Edit/Create" in Master Recipe box to open Master Recipe Builder window.
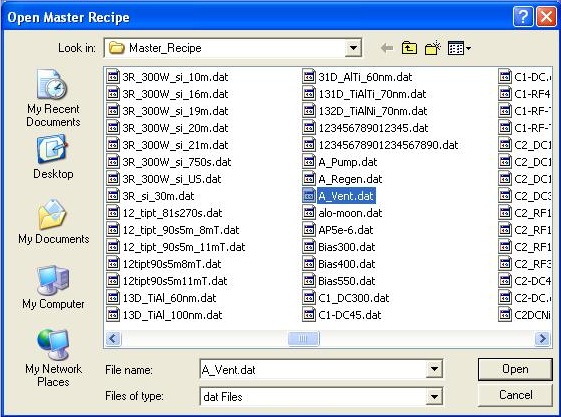
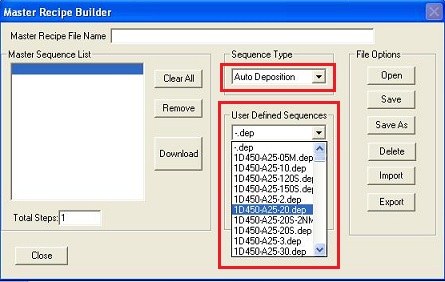
3. Click "Open" to open list of recipes. Make sure that "Auto Pump" is shown under Sequence Type.
4. Choose "A_Vent.dat", and click "Open".
5. Click "Download" in Master Recipe Builder window. Make sure that the name in Active Recipe on the left up corner of the screen is "A_Vent.dat".
6. Click "Close" in Master Recipe Builder window
7. Click "Overview" to go back to Overview screen.
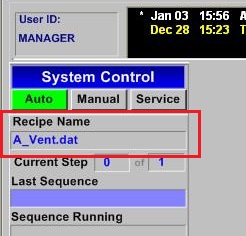
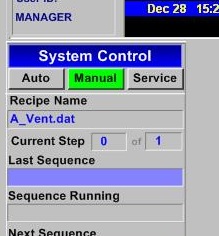
8. Make sure that "Auto" in System Control in Overview screen is high-lighted. If not, click "Auto". In addition, Recipe name should be "A_Vent.dat".
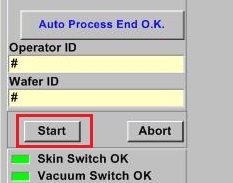
9. Click "Start", so that the venting recipe starts.
1. Open the chamber after the venting procedure.
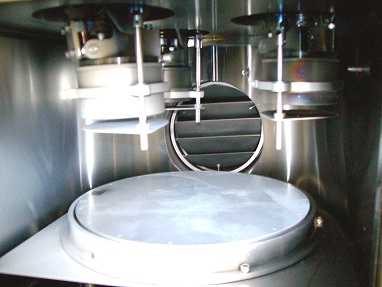
2. Place your sample on the rotatable stage.
3. Close the chamber.
1. Follow the same steps as for venting the chamber, but use recipe "A_Pump.dat".
1. Choose the recipe from list of recipes in Master Recipe Builder directory, like A_VENT.dat file in the above venting procedure.
2. Make sure that the active recipe in the Recipe screen is the recipe you choose.
3. Go to Overview screen, then click "start".
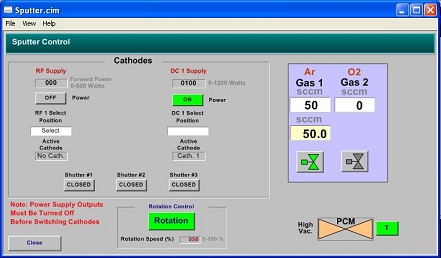
1. Click the "Manual" button in the "System Control" box in Overview screen.
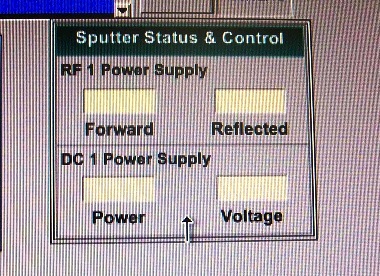
2. Move the cursor to the "Sputter Status & Control" box on the right top side of the screen.
3. Click the "Sputter Status & Control" box.
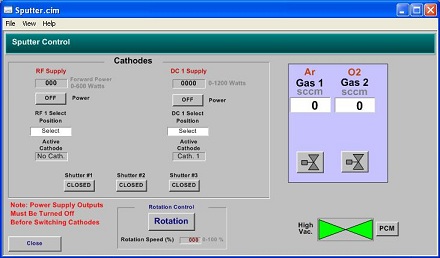
4. The "Sputter Control" dialog box shows up on the left side of the screen.
5. Set the rotation speed and click the "Rotation" button (50% is a default value).
6. Click the "PCM" button to turn on Pressure Control Mode (PCM) for the gate valve.
7. Set the gas flow, and click the valve button to start the gas flow.
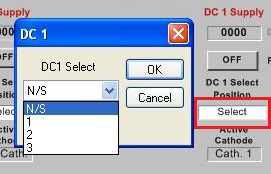
8. Select the cathode on DC or RF supply.
9. Set the power, and click the "power" button.
10. Open the shutter to start the deposition.
1. Go to the recipe screen.
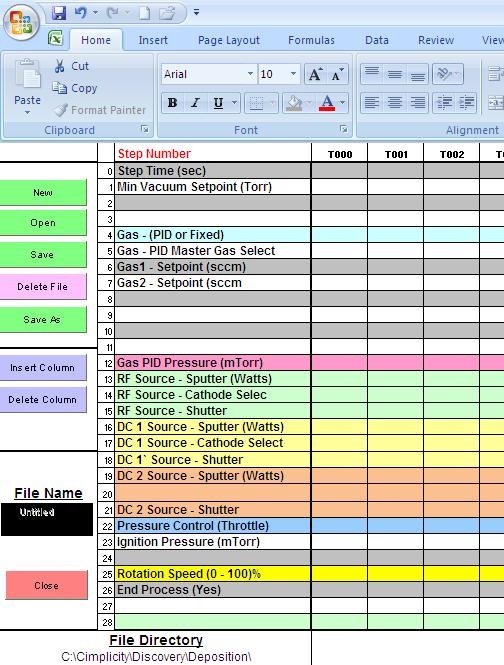
2. Click "Edit/Create" on Deposition/T Steps to open the time-step configuration sheet. This procedure sets up the deposition sequences in the recipe.
3. Type the parameters in the time-step configuration sheet (See the detail in Explorer14 Recipes , some examples are listed ) and then save the sheet.
4. Close the time-step configuration sheet.
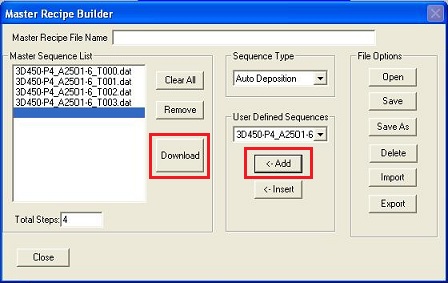
5. Click "Edit/Create" in Master Recipe box in the recipe screen.
6. Choose "Auto Deposition" in Sequence Type.
7. Choose the dep file of your deposition sequences that you created from User Defined Sequences.
8. Click "Add", so that your deposition sequences are posted in the sequence list.
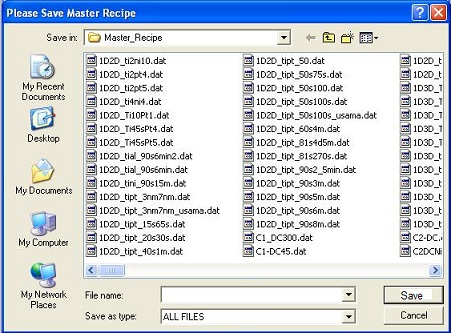
9. Click "Download", and then the window for saving into Master Recipe directory pops up.
10. Save the sequences into Master Recipe directory, as a ".dat" file.
11. You can see your recipe name in the "active recipe" box on the left top of the screen.
12. Go to the "overview" screen, and start your recipe.
1. Follow the steps outlined in "2. Vent the chamber".
2. Open the chamber, and take out your sample.
3. Vacuum-clean the inside of the chamber. Wipe-off with IPA, if necessary.
4. Close the chamber.
1. Follow the steps outlined in "4. Pump down the chamber".
1. Logout Explorer14 on the scheduler of the ISIS system after use.
a) The target is not ignited.
-> Increase the Ar pressure to 10-20 mTorr, and ignite the target. After the ignition, the Ar pressure is reduced to 3-5 mTorr.
-> Ignite another target, which induces ignition of the target.
-> Clean the target using RF sputtering for 10-20 min.
b) The vacuum cannot be pumped down well, even if it is pumped down overnight.
-> O-ring might be deteriaorated. Consult the staff.
-> Re-generate the cryopump. Consult the staff.
Revision
3/29/2019, by Hiro, added Ag target warning.
5/1/2017, by Hiro, added troubleshooting.
9/14/2021, by Hiro, revised


