Updated on10/1/2021
Note:
1 Check-in
2 Vent Chamber
3 Load Sample
4 Load Evaporating Material
4.1 Preparation for thermal evaporation
4.2 Preparation for E-beam evaporation
4.2.1 Remote Control
5 Pump Down Chamber
6 Conditions of The Sample Holder
6.1 Rotation Speed
7 Evaporation
7.1 Manual Operation
7.1.1 Thermal Evaporation
7.1.2 E-beam Evaporation
7.2 Automatic Operation
8 Unload Sample
9 Stand by
10 Check-out
11 Supplemental Documents
12 Troubleshooting
1. Log-in on the ISIS scheduler
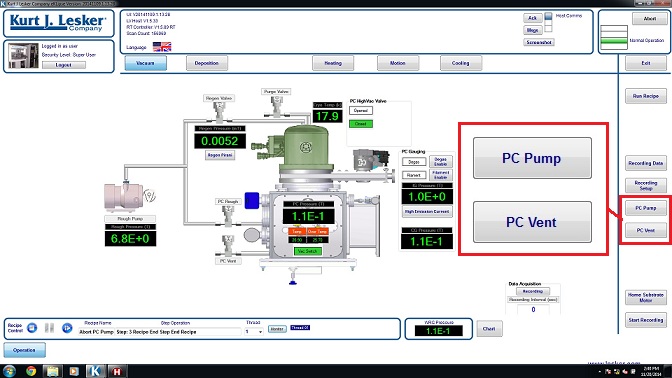
1. Touch/Click the "PC Vent" button on the right side of the screen.
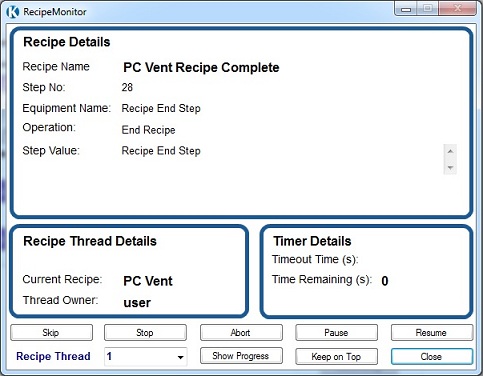
3. When the venting procedure is done, the pop-up dialog box indicates "Recipe Complete".
4. Touch/Click the "Close" button.
* Note: Make sure that the power supply of e-beam evaporation is turned off behind the right door, for the sake of safety.
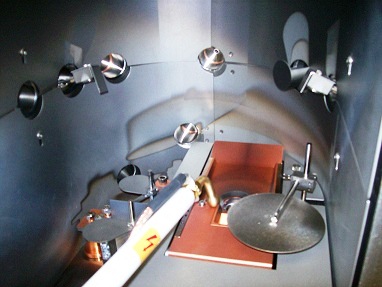
1. Open the door of the process chamber on the left side.
2. Touch the evaporation sources with the grounding rod; this will remove any harmful electrical charge.
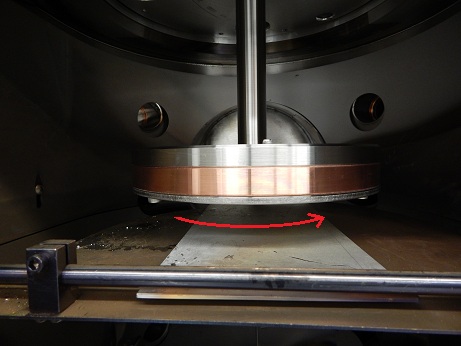
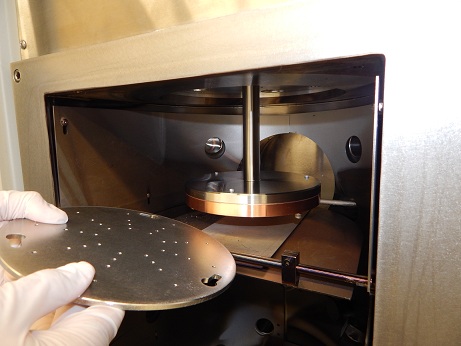
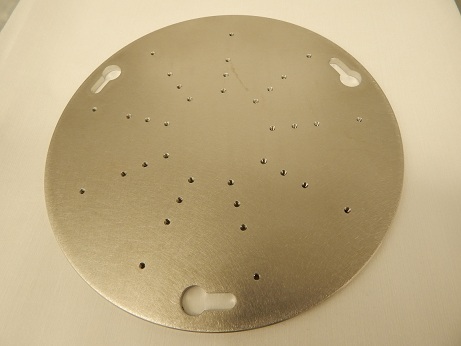
3. Take out the sample chuck.
Note: As you can see in the pictures, you have to rotate the sample chuck and take it out of the hook (screws) on the chuck holder.
4. Using clips or Kapton tape, hold your sample(s) onto the chuck.
5. Put the chuck back to the chuck holder.
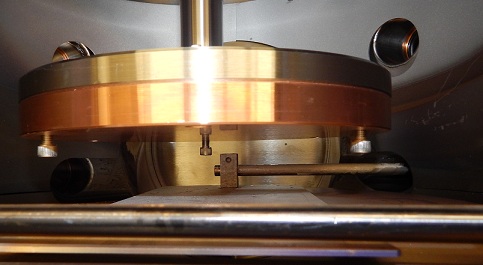
6. Put a Kapton film in front of the glass window on the back side of the left door.

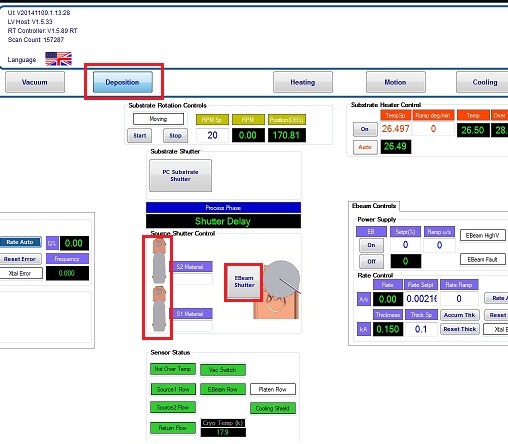
1. Open the shutter(s) by touching/clicking the icon of "Source Shutter 1", the "Source Shutter 2", and/or the "E-beam Shutter" button in the "Source Shutter Control" box in the "Deposition" screen, if necessary.
1. Loosen the screws to take out a used evaporation boat, if necessary.
2. Replace it by a new evaporation boat, if necessary.
3. Tighten up the screws to hold the evaporation boat, if necessary.
4. Place the evaporating material onto the boat.
5. Close the shutter by touching/clicking the "Source Shutter 1" and/or the "Source Shutter 2" on the "Deposition" screen.

1. Open the right door of the PVD75 that has the PC monitor on the front.
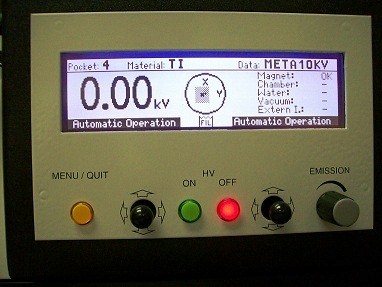
2. You will find the remote control box on the middle of the tool panel. Since the default is in automatic mode, you have to change it to manual mode.
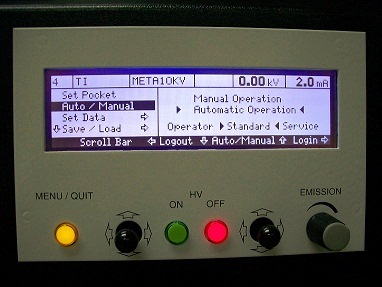
3. Press the "MENU/QUIT" button on the remote control box.
4. Using the left joystick, move the inverse-highlight from "Set Pocket" to "Auto/Manual" in the left column.
5. Using the right joystick, move the pointed arrows from "Automatic Operation" to "Manual Operation" in the right column.
Move the crucible liner
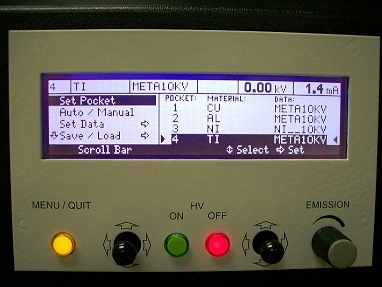
1. Using the left joystick, move the inverse-highlight from "Auto/Manual" to "Set Pocket" in the left column.
2. Using the right joystick, move the pointed arrows to the desired pocket in the right column.
3. Keep holding the right joystick to the right until the crucible stops rotating.
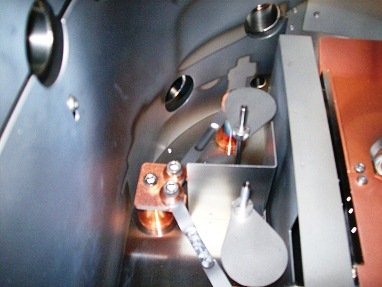
Change the crucible with the depositing material
1. Place the crucible liner with the appropriate material into the pocket.
2. Move the crucible pocket back to the original position, which is indicated to be in position on Crucible Indexer in Deposition screen. In this case, the pocket number is 4.
From Manual to Auto mode
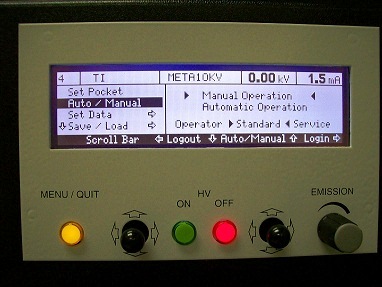
1. Using the left joystick, move the inverse-highlight from "Set Pocket" to "Auto/Manual" in the left column. Then, press the joystick to the right.
2. Using the right joystick, move the pointed arrows from "Manual Operation" to "Automatic Operation" in the right column.
3. Press the "MENU/QUIT" button on the remote control box.
4. Make sure that the screen of the remote control box shows "Automatic Operation".
Close the shutter
1. Close the shutter by touching/clicking the "E-beam Shutter" button on Deposition screen.
1. Close the left and right doors of the tool.
2. While holding the process chamber door closed, touch/Click the "PC Pump" button on the right side of the screen.
3. When the pumping procedure is done, the pop-up dialog box indicates "Recipe Complete".
4. Touch/Click the "Close" button.
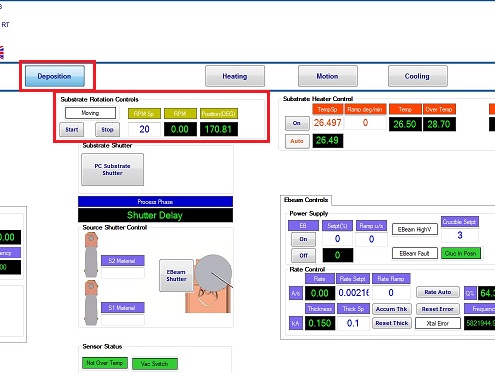
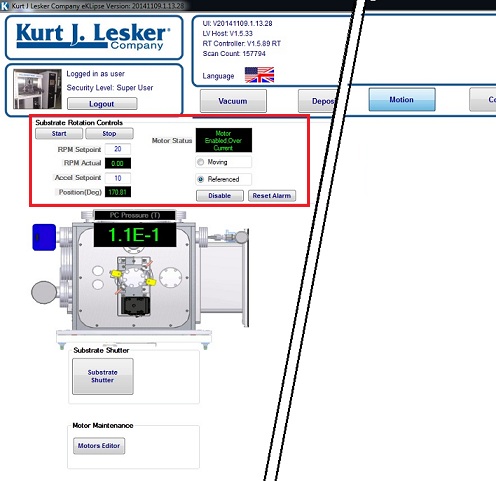
1. The rotation speed of the sample holder can manually be set up in the "Deposition" and "Motion" screens.
2. The rotation speed of the sample holder can automatically be set up in the recipe.
* Note:
1. Z-factor and density of the material need to be set up for thickness monitoring before deposition.
2. Since these functional buttons are not available on the "Deposition" screen, the recipe is started and paused so that the Z-factor and density of the material in the recipe can be used in the manual operation.
3. Chart is opened, so that the deposition profile can also be observed.
4. You can manually deposit the material, but the deposition rate is not controlled.
5. You can determine the conditions of the soak 1 and soak 2 processes, using the manual operation. Then you can set up the conditions in the recipe later.
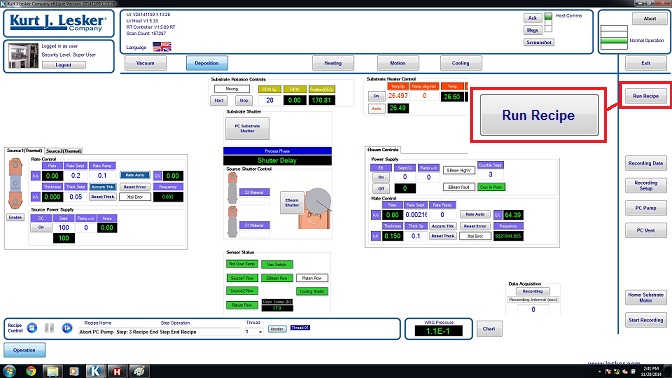
1. Touch/Click the "Run Recipe" button on the right side of the screen.

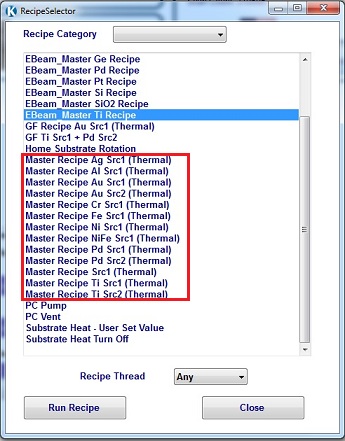
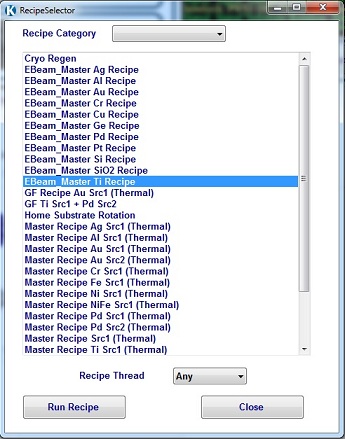
2. The Recipe Selector dialog box appears.
3. Choose the thermal evaporation recipe desired and the Source number.
4. Touch/Click the "Run Recipe" button.
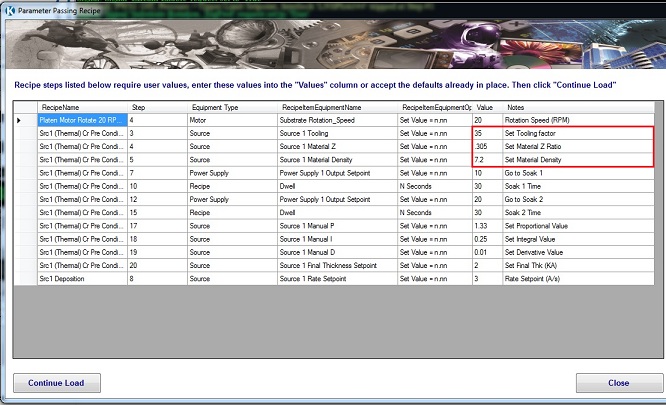
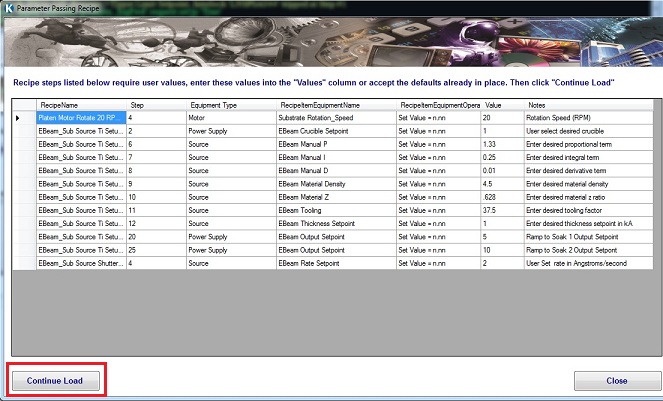
5. The following dialog box appears.
6. Touch/Click the "Continue Load" button to start the recipe.
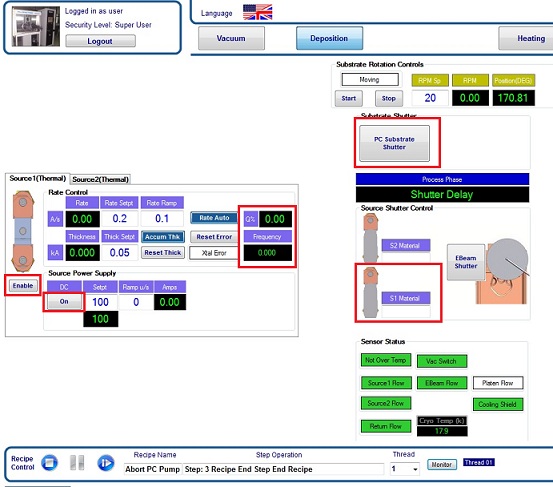
7. If you find some number of Q% and Frequency in the thermal evaporation source box in the "Deposition" screen, then the thickness monitoring is activated.
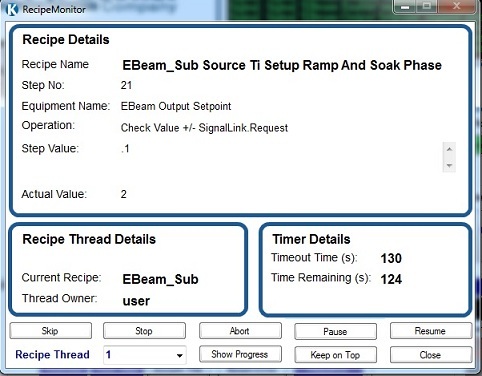
8. Touch/Click the "Pause" button in the "RecipeMonitor" dialog box.
9. Turn on the "Enable" button of Source and Source power, if necessary.
10. Open the Source shutter.
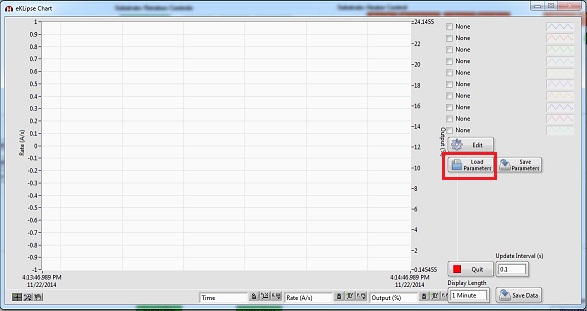
11. Touch/Click the "Chart" button on the bottom of the screen.
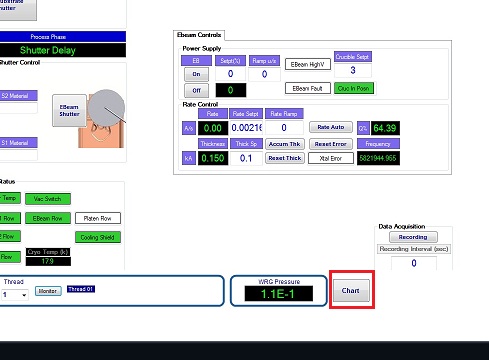
12. The chart appears.
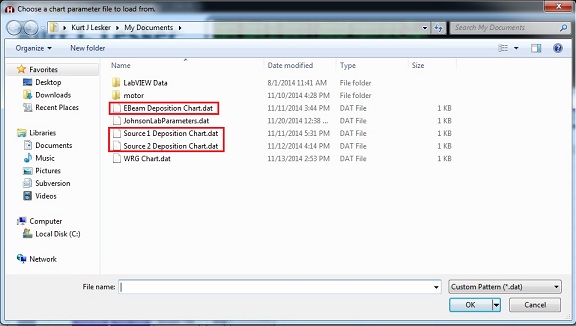
13. Touch/Click the "Load Parameters" button to open the file directory.

14. Choose the dat file from the list.
15. Touch/Click the "OK" button, and the real time monitoring will start.

16. Input the Setpt and Ramp in the "Source Power Supply" box.
17. If you want to deposit the material, then open the substrate shutter.
18. If you do not want to deposit the material, then abort the recipe. Re-start the recipe after inputting the parameters optimized.
19. When the deposition is done, close the substrate and source shutters, and set up the power to be zero.
20. Touch/Click the "Abort" button in "Recipe Monitor" dialog box, or the "Skip" button to end the recipe.
* Note: Make sure that the power supply of e-beam evaporation is turned ON behind the right door.
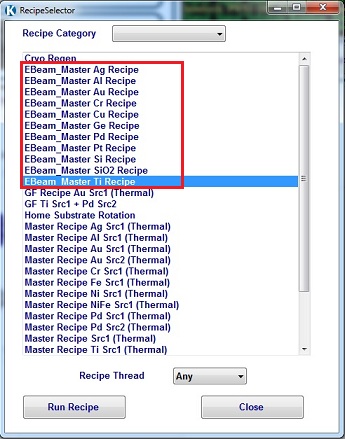
1. Touch/Click the "Run Recipe" button on the right side of the screen.
2. The Recipe Selector dialog box appears.
3. Choose the E-beam evaporation recipe desired.
4. Touch/Click the "Run Recipe" button.
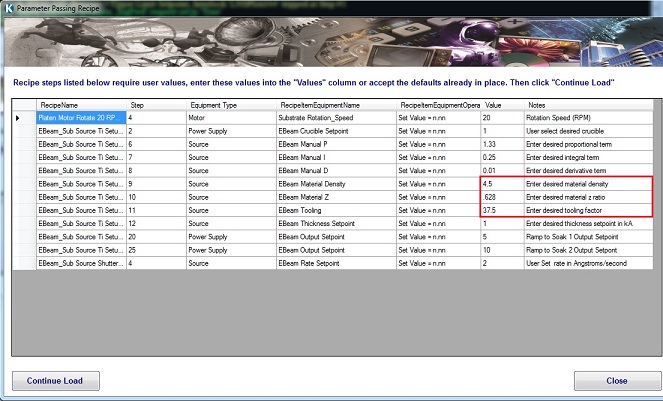
5. The following dialog box appears.
6. Touch/Click the "Continue Load" button to start the recipe.
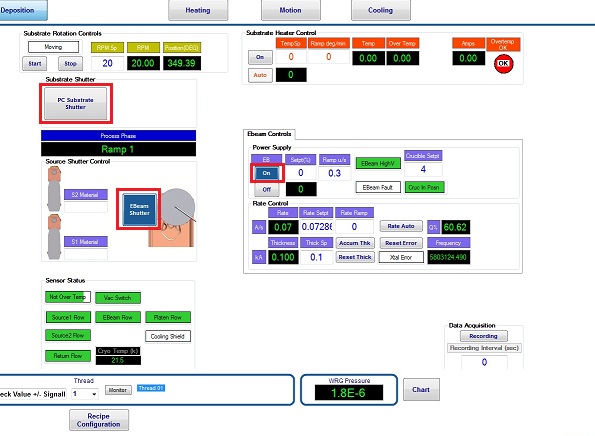
7. If you find some number of Q% and Frequency in the E-beam evaporation source box in the "Deposition" screen, then the thickness monitoring is activated.
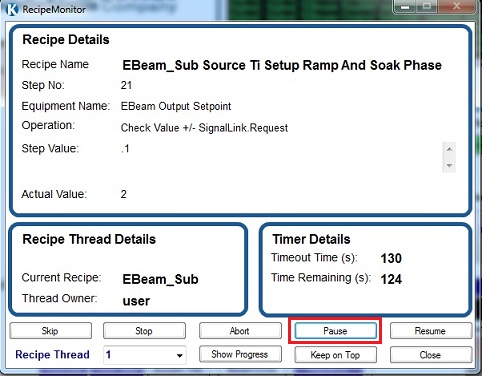
8. Touch/Click the "Pause" button in the "RecipeMonitor" dialog box.
9. Turn on the "ON" button of EB power supply, if necessary.
10. Open the "EBeam" shutter.
11. Touch/Click the "Chart" button on the bottom of the screen.

12. The chart appears.
13. Touch/Click the "Load Parameters" button to open the file directory.

14. Choose the dat file from the list.
15. Touch/Click the "OK" button, and the real time monitoring will start.

16. Input the Setpt and Ramp in the "Power Supply" box.
17. If you want to deposit the material, then open the substrate shutter.
18. If you do not want to deposit the material, then abort the recipe. Re-start the recipe after inputting the parameters optimized.
19. When the deposition is done, close the substrate and "EBeam" shutters, and set up the power to be zero.
20. Touch/Click the "Abort" button in "Recipe Monitor" dialog box, or the "Skip" button to end the recipe.
* Note: Make sure that the power supply of e-beam evaporation is turned ON behind the right door, if the e-beam evaporation is used.
1. Touch/Click the "Run Recipe" button on the right side of the screen.

2. The Recipe Selector dialog box appears.
3. Choose the E-beam/thermal evaporation recipe desired.
4. Touch/Click the "Run Recipe" button.
5. The following dialog box appears.
6. Input the following parameters, if necessary.
6. Touch/Click the "Continue Load" button to start the recipe.
7. The "RecipeMonitor" dialog box appears, and the deposition process starts.
8. Touch/Click the "Chart" button on the bottom of the screen.

9. The chart appears.
10. Touch/Click the "Load Parameters" button to open the file directory.
11. Choose the dat file from the list.
12. Touch/Click the "OK" button, and the real time monitoring will start.
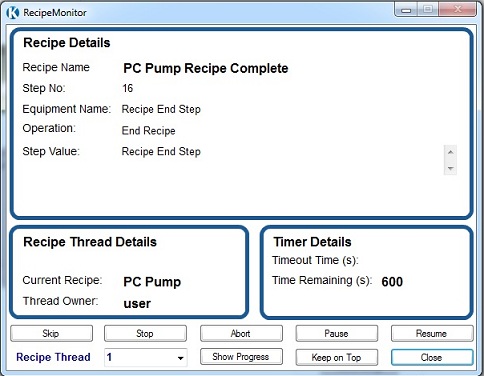
13. When the recipe is done, the "Recipe Monitor" dialog box will indicate "Recipe Complete".
14. Close the the "Recipe Monitor" dialog box.
1. Wait until the substrate temperature becomes below 50 ºC, if the substrate is heated up.
2. Turn off the power supply of e-beam evaporation for the sake of safety.
3. Click the "PC Vent" button on the right side of the screen.
4. When the venting procedure is done, the pop-up dialog box indicates "Recipe Complete".
5. Touch/Click the "Close" button.
6. Open the left door.
7. Take out the sample chuck.
8. Remove the sample from the chuck.
9. Put the chuck back to the chuck holder.
10. Remove the materials from E-beam/thermal evaporation spource.
1. Close the left door.
2. Touch/Click the "PC Pump" button on the right side of the screen.
3. When the pumping procedure is done, the pop-up dialog box indicates "Recipe Complete".
4. Touch/Click the "Close" button.
1. Log-out on the ISIS scheduler
a) The thickness is not shown properly.
-> Replace the quartz crystal on the thickness monitor head.
b) The cruible pocket is jammed.
-> Make sure that the remote controller is in automatic mode, and the yellow LED on the remote controller is off.
-> The cruible liner needs to be cleaned. Consult the staff.
Revision
8/20/2018, by Kyle, revised.
5/1/2017, by Hiro, added troubleshooting.
10/1/2021, by Hiro, revised.
 --->
---> 
 --->
---> 
