
Ultra96 Setup
Contents
Ultra96 Setup#
AMD-Xilinx Zynq Architecture#
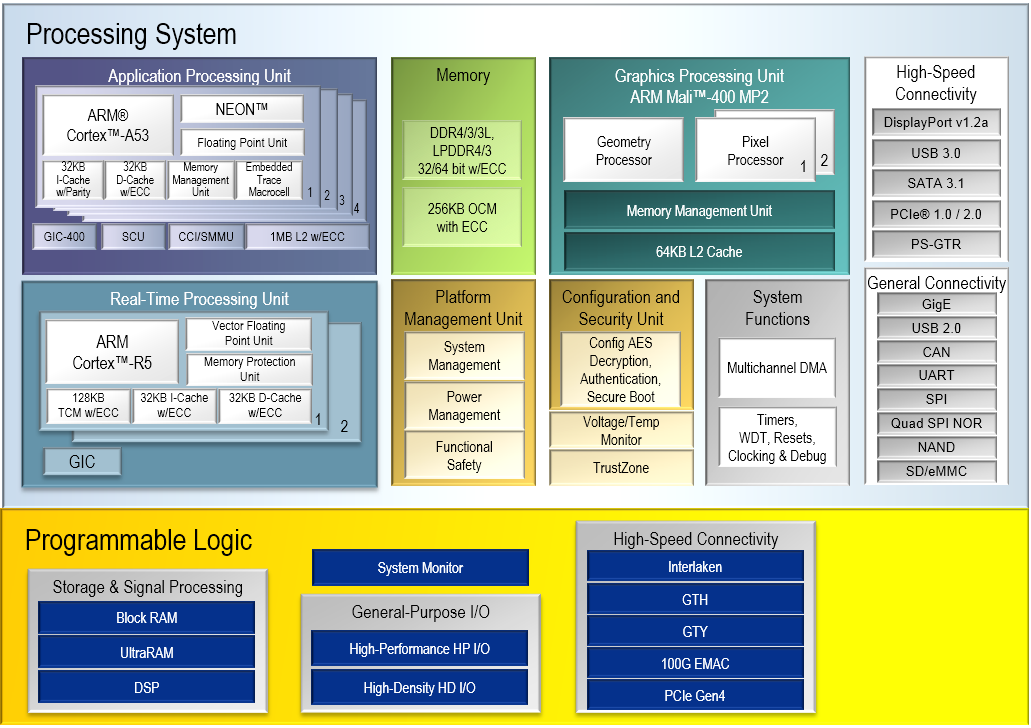
Fig. 3 AMD-Xilinx Zynq UltraScale+ MPSoC diagram#
Ultra96 v2 board features Xilinx Zynq UltraScale+ MPSoC. Zynq UltraScale+ MPSoC is a heterogeneous SoC that consists of Processing System (PS) and Processing Logic (PL). PS includes the quad-core ARM Cortex A53-based APU (Application Processing Unit) and the dual-core ARM Cortex R5-based RPU (Real-Time Processing Unit). PL refers to FPGA hardware resources LUTs (Look-Up Tables), FFs (Flip-Flops), Block RAMs, DSPs, etc. In this lab, we will first run Linux on the A53, and we will divide the computation into threads that run on different cores.
Environment Setup#
Setting up Ultra96 and Host Computer#
We have provided you with:
An Ultra96 board with a power cable and a JTAG USB cable
Please check SW3 as the Note below. 1 should be in the “off” position, and 2 should be in the “on” position.
2 USB-ethernet adapters
1 ethernet cable
1 SD card and an SD card reader
USB-C to USB 3.1 adaptor (for those of you who only have USB-C ports in your computer)
Note
Some of you might be receiving the boards disassembled. In that case, make sure you have set the board in SD card mode as follows:
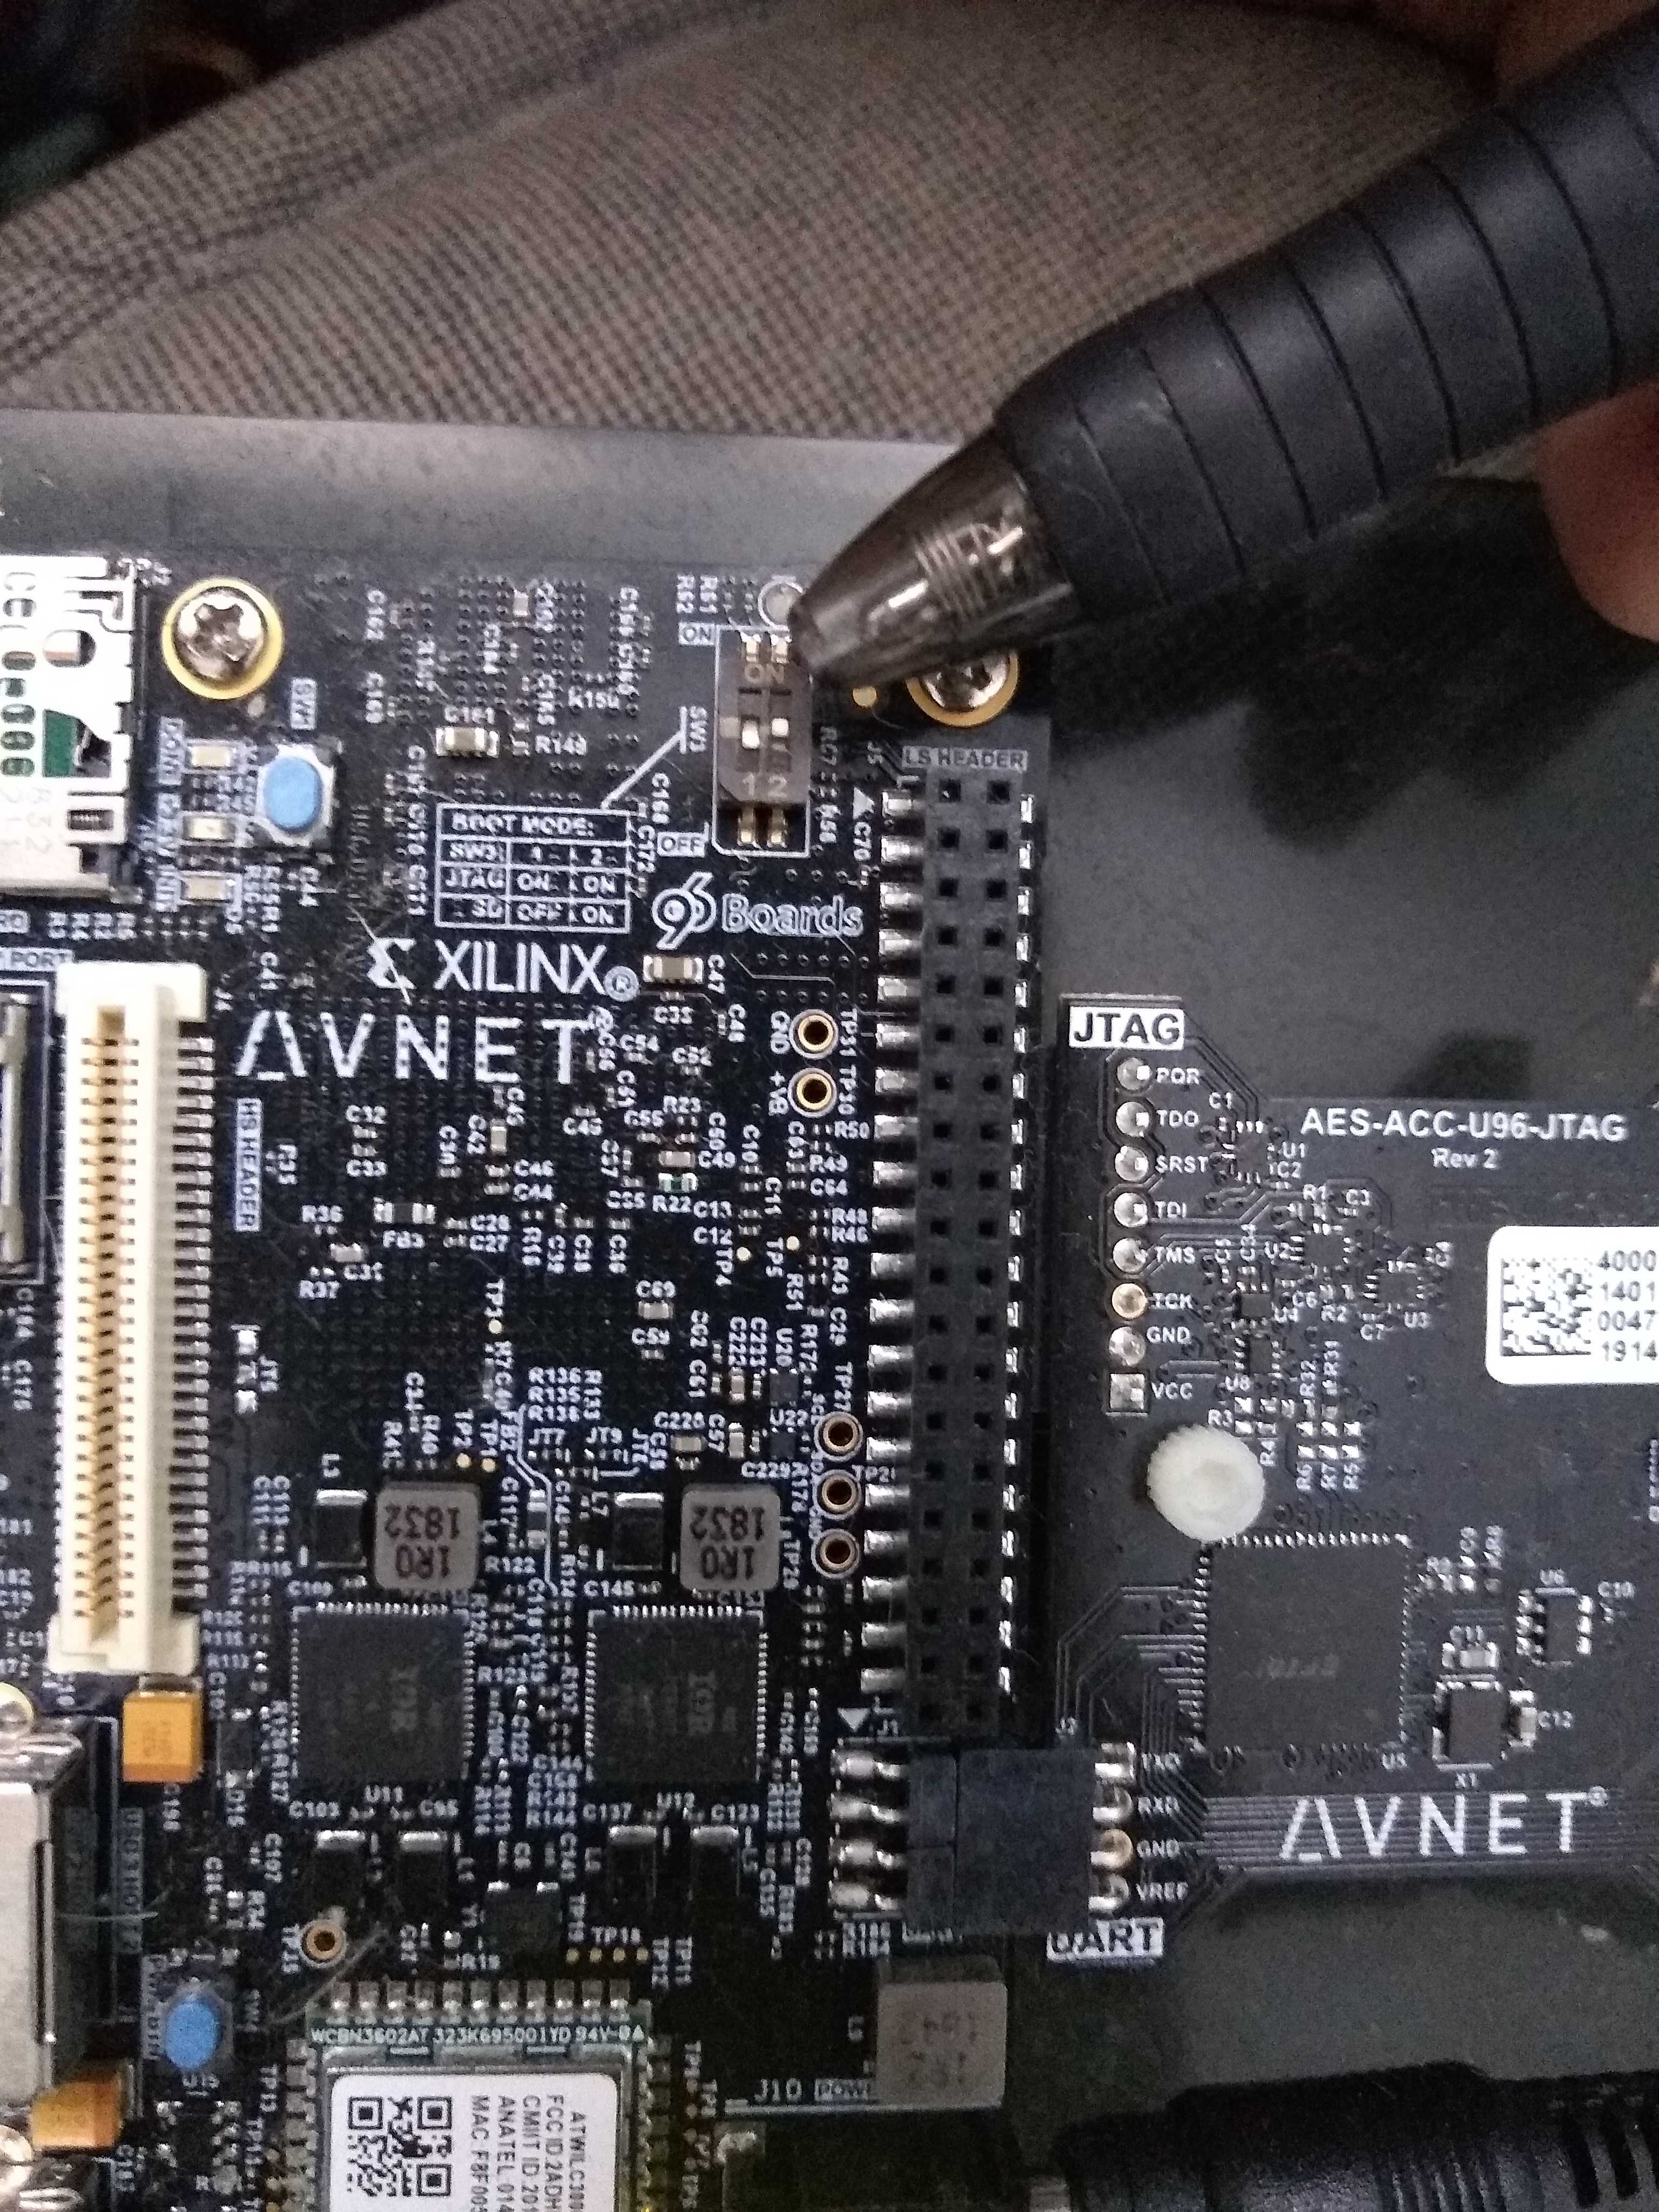
Fig. 4 SD card mode. 1 is OFF and 2 is ON at SW3.#
And also make sure you have properly connected the JTAG module as follows:
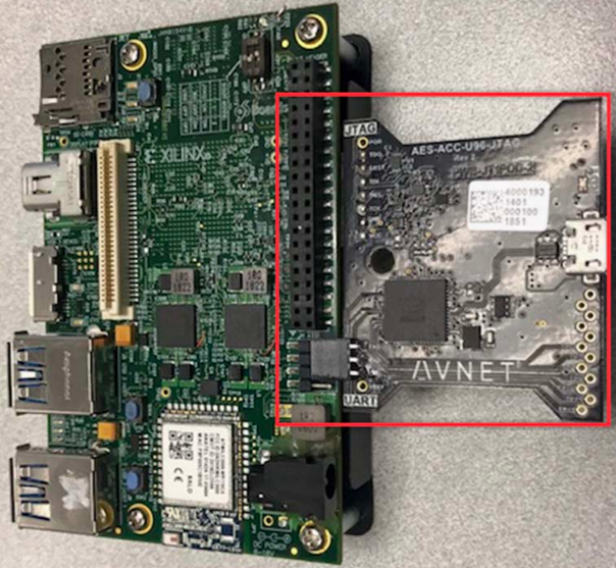
Fig. 5 JTAG module#
Caution
Be cautious with ESD protection when using this board with Ultra96. The Ultra96 has exposed pins on the UART and JTAG headers. Be careful not to touch these pins or the circuits on the Pod when plugging the boards together - https://www.avnet.com/opasdata/d120001/medias/docus/190/5362-PB-AES-ACC-U96-JTAG-V3b.pdf
Your setup for this HW should look like Fig. 6.
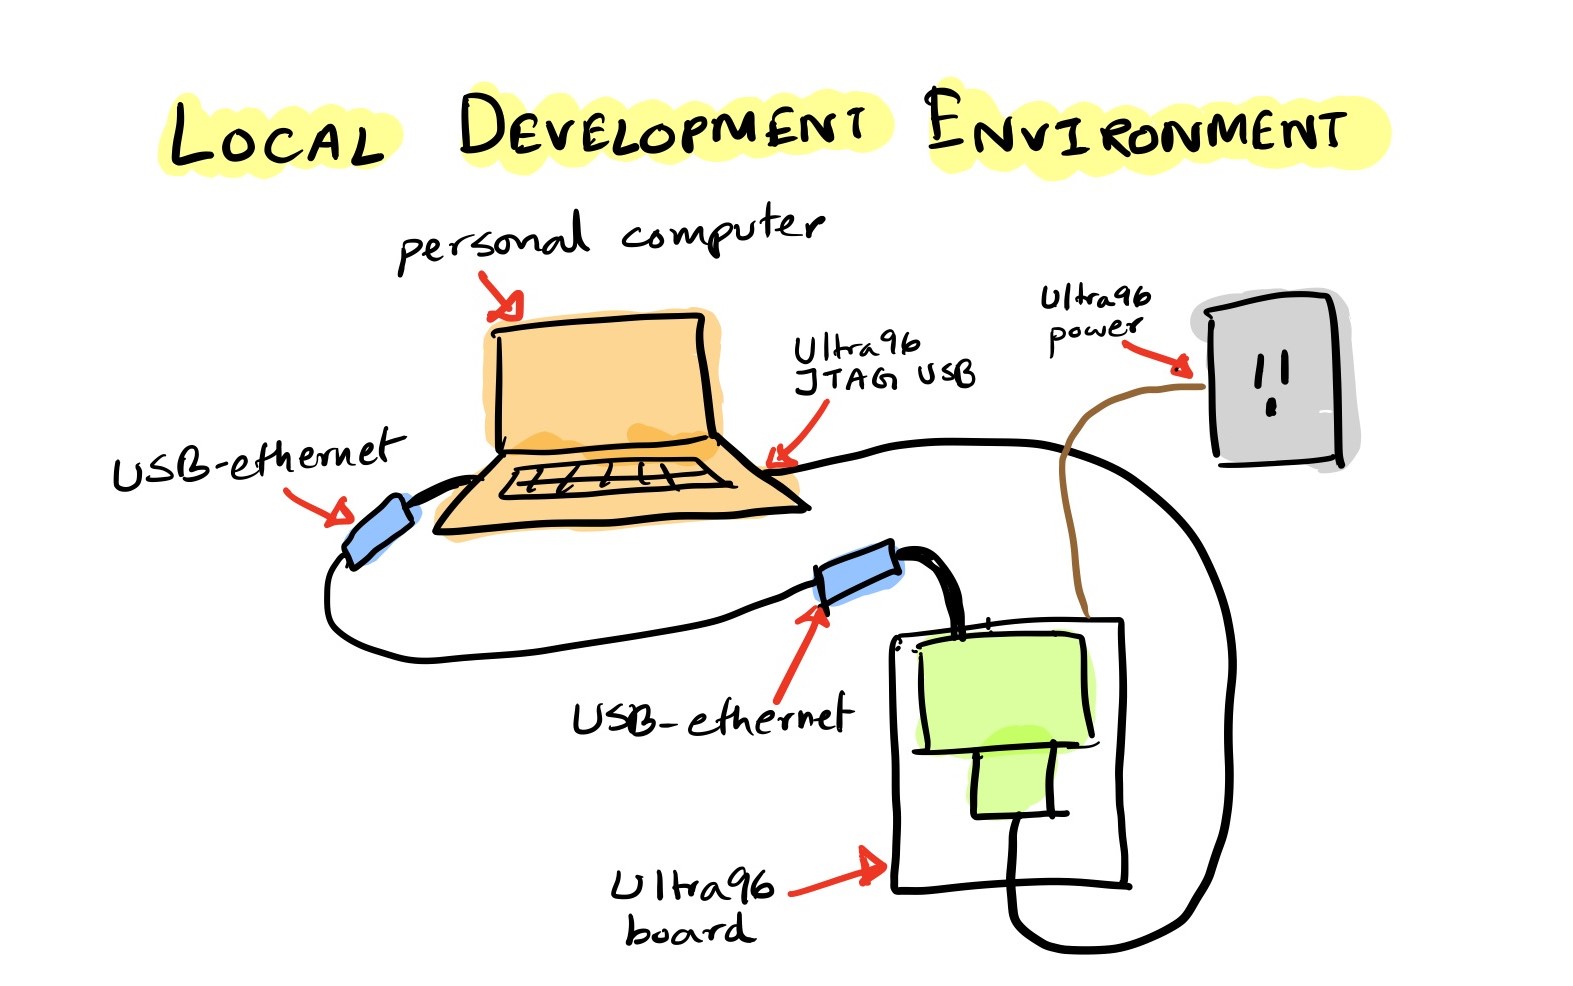
Fig. 6 Development Environment#
Run on the FPGA#
Write the SD Card Image#
Download a sample SD card image for Ultra96 from here.
Then, unzip the
u96v2_sbc_vadd_2020_2.tar.gz. The .gz file containssd_card.imgandREADME.txt.tar -xvzf u96v2_sbc_vadd_2020_2.tar.gz
Write
sd_card.imgto your SD card.In Ubuntu 20.04, you can use
Startup Disk Creator.You can also use Rufus or balenaEtcher.
Once you finish writing the image to the SD card, slide it into your Ultra96’s SD card slot.
Boot the Ultra96 (Environment - Personal Computer with Linux)#
The instructions here are for users running Linux on their personal computers. For Windows users, skim these through, and go to Boot the Ultra96 (Environment - Personal Computer or Detkin Machines with Windows).
Make sure you have the board connected as shown in Fig. 6.
We will use two terminals on our host computer:
the first terminal will be used to copy binaries into the Ultra96
the second terminal will be used to access the serial console of the Ultra96
We will now open the serial console of the Ultra96. You can use any program like
minicom,gtktermorPuTTYto connect to our serial port. We are usingPuTTYand launchPuTTYbysudo putty. The settings are shown in Fig. 7./dev/ttyUSB1is the port where the Ultra96 dumps all the console output. If you are on Windows, this will be something different, likeCOM4.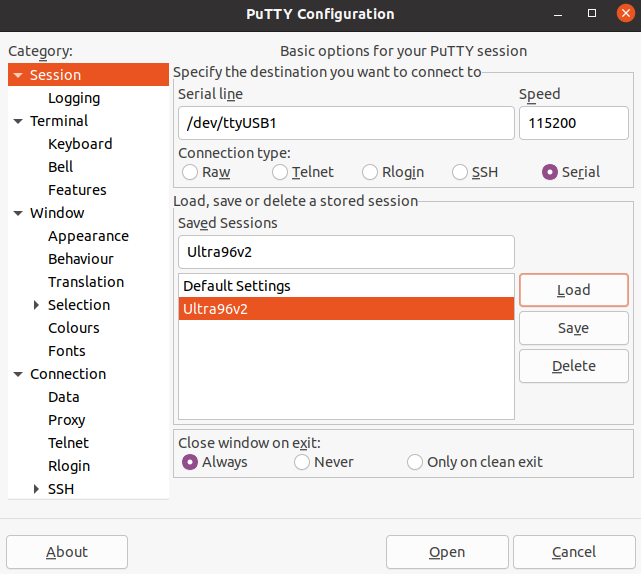
Fig. 7 PuTTY settings#
After you have connected to the serial port, boot the board by pressing the boot switch as shown in Fig. 8.
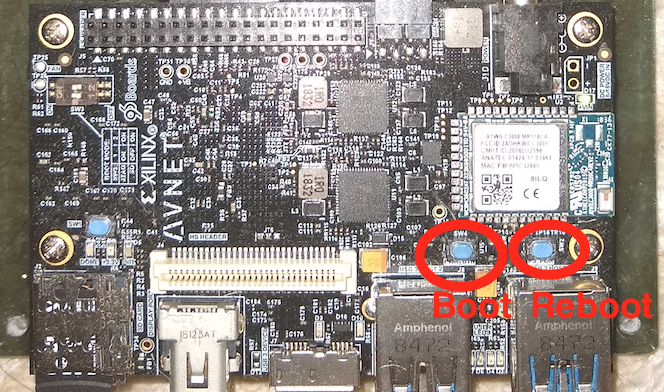
Fig. 8 Switch for booting Ultra96#
Watch your serial console for boot messages. Following is what ours look like:
�Xilinx Zynq MP First Stage Boot Loader
Release 2020.1   Oct 17 2020  -  06:29:34
NOTICE:  ATF running on XCZU3EG/silicon v4/RTL5.1 at 0xfffea000
NOTICE:  BL31: v2.2(release):v1.1-5588-g5918e656e
NOTICE:  BL31: Built : 20:07:49, Oct 17 2020
U-Boot 2020.01 (Oct 17 2020 - 20:08:47 +0000)
Model: Avnet Ultra96 Rev1
Board: Xilinx ZynqMP
DRAM:  2 GiB
.
.
.
Starting kernel ...
[    0.000000] Booting Linux on physical CPU 0x0000000000 [0x410fd034]
[    0.000000] Linux version 5.4.0-xilinx-v2020.1 (oe-user@oe-host) (gcc version 9.2.0 (GCC)) #1 SMP Sat Oct 17 20:08:16 UTC 2020
[    0.000000] Machine model: Avnet Ultra96 Rev1
[    0.000000] earlycon: cdns0 at MMIO 0x00000000ff010000 (options '115200n8')
[    0.000000] printk: bootconsole [cdns0] enabled
[    0.000000] efi: Getting EFI parameters from FDT:
[    0.000000] efi: UEFI not found.
[    0.000000] Reserved memory: created DMA memory pool at 0x000000003ed40000, size 1 MiB
[    0.000000] OF: reserved mem: initialized node rproc@3ed400000, compatible id shared-dma-pool
[    0.000000] cma: Reserved 512 MiB at 0x000000005fc00000
.
.
.
.
Starting syslogd/klogd: done
Starting tcf-agent: OK
PetaLinux 2020.1 ultra96v2-2020-1 ttyPS0
root@ultra96v2-2020-1:~# The XKEYBOARD keymap compiler (xkbcomp) reports:
> Warning:          Unsupported high keycode 372 for name <I372> ignored
>                   X11 cannot support keycodes above 255.
>                   This warning only shows for the first high keycode.
Errors from xkbcomp are not fatal to the X server
D-BUS per-session daemon address is: unix:abstract=/tmp/dbus-2CuBS4BnDn,guid=63270a6bec61460191859caa5f9022fc
matchbox: Cant find a keycode for keysym 269025056
matchbox: ignoring key shortcut XF86Calendar=!$contacts
matchbox: Cant find a keycode for keysym 2809
matchbox: ignoring key shortcut telephone=!$dates
matchbox: Cant find a keycode for keysym 269025050
matchbox: ignoring key shortcut XF86Start=!matchbox-remote -desktop
dbus-daemon[641]: Activating service name='org.a11y.atspi.Registry' requested by ':1.0' (uid=0 pid=636 comm="matchbox-desktop ")
dbus-daemon[641]: Successfully activated service 'org.a11y.atspi.Registry'
SpiRegistry daemon is running with well-known name - org.a11y.atspi.Registry
[settings daemon] Forking. run with -n to prevent fork
Note that near the end some messages spill, so just press Enter couple of times, and you see that you need to login. Login as
rootwith Password:root.root@u96v2-sbc-base-2020-2:~#
We will now enable ethernet connection between our Ultra96 and the host computer, such that we can copy files between the devices. Issue the following command in the serial console:
ifconfig eth0 10.10.7.1 netmask 255.0.0.0
Now in your second console on the host computer, first find out the name that has been assigned to the USB-ethernet device by issuing
ifconfigenx000ec6c4b500: flags=4163<UP,BROADCAST,RUNNING,MULTICAST> mtu 1500 inet 10.10.7.2 netmask 255.0.0.0 broadcast 10.255.255.255 ether 00:0e:c6:c4:b5:00 txqueuelen 1000 (Ethernet) RX packets 213 bytes 32750 (32.7 KB) RX errors 0 dropped 0 overruns 0 frame 0 TX packets 249 bytes 25958 (25.9 KB) TX errors 0 dropped 0 overruns 0 carrier 0 collisions 0 lo: flags=73<UP,LOOPBACK,RUNNING> mtu 65536 inet 127.0.0.1 netmask 255.0.0.0 inet6 ::1 prefixlen 128 scopeid 0x10<host> loop txqueuelen 1000 (Local Loopback) RX packets 570887 bytes 920673672 (920.6 MB) RX errors 0 dropped 0 overruns 0 frame 0 TX packets 570887 bytes 920673672 (920.6 MB) TX errors 0 dropped 0 overruns 0 carrier 0 collisions 0
In our case, the USB-ethernet device is
enx000ec6c4b500. Now issue the following command:sudo ifconfig enx000ec6c4b500 10.10.7.2 netmask 255.0.0.0
We have now assigned IP
10.10.7.1to our Ultra96 and IP10.10.7.2to our USB ethernet device connected to our host computer. You can test the connection by doingping 10.10.7.2from the Ultra96 serial console, and doingping 10.10.7.1from the host computer.Unfortunately, currently every time you boot your Ultra96, you will have to login via serial and configure the IP address, before you can connect via ssh. To fix this, create a new file on your host computer
.profile(make sure you don’t do this in your home directory, or else you may overwrite an existing one). In.profile, add the following:ifconfig eth0 10.10.7.1 netmask 255.0.0.0 alias ls="ls --color" alias ll="ls -laF --color"
Then create another file (also not in your home directory), called
.bashrc, and add the following:source .profileNext, copy these files over to the Ultra96:
scp .profile .bashrc root@10.10.7.1:/home/root/
Now when the Ultra96 boots, you should be able to connect directly over ssh without having to configure the board via serial.
Boot the Ultra96 (Environment - Personal Computer or Detkin Machines with Windows)#
Connect your ultra96 jtag usb to your computer. Also connect the ethernet-usb to ultra96 and the computer. Go to device managers and note down the serial port of the usb. In the example case, it’s COM4.
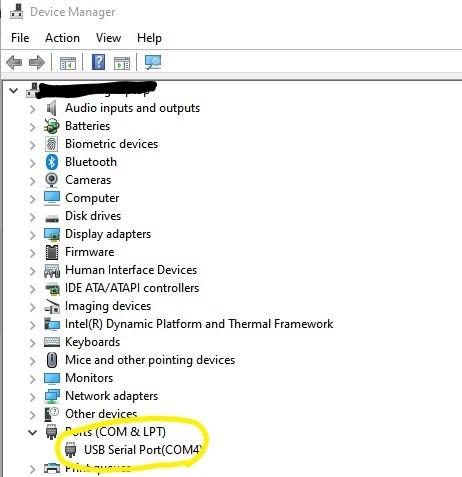
Fig. 9 Find the port#
Download and install MobaXterm from here. In Detkin/Ketterer machines, use the portable version since you don’t have a permission to install the software.
Start MobaXterm. Click Session in the left top corner and select Serial. Set the serial port as the one you found in the previous step and bps. In the example case, it’s COM4 and 115200. Click OK.
Boot the board by pressing the boot switch as shown in Fig. 8.
Note that near the end some messages spill, so just press Enter couple of times, and you see that you need to login. Login as
rootwith Password:root.root@u96v2-sbc-base-2020-2:~#
Click plus sign to open up the local machine’s session(new tab). Type
ifconfigand find out the ip address and netmask assigned to the USB-ethernet device. Following is the example: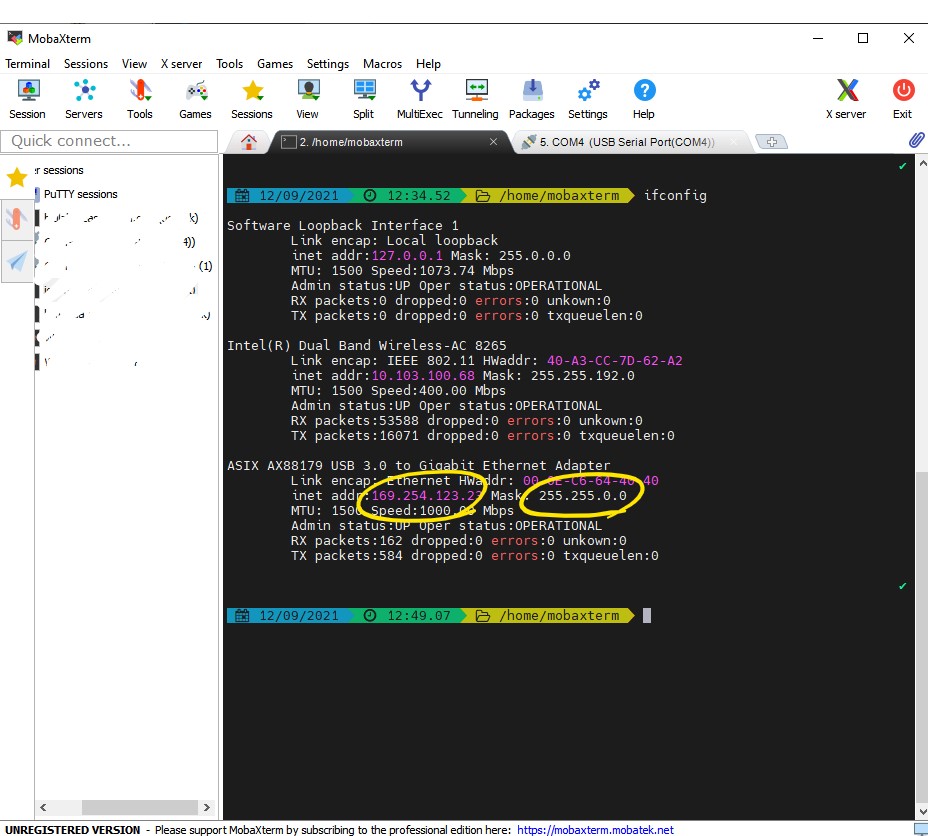
Fig. 10 ifconfig to find out your local machine’s ip#
Assign your Ultra96 an ip address on the same subnet as the USB-ethernet, e.g. from the previous step, the ip address of the local machine is
169.254.123.23and netmask is255.255.0.0. So, let’s assign the ultra96 to a ip of169.254.123.24(note that this is 24!) as follows: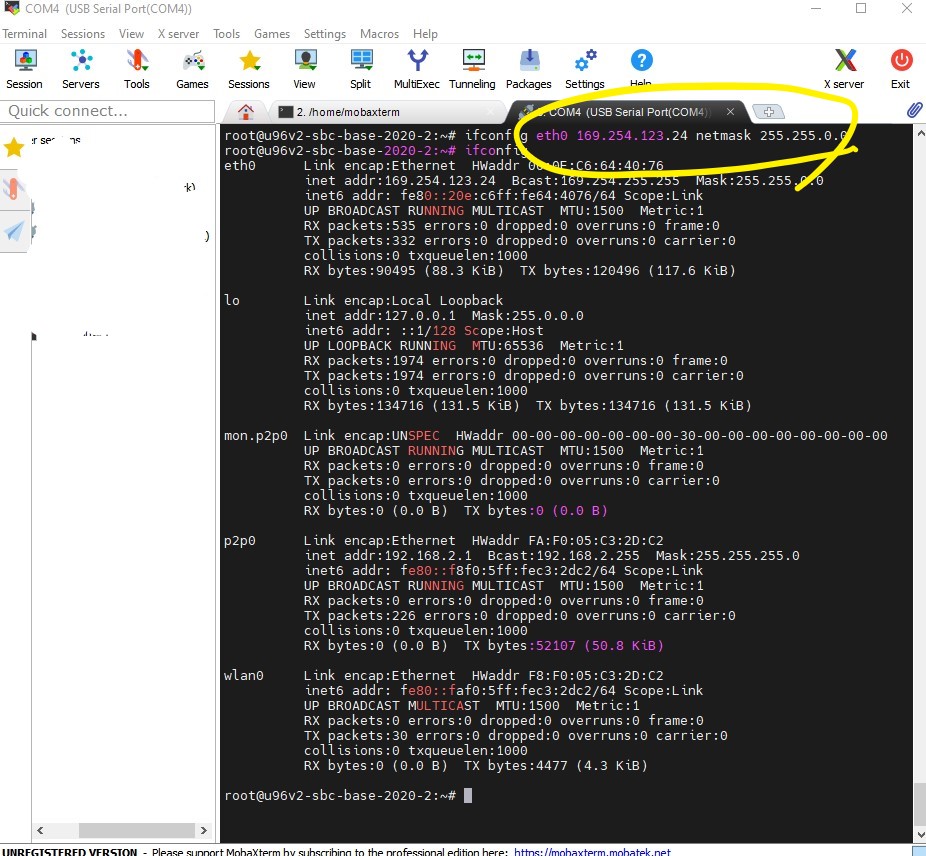
Fig. 11 Connect you machine and Ultra96#
Your devices are now connected. Go to the local machine’s tab and ssh into the Ultra96:
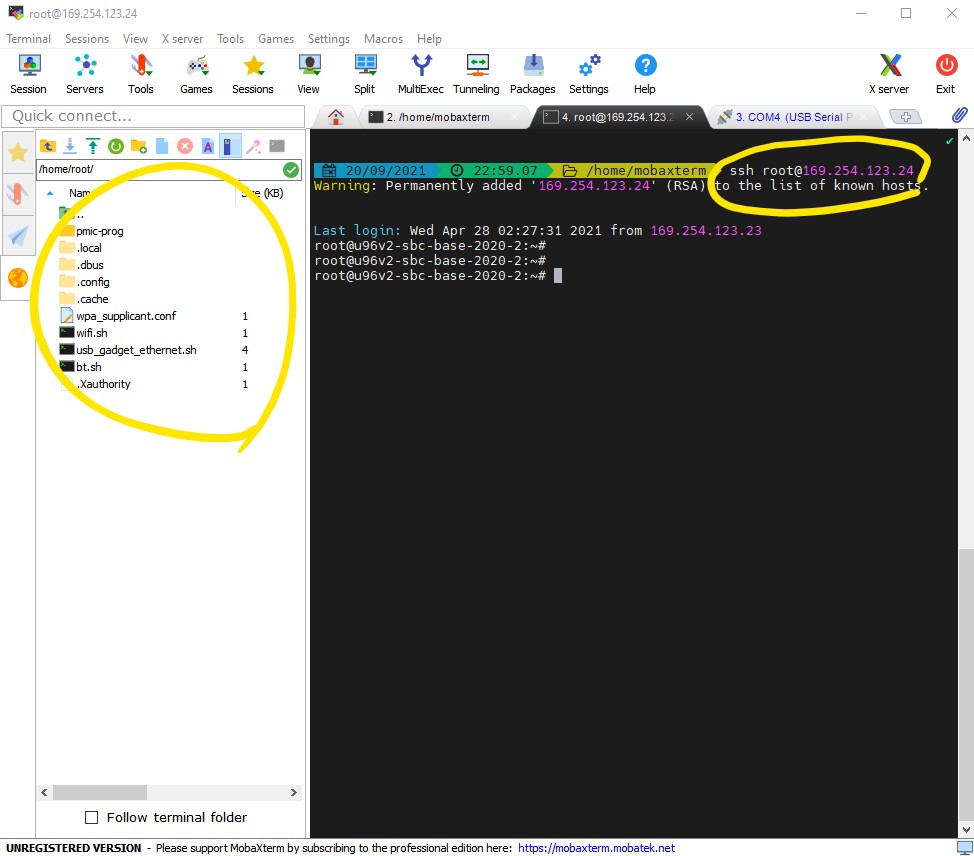
Fig. 12 ssh in to the Ultra96 and transfer files#
You can view the files of the Ultra96 on the left hand side. You can easily drag and drop files from/to the local machine to/from Ultra96.
Unfortunately, currently every time you boot your Ultra96, you will have to login via serial and configure the IP address, before you can connect via ssh. To fix this, create a new file on your host computer
.profile(make sure you don’t do this in your home directory, or else you may overwrite an existing one). In.profile, add the following:ifconfig eth0 put-your-ip-address-here netmask 255.255.0.0 alias ls="ls --color" alias ll="ls -laF --color"
Where
put-your-ip-address-hereis the ip you set in the previous step (in the example it was169.254.123.24). Then create another file (also not in your home directory), called.bashrc, and add the following:source .profileNext, drag and drop these files over to the Ultra96 in /home/root/. Now when the Ultra96 boots, you should be able to connect directly over ssh without having to configure the board via serial.