
Setup and Walk-through
Contents
Setup and Walk-through#
Hardware Acceleration#
To implement a hardware function, it will ultimately be necessary to perform low-level placement and routing of the hardware onto the FPGA substrate. That is, the tools must decide which particular instance of each primitive is used (placement) or which wires to use for connections (routing). These tasks are typically much slower (at least 20 minutes, can take hours) than the compilation time for software (a few minutes). This means you will need to plan your time carefully for this lab and for subsequent labs. One way to optimize our development time is to be careful about when we invoke low-level placement and routing and when we can avoid it. This lab and next will show you a few techniques that allow you to reduce the number of times you need to invoke low-level placement and routing and introduce simulation and emulation you can use validate your design before invoking low-level placement and routing.
In the homework, you could either use linux machines in Detkin/Ketterer or install Vitis locally. If you want to install Vitis locally, we expect that your computer has at least:
Linux OS
16 GB RAM
4 cores
70 GB free hard disk space If you want to install Vitis locally, follow the instructions in Installing Vitis 2020.2 on your Personal Computer(Linux OS). If you want to use Detkin/Ketterer machines, jump to Obtaining and Running the Code.
Installing Vitis 2020.2 on your Personal Computer(Linux OS)#
Note that Vitis is fully supported in Linux OS only. Follow the instructions below to install Vitis on your linux machine:
Go to this link and select 2020.2. Then, download Xilinx Unified Installer 2020.2: Linux Self Extracting Web Installer. Create an account with Xilinx if you don’t have one.
We found this video useful to install Vitis.
When selecting devices, selecting Zynq UltraScale+ MPSoC should be enough for this class.
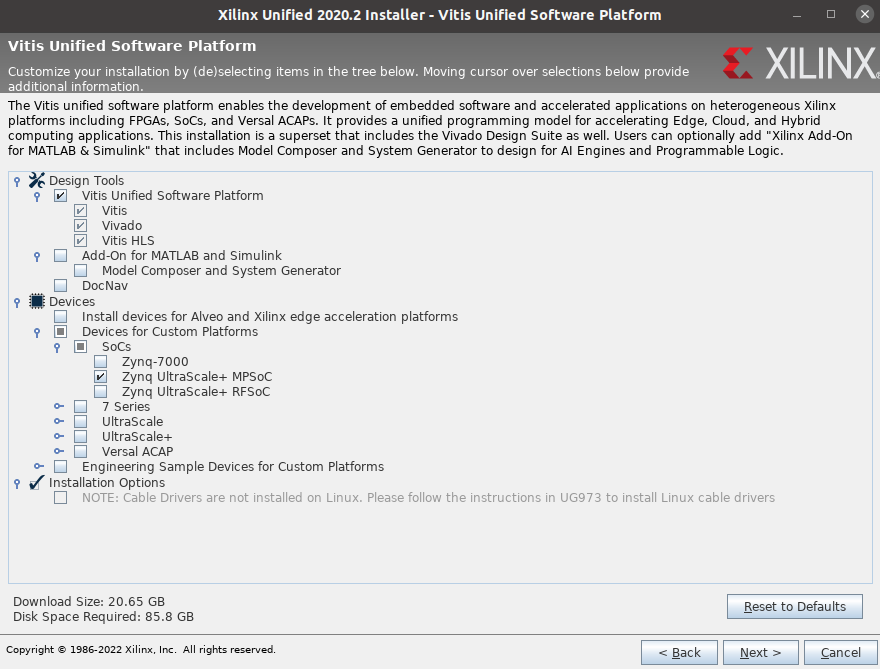
Fig. 18 Selecting devices when installing Vitis#
The full installation will take about 30 min - 1 hour.
Open the file
~/.bashrcin your terminal and add the following line. This is the license for using Vitis:export LM_LICENSE_FILE="2100@potato.cis.upenn.edu:1709@potato.cis.upenn.edu:1717@potato.cis.upenn.edu:27010@potato.cis.upenn.edu:27009@potato.cis.upenn.edu"
Do
source ~/.bashrcto update the terminal environment with this variable.You might need to issue the following commands if you encounter an error with
libtinfo:sudo apt update sudo apt install libtinfo-dev sudo ln -s /lib/x86_64-linux-gnu/libtinfo.so.6 /lib/x86_64-linux-gnu/libtinfo.so.5
As of January 1st 2022, there needs a patch. Download y2k22_patch-1.2.zip in this link. Follow the instructions to apply y2k22 patch. If need help on this, please contact TAs.
Get the Ultra96 platform from here. Scroll down and click Reference Designs tab. Then, click Ultra96-V2 – Vitis Platform 2020+ (Sharepoint site). Click 2020.2\(\rightarrow\)Vitis_Platform. Download u96v2_sbc_vitis_2020_2.tar.gz.
tar -xvzf u96v2_sbc_vitis_2020_2.tar.gz
Locate the extracted folder to wherever you want.
Obtaining and Running the Code#
In this homework, we will first run a matrix multiplication function on the cpu and then run the same matrix multiplication function on the FPGA.
Pull in the latest changes using:
cd ese532_code/
git pull origin master
The code you will use for homework submission
is in the hw5 directory. The directory structure looks like this:
hw5/
    sourceMe.sh
    xrt.ini
    common/
        Constants.h
        EventTimer.h
        EventTimer.cpp
        Utilities.cpp
        Utilities.h
    hls/
        MatrixMultiplication.h
        MatrixMultiplication.cpp
        Testbench.cpp
    Host.cpp
    Makefile
    u96_v2.cfg
sourceMe.shwill help you to source Xilinx toolsxrt.inidefines the options necessary for Vitis Analyzer.The
commonfolder has header files and helper functions.You will mostly be working with the code in the
hlsfolder. Thehls/MatrixMultiplication.cppfile has the function that gets compiled to a hardware function (known as a kernel in Vitis). TheHost.cppfile has the “driver” code that transfers the data to the fpga, runs the kernel, fetches back the result from the kernel and then verifies it for correctness.Read this tutorial to get an idea of how the Vitis flow works. Note that there are Data Center Platform and Embedded Platform. Our ultra96 board belongs to Embedded Platform.
We are now going to start working on the Homework Submission where we will follow a bottom-up approach and optimize our hardware function using Vitis HLS IDE first and then re-compile it and run it on the FPGA in the end. This tutorial will give you a basic idea on Vitis HLS.
Once you have 3i completed from the Homework Submission, proceed Building the code.
Building the code#
Make sure you have 3i completed from the Homework Submission.
Vitis flow consists of 1)compiling the host code, 2)generating kernel object(.xo file), 3)generating FPGA binary(.xclbin file), 4)packaging to a bootable image.
If you take a look at the Makefile, make all will execute steps specified above.
Because we already generated mmult.xo file, the command to generate Xilinx object file(.xo) is commented out.
Vitis compiler(v++) performs this step with --copmile flag, or -c for short.
You can also generate .xo file directly using Vitis HLS like we just did.
FYI, you can create .xo file from RTL code, too (obviously).
Next step, which is usually called “linking” step, calls Vivado to perform
logic synthesis, placement, and routing to generate a FPGA binary container file(.xclbin, Yes, this file encapsulates the bitstream that’s necessary to program the FPGA).
Vitis compiler(v++) performs this step with --link, or -l for short.
This step is the most time-consuming part in FPGA development on Vitis, and for this lab, it should take >20 minutes.
The last step is called “packaging” step and is done with --package, or -p for short.
This step packages your design and define various files required for booting/configuring the device.
Make sure that
mmult.xoexists in HW5 directory.Source settings to be able to run vitis:
source sourceMe.sh.If you work locally, source
settings64.shin vitis installation directory and doexport PLATFORM_REPO_PATHS=/PATH/TO/U96_V2_PLATFORM.(e.g.
export PLATFORM_REPO_PATHS=/home/user/ese5320/u96v2_sbc_base)make allto generate .xclbin file and bootable image. This process will take >20 minutes depending on your kernel design. If you are working in Detkin/Ketterer, make sure that you have enough space in your user directory so that the image file does not exceed the quota.Note
In
u96_v2.cfg, we commented out the profiling block. As mentioned in here, we can monitor data ports with Vitis Analyzer when the profiling is enabled. But it costs additional resources on the FPGA that makes the compilation longer, and we commented out for this assignment.Note
To increase the clock frequency, you first need to generate
.xofile targeting 200MHz(for example) in Vitis HLS. And you need to include a flag like--clock.defaultFreqHz 200000000when you do linking (v++ --link). Without the flag, the tool uses the default clock frequency for Ultra96, which is 150MHz.If you go through Vitis User Guide for useful flags/options, please make sure that they are applicable to the embedded platform. As mentioned earlier, there are datacenter platform and embedded platform; Ultra96 belongs to the embedded platform.
Environment Setup#
Setting up Ultra96 and Host Computer#
Your setup should look like Fig. 19 like we did in HW3 and HW4.
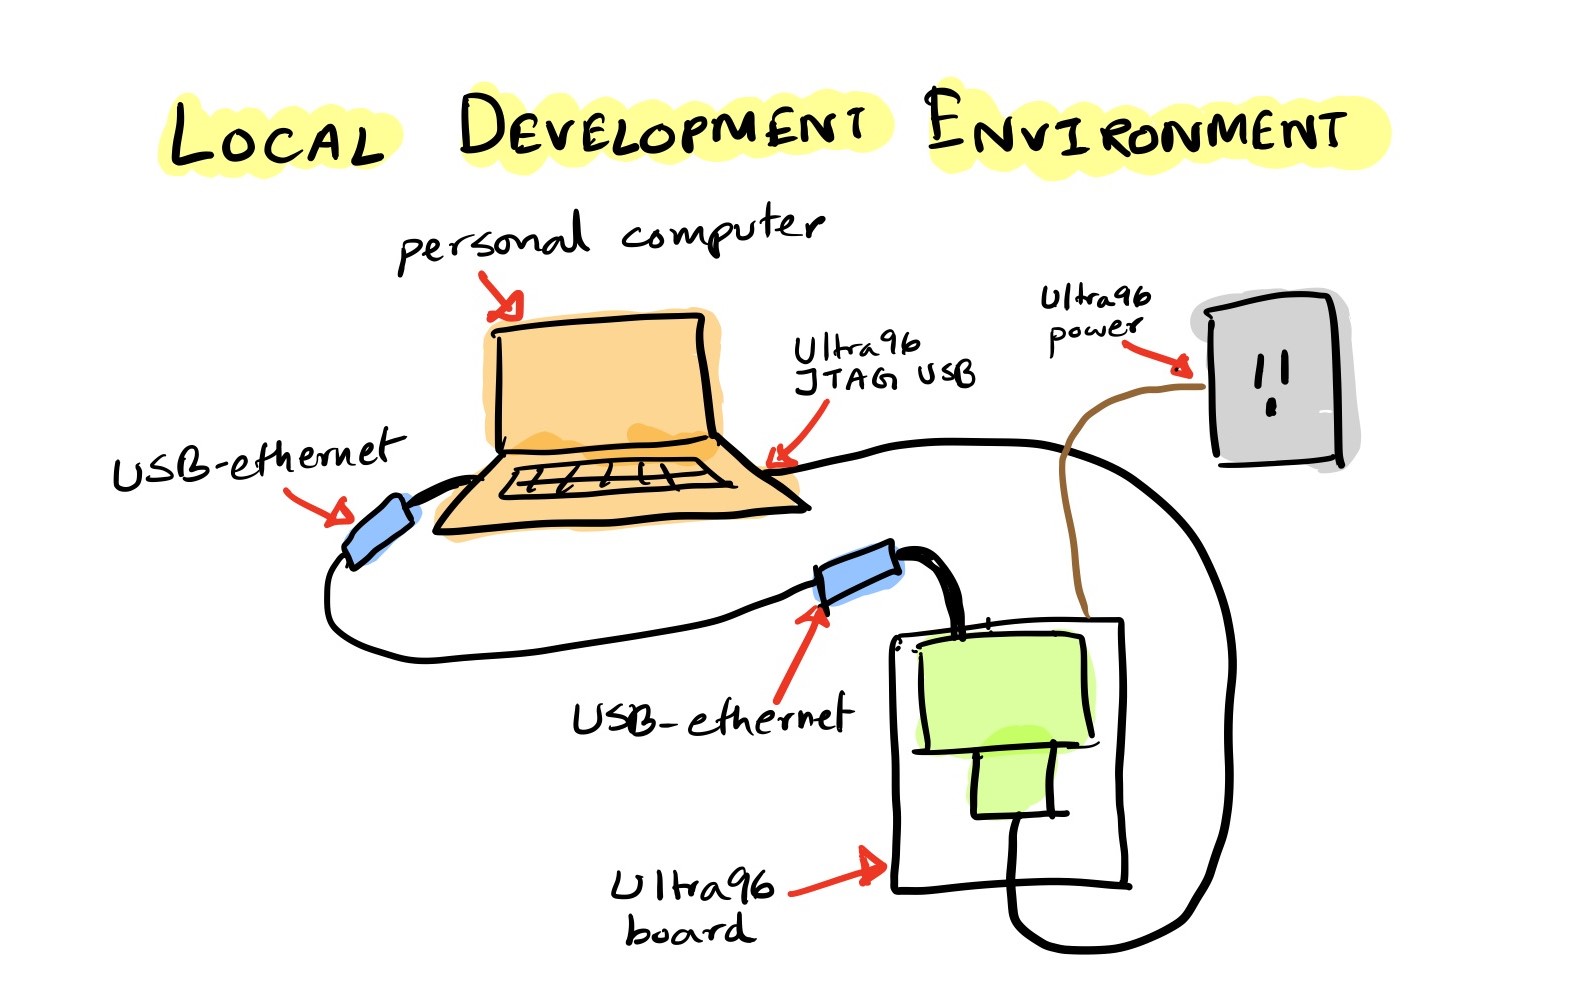
Fig. 19 Development Environment#
Run on the FPGA#
Write the SD Card Image (one time setup)#
Once the build has completed in Building the code section, you will see a generated package directory. e.g. hw5/package.
The package directory contains the following
files that we are interested in:
package/sd_card.img
package/sd_card/BOOT.BIN
package/sd_card/boot.scr
package/sd_card/image.ub
package/sd_card/host
package/sd_card/mmult.xclbin
If you are working in Detkin/Ketterer machines, we suggest you to copy files above to your
local machine and proceed. You can plug in USB disk to the Detkin/Ketterer machines and copy the
generated package directory over to your laptop. You can also use scp or WinSCP.
If another image is already written on your SD card(from HW3/HW4), delete the partitions. On Linux, you can do this from Disks application.
Write
sd_card.imgto your SD card.In Ubuntu 20.04, you can use
Startup Disk Creator.You can also use Rufus or balenaEtcher.
Once you finish writing the image to the SD card, slide it into your Ultra96’s SD card slot.
Note
We will only have to write our SD card image once. When we recompile our code, the files that will need to be updated are:
package/sd_card/BOOT.BIN
package/sd_card/boot.scr
package/sd_card/image.ub
package/sd_card/host
package/sd_card/mmult.xclbin
We will copy those files to the running board using scp.
We will then reboot the board, which will load the updated
boot files. The boot files contain the bitstream, which
reconfigures the Programmable Logic of the Ultra96. Hence,
we need a reboot. If you copy the files, but don’t do a reboot,
you will see that your program throws an error.
Note
If your Ultra96 is connected to a different machine from the one where you are running Vitis (e.g., you are running Vitis on a Detkin machine, but your Ultra96 is connected to your laptop), you will need to first copy the files from the Vitis machine(Detkin machine) to the Ultra96-host machine(your laptop) and then copy them from the Ultra96-host(your laptop) to the Ultra96.
Caution
Make sure you don’t hot plug/unplug the SD card. This can potentially corrupt the SD card/damage the board. Always shut down the device first and then insert/take out the SD card. You can shut down the device by typing “poweroff” in the serial console of the device.
Boot the Ultra96#
Boot the ultra96 as we did in HW3 and HW4. Login as
rootwith Password:root.On the serial console, you can now run your code as follows:
cd /media/sd-mmcblk0p1
export XILINX_XRT=/usr
./host mmult.xclbin
You should see the log message that the xclbin file is being loaded.
Loading: 'mmult.xclbin'
In the last line of the log message, you should see the testing message.
TEST PASSED
You should see the generated files:
mmult.xclbin.run_summary
profile_summary.csv
timeline_trace.csv
To generate these files, you need to have
xrt.iniin the same directory that you run./host mmult.xclbinon. If you uncomment the profiling block inu96_v2.cfgwhen you build for.xclbin, you will be able to get additional information in these*.csvfiles.Copy these files to your computer by issuing the following command. Modify the command with the username of your computer and the directory you want to put the files in.
scp mmult.xclbin.run_summary timeline_trace.csv profile_summary.csv YOURNAME@10.10.7.2:/YOUR_DIR/
If you are using Detkin/Ketterer machines, copy these files to Detkin/Ketterer machines and run Vitis Analayzer in your host computer to view the trace by doing:
vitis_analyzer ./mmult.xclbin.run_summary
As stated in the note above, when you modify your HLS code, that will cause the hardware to change, and hence the following files(regenerated) will need to be copied to the
/media/sd-mmcblk0p1directorypackage/sd_card/BOOT.BIN package/sd_card/boot.scr package/sd_card/image.ub package/sd_card/host package/sd_card/mmult.xclbin
After you copy these files, type
rebootin the serial console and that will reprogram the device.When you only modify your host code, you don’t have to copy any of the files mentioned above and only neeed to copy the OpenCL host binary, which is
hostin this example. You also don’t need to reboot the device in that case.
This concludes a top-down walk-through of the steps involved in running a hardware function on the Ultra96.