
2. Setup and Walk-through
Warning
Make sure to stop your Amazon instances! We only have $150 of credits and we need it to last through Homework 7. You may need to take a long break during a homework, or you might take longer to read about something on google/stackoverflow; remember to stop your instance and restart it when you are ready to continue.
2.1. Linux vs Bare-Metal
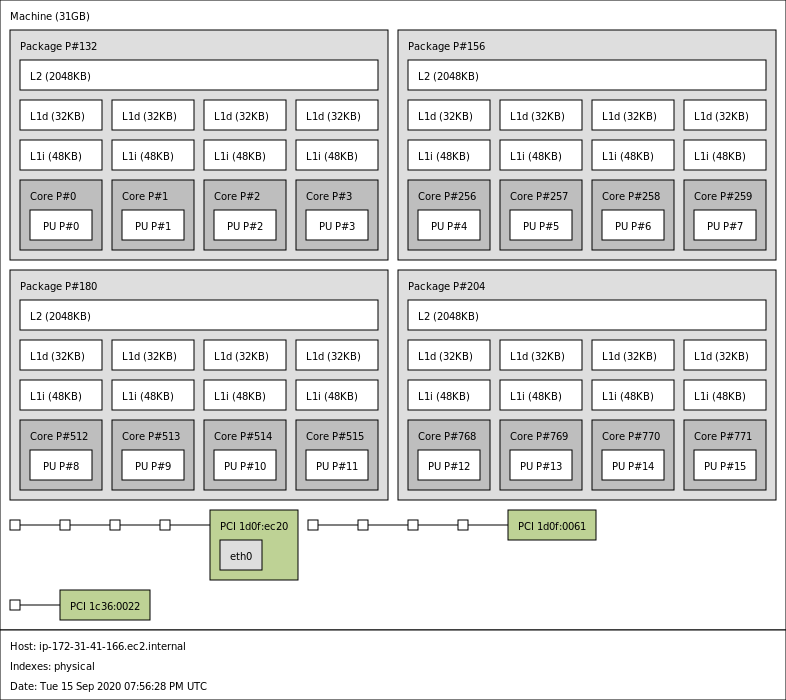
Fig. 2.1 Amazon a1.metal instance
We will divide the computation into threads that run on different processors. Fig. 2.1 shows the machine we will be running on, where we will be utilizing four cores out of the 16 cores available. We will be running these threads on the Linux OS and hence, all the heavy lifting of sharing main memory global address is taken care of by the OS.
However, in a bare-metal system:
we would have to map the main memory (DRAM) into the address spaces of each processors. Only then can the processors distribute and coordinate the work (which involves communicating pointers to shared memory areas and synchronization).
in order to share data, the processors in the bare-metal system must agree on the location and organization of the data.
we must make sure that the processors respect each other’s private memory areas. We can do that in a bare-metal system by mapping private code and data of individual processors at different locations.
Sharing DRAM is complicated by the fact that DRAM is cached in L1 and L2 caches. Data that one processor attempts to write to DRAM may not have been written to shared DRAM yet, but instead remain in the private L1 cache of the processor. When another processor reads the same memory location, it may observe an old value. Fortunately, our ARM processors (and the Zynq we will later use) have a Snoop Control Unit, which bypasses data directly between processors as needed to maintain a consistent view of the DRAM. Therefore, this is no concern.
Another problem that we face when we communicate via shared memory is that
the reading processor should not start reading the memory until the writing
processor has completed writing the data. In other words, we need a form
of synchronization between the cores. Design of synchronization functions
is a rather complex subject, which is dealt with in other courses such as
CIS 471 or CIS 505. In this assignment, we will use the APIs of std::thread
to accomplish synchronization between cores. We will show you exactly how to
use these APIs in the following sections, but if you would like to learn about
std::threads, here are some useful links:
If you prefer a book, refer to C++ Concurrency in Action by Anthony D. Williams.
2.2. Obtaining and Running the Code
In the previous homework, we dealt with a streaming application that compressed only one picture. For this homework, we will use the same application, except that it will take a video stream instead of a single picture.
We will also use a a1.metal instance. Amazon AWS
instances are usually virtual machines—meaning the underlying
hardware might not necessarily reside on a single machine. The
*.metal instances guarantee that the user application has
full access to the hardware (all cpus and rams). Since
we want to see performance scaling as we use more cores, we have
to use the a1.metal. You could run the same code on other
instances, but you might not necessarily see the performance
scaling.
Important
The a1.metal instance costs $0.408 per hour. So be mindful
of that and your credit usage.
Create an
a1.metalinstance following Getting Started on Amazon EC2. The setup should be exactly the same, except for choosinga1.metalas your instance type.Login to your
a1.metalinstance and clone theese532_coderepository using the following command:git clone https://github.com/icgrp/ese532_code.git
If you already have it cloned, pull in the latest changes using:
cd ese532_code/
git pull origin master
The code you will use for homework submission is in the
hw3directory. The directory structure looks like this:hw3/ assignment/ Makefile Walkthrough.cpp common/ App.h Constants.h Stopwatch.h Utilities.h Utilities.cpp baseline/ App.cpp Compress.cpp Differentiate.cpp Filter.cpp Scale.cpp coarse_grain/ ... pipeline_2_cores/ ... pipeline_4_cores/ ... data/ Input.bin Golden.bin
There are four parts to the homework. You can build all of them by executing
make allin thehw3/assignmentdirectory. You can build separately by:make baseand run./baseto run the baseline project.make coarseand run./coarseto run the coarse-grain project.make pipeline2and run./pipeline2to run the pipeline project on 2 cores.make pipeline4and run./pipeline4to run the pipeline project on 4 cores.
The
datafolder contains the input data,Input.bin, which has 100 frames of size \(960\) by \(540\) pixels, where each pixel is a byte.Golden.bincontains the expected output. Each program uses this file to see if there is a mismatch between your program’s output and the expected output.The
assignment/commonfolder has header files and helper functions used by the four parts.You will mostly be working with the code in the rest of the folders.
2.3. Working with Threads
2.3.1. Basics
Consider the following code:
#include <iostream>
#include <thread>

void my_function(int a, int b, int&c) {
    c = a + b;
}

int main() {
    int a = 2;
    int b = 3;
    int c;
    my_function(2, 3, c);
    std::cout << "a+b=" << c << std::endl;
}
What thread do you think this code is running on? Let’s find out. Adding a little bit more to the code:
#include <iostream>
#include <thread>

// gets the thread id of the main thread
std::thread::id main_thread_id = std::this_thread::get_id();

// checks if running on main thread using the id
void is_main_thread() {
  if ( main_thread_id == std::this_thread::get_id() )
    std::cout << "This is the main thread." << std::endl;
  else
    std::cout << "This is not the main thread." << std::endl;
}

void my_function(int a, int b, int&c) {
    c = a + b;
}

int main() {
    int a = 2;
    int b = 3;
    int c;
    my_function(2, 3, c);
    std::cout << "a+b=" << c << std::endl;
    is_main_thread();
}
The output is:
a+b=5
This is the main thread.
Can we be really sure? Let’s add a little bit more:
#include <iostream>
#include <thread>

// gets the thread id of the main thread
std::thread::id main_thread_id = std::this_thread::get_id();

// checks if running on main thread using the id
void is_main_thread() {
  if ( main_thread_id == std::this_thread::get_id() )
    std::cout << "This is the main thread." << std::endl;
  else
    std::cout << "This is not the main thread." << std::endl;
}

void my_function(int a, int b, int&c) {
    c = a + b;
}

int main() {
    int a = 2;
    int b = 3;
    int c;
    my_function(a, b, c);
    std::cout << "a+b=" << c << std::endl;
    is_main_thread();

    // create a new thread, note it's not running
    // anything yet.
    std::thread th;

    // construct the thread to run is_main_thread
    // note, as soon as you construct it, the thread
    // starts running.
    // You could create and run at the same time
    // by writing: std::thread th(is_main_thread);
    th = std::thread(is_main_thread);

    // wait for the thread to finish.
    th.join();
}
The output is:
a+b=5
This is the main thread.
This is not the main thread.
From the above, we learned:
#include <thread>to use thread.don’t construct a thread if you don’t want to run it immediately, i.e. just declare it.
thread starts running as soon as we construct it, i.e. give it a function to run.
th.join()is a blocking call and waits for the thread to finish at the point of the program where it’s called.we are running on the
mainthread by default.
We have 16 cores in a1.metal instance. By default,
the linux scheduler will schedule our threads into one of these
cores. What if we know what we are doing and want full
control over assigning a specific thread to run on a
specific core? Let’s learn how to do that.
We have given you two functions:
void pin_thread_to_cpu(std::thread &t, int cpu_num);
void pin_main_thread_to_cpu0();
They are declared and defined in common/Utilities.h and
common/Utilities.cpp. Adding to our previous example:
#include <iostream>
#include <thread>
#include "Utilities.h"

// gets the thread id of the main thread
std::thread::id main_thread_id = std::this_thread::get_id();

// checks if running on main thread using the id
void is_main_thread() {
  if ( main_thread_id == std::this_thread::get_id() )
    std::cout << "This is the main thread." << std::endl;
  else
    std::cout << "This is not the main thread." << std::endl;
}

void my_function(int a, int b, int&c) {
    c = a + b;
}

int main() {
    // Assign main thread to cpu 0
    pin_main_thread_to_cpu0();

    int a = 2;
    int b = 3;
    int c;
    my_function(a, b, c);
    std::cout << "a+b=" << c << std::endl;
    is_main_thread();

    // create a new thread, note it's not running
    // anything yet.
    std::thread th;

    // construct the thread to run is_main_thread
    // note, as soon as you construct it, the thread
    // starts running.
    // You could create and run at the same time
    // by writing: std::thread th(is_main_thread);
    th = std::thread(is_main_thread);

    // Assign our thread to cpu 1.
    pin_thread_to_cpu(th, 1);

    // wait for the thread to finish.
    th.join();
}
Note
The pin_thread_to_cpu APIs we have given you, only
works on Linux. For MacOS and Windows, we let the scheduler
choose the core. So if you are prototyping on your local
machine, keep it in mind.
Last thing we need to know is how to pass function and their arguments to threads? Modifying our example:
#include <iostream>
#include <thread>
#include "Utilities.h"

// gets the thread id of the main thread
std::thread::id main_thread_id = std::this_thread::get_id();

// checks if running on main thread using the id
void is_main_thread() {
  if ( main_thread_id == std::this_thread::get_id() )
    std::cout << "This is the main thread." << std::endl;
  else
    std::cout << "This is not the main thread." << std::endl;
}

void my_function(int a, int b, int&c) {
    c = a + b;
    std::cout << "From thread id:"
            << std::this_thread::get_id()
            << " a+b=" << c << std::endl;
}

int main() {
    // Assign main thread to cpu 0
    pin_main_thread_to_cpu0();

    int a = 2;
    int b = 3;
    int c;
    my_function(a, b, c);
    is_main_thread();

    // create a new thread, note it's not running
    // anything yet.
    std::thread th;

    // construct the thread to run is_main_thread
    // note, as soon as you construct it, the thread
    // starts running.
    // You could create and run at the same time
    // by writing: std::thread th(is_main_thread);
    th = std::thread(is_main_thread);

    // Assign our thread to cpu 1.
    pin_thread_to_cpu(th, 1);

    // wait for the thread to finish.
    th.join();

    std::thread th2(&my_function, a, b, std::ref(c));
    th2.join();
}
The output is:
From thread id:0x114275dc0 a+b=5
This is the main thread.
This is not the main thread.
From thread id:0x700001055000 a+b=5
From the above, we learned:
the first argument to constructing a thread is a callback function. This callback can be a function object (as we see in
th), a function pointer (as we see inth2) or a lambda function.the rest of the arguments are the inputs to the function. They are passed-by-value by default (i.e.
aandbare copied). Hence, if you need to pass something by reference (as we seeint& cinmy_function), you have to wrap it instd::ref.
This concludes everything you need to know about std::threads to
complete this homework. You can run the full walk-through by
make walkthrough and ./walkthrough.
2.3.2. Coarse-grain
The coarse-grain part of the homework shows you how you can process
a data parallel function with threads. We show how you change the
Scale function to process it with two threads:
void Scale_coarse(const unsigned char *Input, unsigned char *Output, int Y_Start_Idx, int Y_End_Idx)
{
  for (int Y = Y_Start_Idx; Y < Y_End_Idx; Y += 2)
  {
    for (int X = 0; X < INPUT_WIDTH_SCALE; X += 2)
    {
      Output[(Y / 2) * INPUT_WIDTH_SCALE / 2 + (X / 2)] = Input[Y * INPUT_WIDTH_SCALE + X];
    }
  }
}
From the code, you can see that we added two additional arguments at the function signature, which is then used in the for loop. This helps us realize the data parallel behavior of the function and let multiple threads work on it:
...
for (int Frame = 0; Frame < FRAMES; Frame++)
  {
    std::vector<std::thread> ths;
    ths.push_back(std::thread(&Scale_coarse, Input_data + Frame * FRAME_SIZE, Temp_data[0], 0, INPUT_HEIGHT_SCALE / 2));
    ths.push_back(std::thread(&Scale_coarse, Input_data + Frame * FRAME_SIZE, Temp_data[0], INPUT_HEIGHT_SCALE / 2, INPUT_HEIGHT_SCALE));

    pin_thread_to_cpu(ths[0], 0);
    pin_thread_to_cpu(ths[1], 1);

    for (auto &th : ths)
    {
      th.join();
    }
    ...
As we can see from the code above, two threads are launched in parallel. One
processes indices [0, 270) and the other processes [270, 540).
If you wanted to use three threads, you can split the indices as [0,180),
[180, 360) and [360, 540) and invoke another thread and pin it to cpu 3.
2.3.3. Pipeline
The pipeline part of the homework shows you how you can orchestrate the launching of threads and achieve pipeline parallelism. Start reading from the main function, where we launch a process on cpu 0:
for (int Frame = 0; Frame < FRAMES + 2; Frame++)
  {
    core_0_process(std::ref(Size), Frame, Input_data, Temp_data, Output_data);
  }
Following a top-down approach, look into core_0_process function:
void core_0_process(int &Size,
                    int Frame,
                    unsigned char *Input_data,
                    unsigned char **Temp_data,
                    unsigned char *Output_data)
{
  static unsigned char temp_core_0[FRAME_SIZE];
  static unsigned char *Input_data_core_0 = temp_core_0;
  std::thread core_1_thread;
  if (Frame < FRAMES + 1)
  {
    // current core (core 0) spins up process on core 1
    core_1_thread = std::thread(&core_1_process,
                                Frame,
                                Input_data,
                                Temp_data);
    pin_thread_to_cpu(core_1_thread, 1);
  }

  // core 0 does its job
  if (Frame > 1)
  {
    Filter_vertical(Input_data_core_0, Temp_data[2]);
    Differentiate(Temp_data[2], Temp_data[3]);
    Size = Compress(Temp_data[3], Output_data);
  }
  // waits for core 1 to finish
  if (Frame < FRAMES + 1)
  {
    core_1_thread.join();
  }

  unsigned char *Temp = Temp_data[1];
  Temp_data[1] = Input_data_core_0;
  Input_data_core_0 = Temp;
}
Pay special attention to the guards—if (Frame < FRAMES + 1) and
if (Frame > 1), and figure out if a code executes or not or
is waiting on another core to finish. Keep following the code
like this and you will realize how we mapped the functions
for the pipelining on 2 cores and pipelining on 4 cores part of the
homework. In summary:
for pipelining on 2 cores, we map
Scaleand parts ofFilteron core 1 and then the rest ofFilter,DifferentiateandCompresson core 2.for pipeline on 4 cores, we map
Scaleon core 2,Filter_horizontalon core 1, andFilter_vertical,DifferentiateandCompresson core 0. We left an empty prototype function that you can use to change the mapping and utilize core 3.
You will also realize how the data flows and how the pipeline
fills and drains. Lastly, pay special attention to the static in
static unsigned char of the processes in the pipeline code.
Remember that static keyword in a block scope changes the
storage class of a variable, i.e. the lifetime of the variable
is until the program stops executing. This is especially important
since being able to use old data while new data is being produced
is key to achieving the pipeline parallelism.
Warning
Make sure to stop your Amazon instances! We only have $150 of credits and we need it to last through Homework 7. You may need to take a long break during a homework, or you might take longer to read about something on google/stackoverflow; remember to stop your instance and restart it when you are ready to continue.