
2. Setup and Walk-through
Warning
Make sure to stop your Amazon instances! We only have $150 of credits and we need it to last through Homework 7. You may need to take a long break during a homework, or you might take longer to read about something on google/stackoverflow; remember to stop your instance and restart it when you are ready to continue.
2.1. Environment Setup
2.1.1. Setting up Ultra96 and Host Computer
We have provided you with:
An Ultra96 board with a power cable and a JTAG USB cable
2 USB-ethernet adapters
1 ethernet cable
1 SD card and an SD card reader
USB-C to USB 3.1 adaptor (for those of you who only have USB-C ports in your computer)
Note
Some of you might be receiving the boards disassembled. In that case, make sure you have set the board in SD card mode as follows:
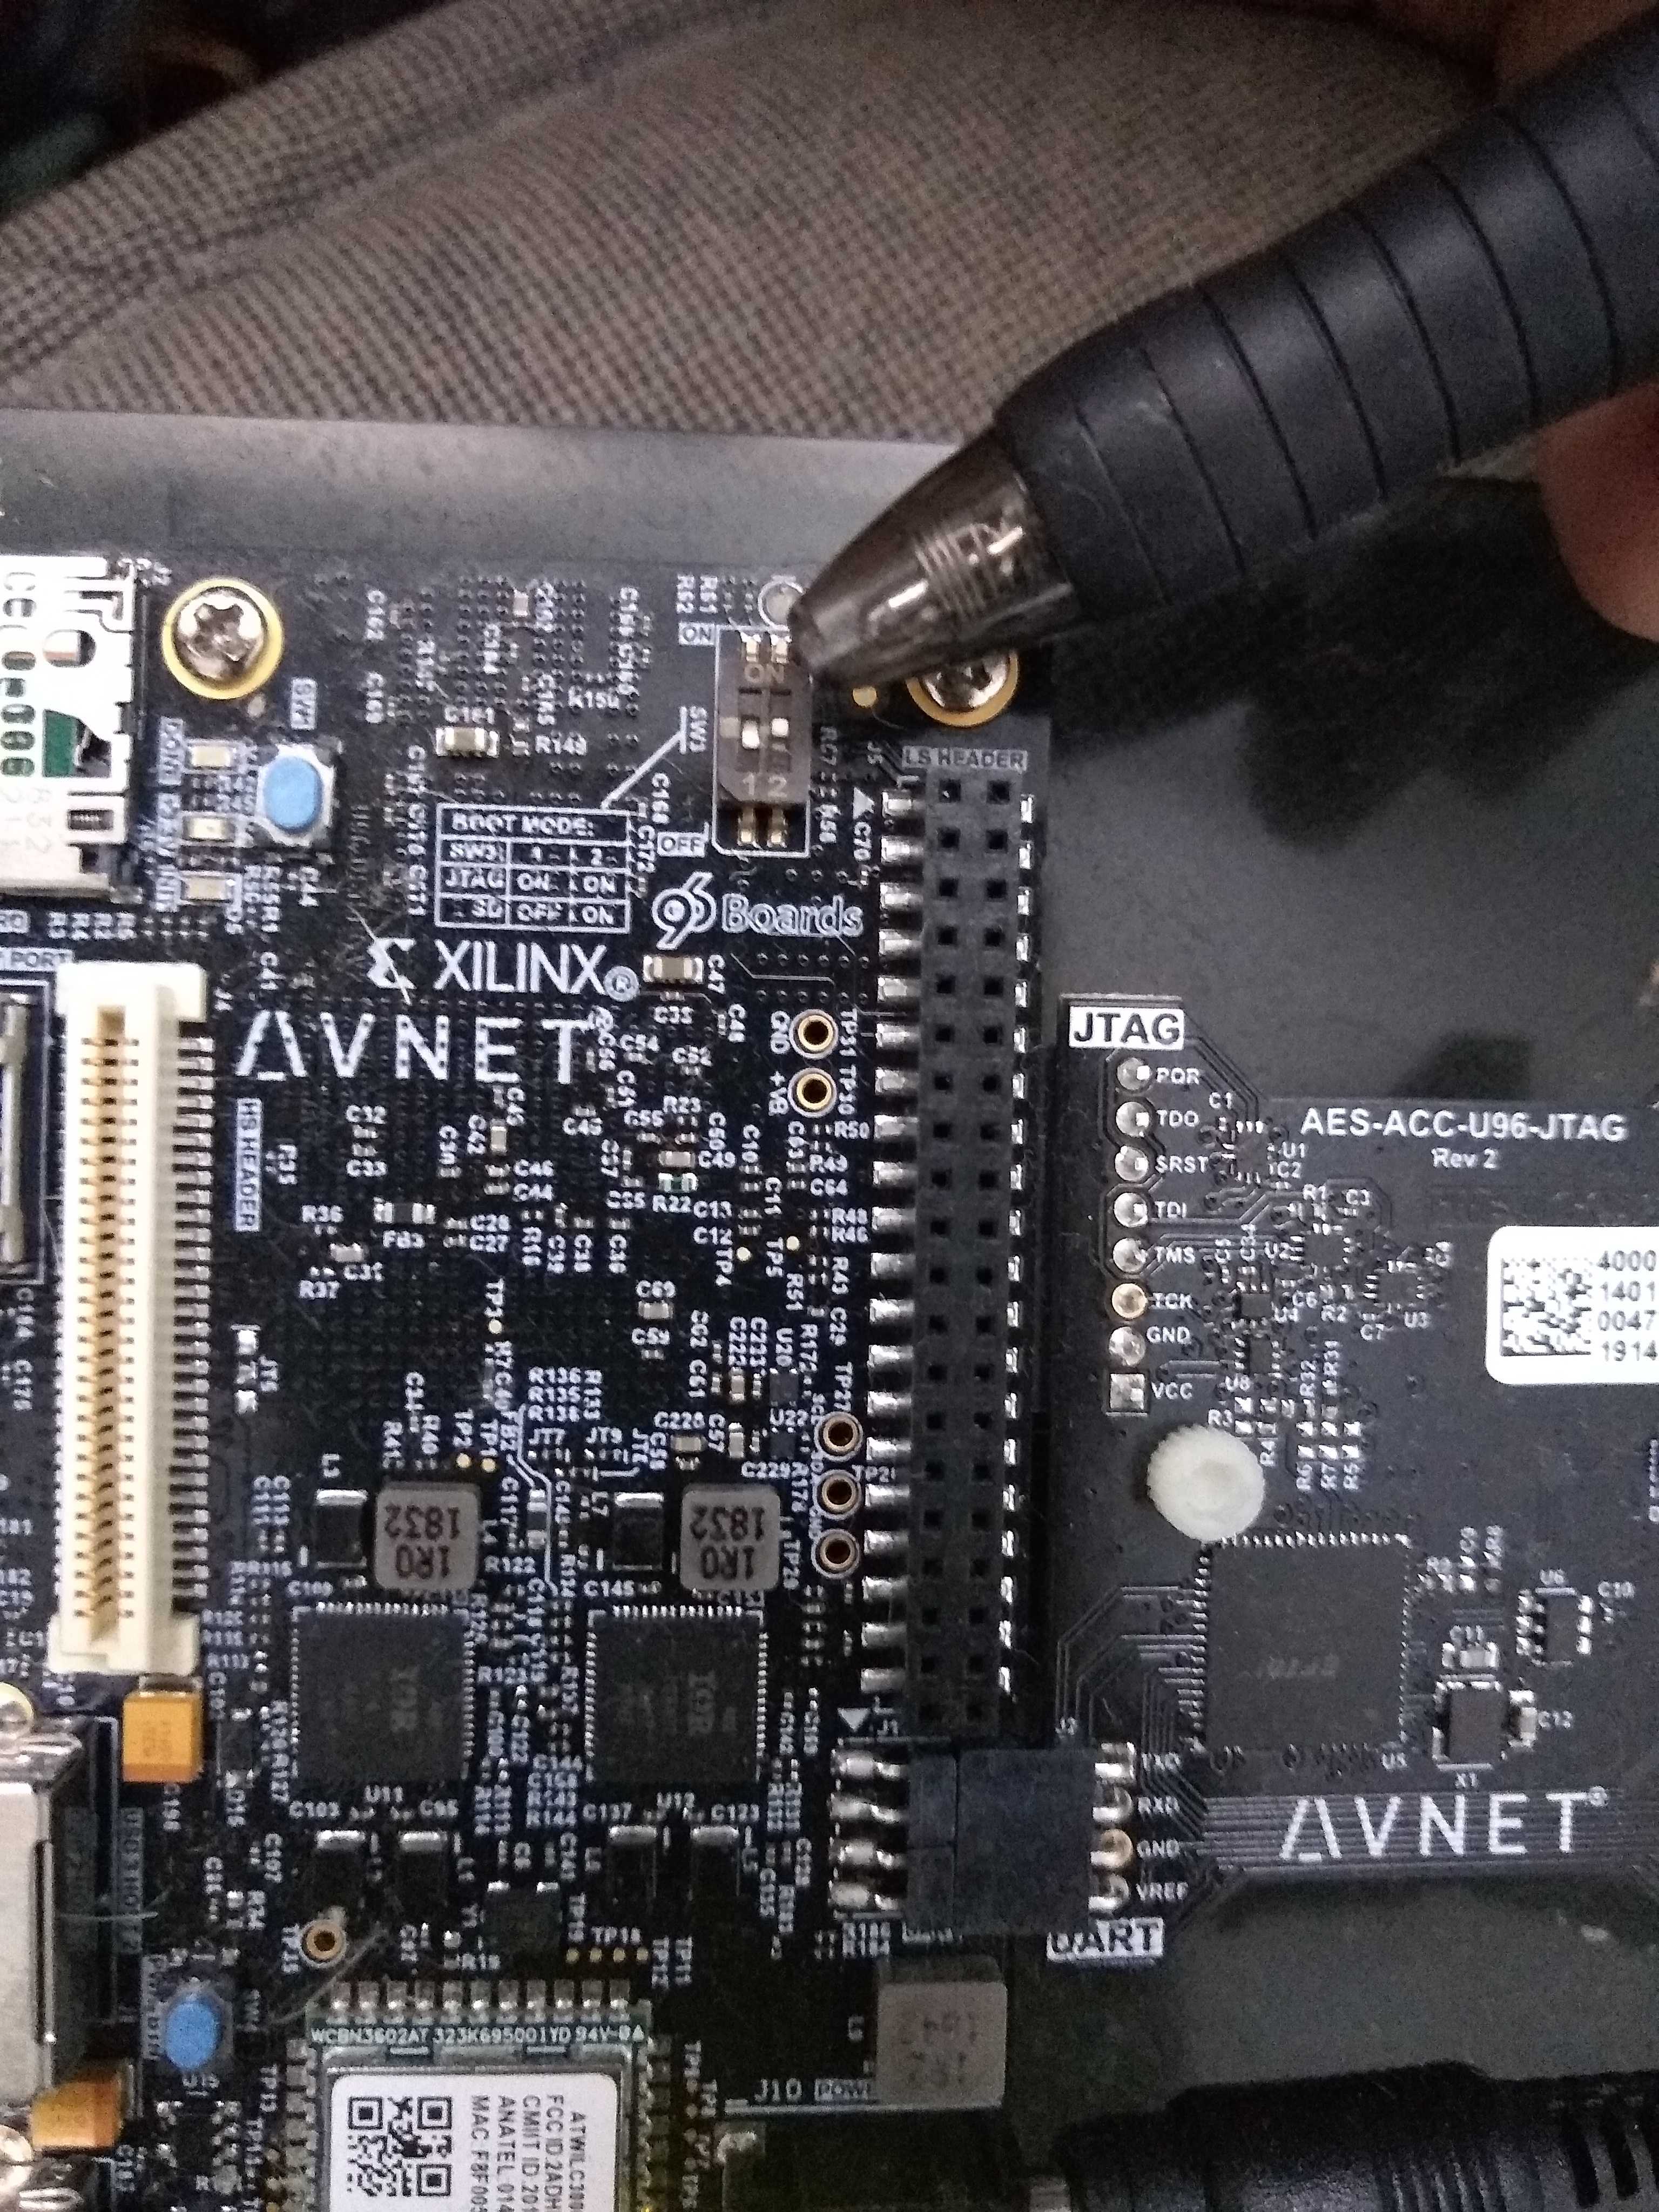
Fig. 2.3 SD card mode. 1 is OFF and 2 is ON at SW3.
And also make sure you have properly connected the JTAG module as follows:
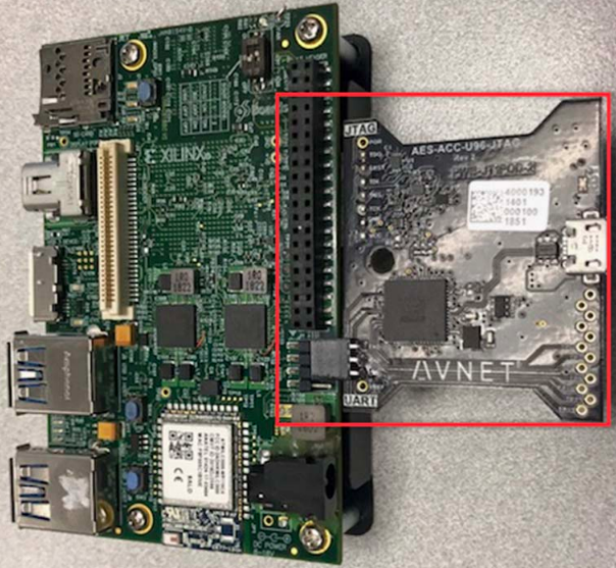
Fig. 2.4 JTAG module
Caution
Be cautious with ESD protection when using this board with Ultra96. The Ultra96 has exposed pins on the UART and JTAG headers. Be careful not to touch these pins or the circuits on the Pod when plugging the boards together - http://www.zedboard.org/product/ultra96-usb-jtaguart-pod
We expect you have a personal computer. If you intend to install Vitis locally, we expect that your computer has at least:
16 GB RAM
4 cores
70 GB free hard disk space
Otherwise, our suggestion is that you compile your code either on AWS or Biglab (shown later) and then later copy the binaries to your personal computer, copy them into the board and finally run them on the board.
In the end, your setup should look like Fig. 2.5. We will be using this setup for the rest of the semester.
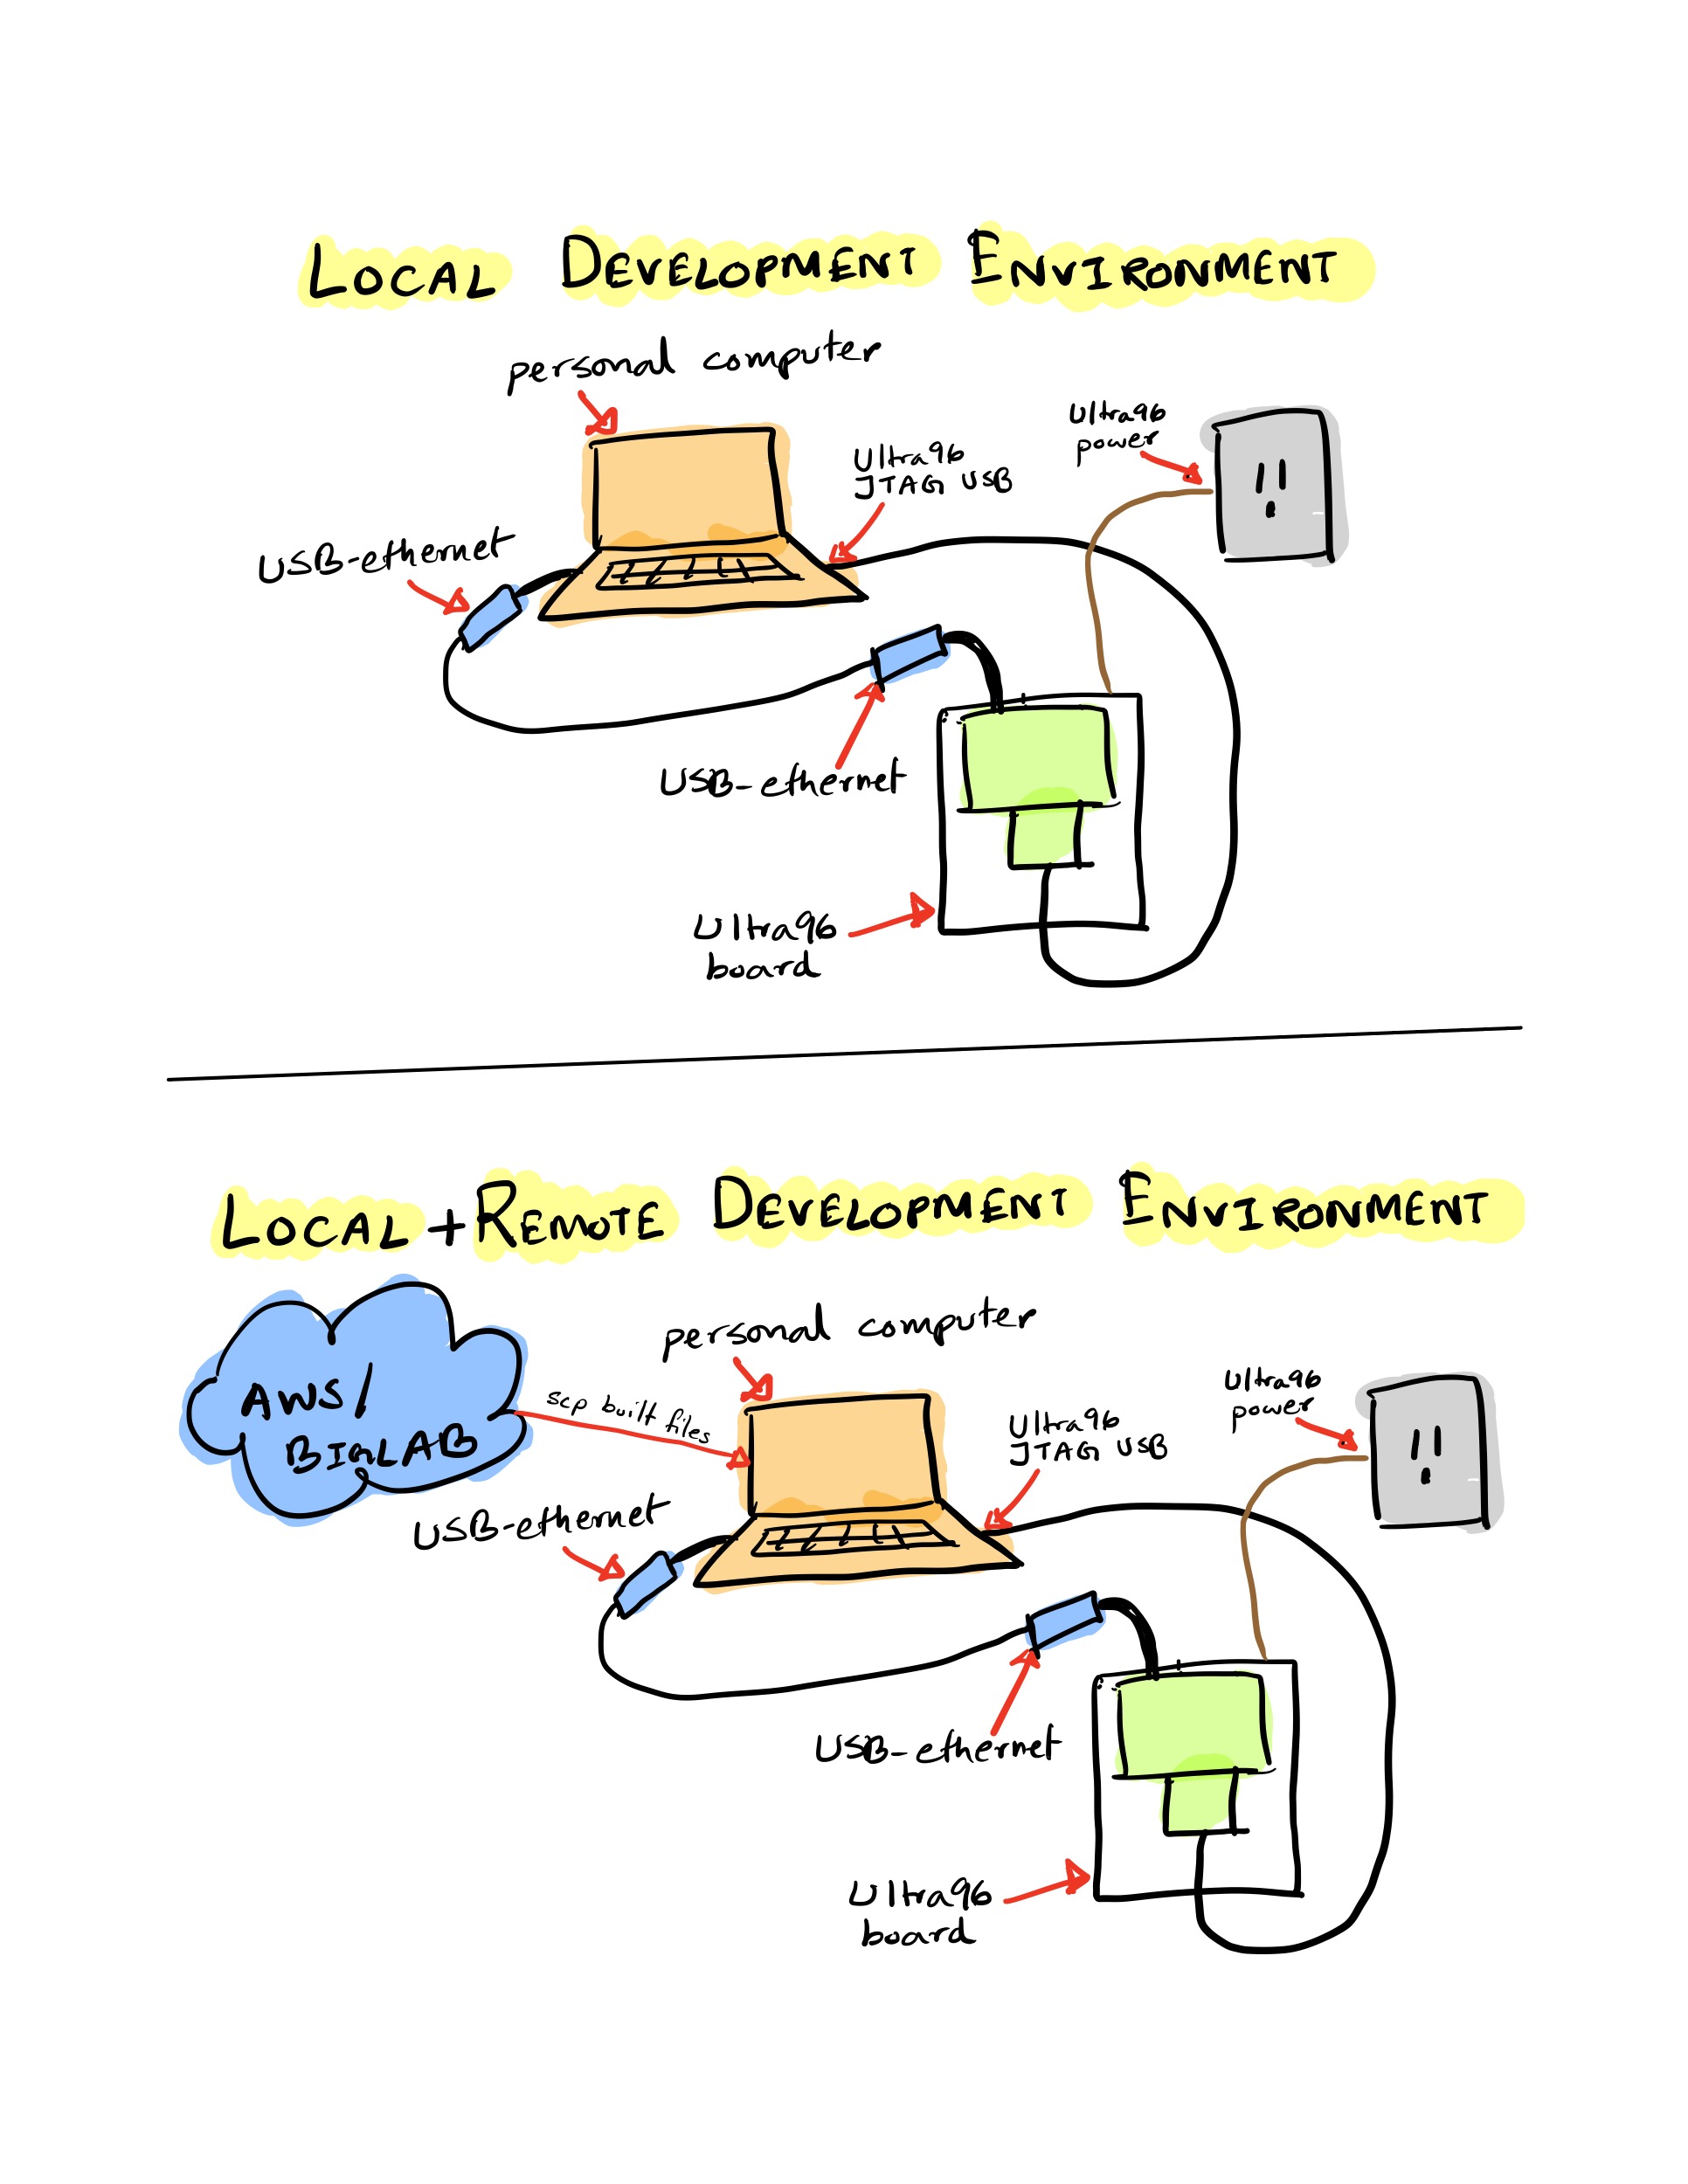
Fig. 2.5 Development Environment
2.1.2. Setting up the Build Machine
There are 3 ways you can run Vitis 2020.1. Any of them will work and have pros and cons. You can use a mix of them.
2.1.2.1. Installing Vitis 2020.1 on your Personal Computer
Running Vitis on your local computer will likely be the best interactive experience with the GUI. However, it will take more time and effort (and disk space) to get it setup. Ultimately, we recommend you set it up, but the other two options means that getting it setup on your local computer does not need to be in your critical path to starting to use the Ultra96.
Note that Vitis only supports Windows and Linux. Although you can use Windows, we strongly suggest you install linux, since we developed our homework code on Linux (Ubuntu 20.04). We won’t be able to help you if you encounter unexpected bugs and issues with tools that may arise from using a different OS. For MacOS users, you have no choice other than installing Vitis in a Virtual Machine. Following are two tutorials we have on setting up a virtual machine. Use Ubuntu 20.04 and the use the instructions below to install Vitis (the tutorials install SDSoC and you should not install that) on your virtual machine:
Follow the instructions below to install Vitis on your personal computer or in your linux virtual machine:
Download Xilinx Unified Installer 2020.1: Linux Self Extracting Web Installer. Create an account with Xilinx if you don’t have one.
Open a terminal and use the following command:
chmod +x Xilinx_Unified_2020.1_0602_1208_Lin64.bin
Extract the installer:
./Xilinx_Unified_2020.1_0602_1208_Lin64.bin --noexec --target ./xilinx-installer
Login with your Xilinx account:
./xsetup -b AuthTokenGen
Type the email you have registered for xilinx and press enter. Type the password and press enter - the command from step 4 completes with
Saved authentication token file successfully.Save the attached
ese532_install_config.txtand add your preferred installation location in theDestinationfield. The default location is/opt/Xilinx.Start the installation with the following command:
./xsetup -b Install -a XilinxEULA,3rdPartyEULA,WebTalkTerms -c ese532_install_config.txt
The full installation will take about 30 min - 1 hour.
Open the file
~/.bashrcin your terminal and add the following line. This is the license for using Vitis:export LM_LICENSE_FILE="2100@potato.cis.upenn.edu;1709@potato.cis.upenn.edu;1717@potato.cis.upenn.edu;27010@potato.cis.upenn.edu;27009@potato.cis.upenn.edu"
Do
source ~/.bashrcto update the terminal environment with this variable.You might need to issue the following commands if you encounter an error with
libtinfo:sudo apt update sudo apt install libtinfo-dev sudo ln -s /lib/x86_64-linux-gnu/libtinfo.so.6 /lib/x86_64-linux-gnu/libtinfo.so.5
2.1.2.2. Using Vitis on AWS
This is what you are already familiar using. The plus side is it that the tools are all setup and ready to go, and you already know how to use AWS. It’s also possible that the AWS servers run the compiles faster than your laptop or biglab. The minus is the high remote latency that makes the GUI harder to use and your limited amount of credit on AWS. One best-of-both-world option might be to only use AWS for slow compiles and use your local machine for cases where you need to use the GUI.
Follow the instructions from the previous homeworks to create an AWS instance with Amazon FPGA Developer AMI. You can use the t2.xlarge instance, which costs about \(0.186\)/hr.
2.1.2.3. Using Vitis on Biglab
Biglab also allows you to use a setup that is known to work. It has the plus that its free, so this will work after your Amazon credits run out. It will require you learn a bit to get yourself logged in and setup to use biglab. For those far from Penn, it may have the same high latency problems on the GUI as AWS.
You can use UPenn’s BigLab as instructed here. Vitis is installed in the /mnt/pollux/software/xilinx/2020.1/ directory. We provide you with a shell script (compile_on_biglab.sh) that sets up the environment
on BigLab and calls the make commands. Note that biglab can
be busy. You can find out which machine is free by going to https://www.seas.upenn.edu/checklab/?lab=biglab
2.2. First Vitis Application on Ultra96
We are now going to run an application on the Ultra96 board and verify our setup.
2.2.1. Obtaining the Ultra96 Platform
In your host machine, download the Ultra96 platform that you will use for this homework (you can use
wget). Use the asia-specific link if you are not in US for faster download:Extract the platform to a desired location.
Set the
PLATFORM_REPO_PATHSto the extracted directory. For instance:export PLATFORM_REPO_PATHS=~/ese532_hw6_pfm
2.2.2. Obtaining and Building the Code
To verify our setup, we will run a simple vector addition on the Ultra96.
Clone the ese532_code repository using the following command:
git clone https://github.com/icgrp/ese532_code.git
If you already have it cloned, pull in the latest changes using:
cd ese532_code/
git pull origin master
The code you will use for this section
is in the hw6_hello_world directory. The directory structure looks like this:
hw6_hello_world/
    compile_on_biglab.sh
    Makefile
    design.cfg
    package.cfg
    xrt.ini
    vadd.h
    vadd.cpp
    krnl_vadd.cpp
Make sure the
PLATFORM_REPO_PATHSis setup from the previous step.Open a terminal and issue the following command. Change the command to reflect the directory you installed Vitis in. The command sets up the paths used by the Makefile.
source /opt/Xilinx/Vitis/2020.1/settings64.sh
If you are compiling on BigLab:
git clone your repo on BigLab.
wgetthe Ultra96 platform in BigLab and extract it in a folder.open the
compile_on_biglab.shfile and change thePLATFORM_REPO_PATHSto reflect the folder you put the platform in.Run
compile_on_biglab.shto compile the code. Note that by defaultcompile_on_biglab.shcallsmake fpga. Change it if you want to run a different make command. Also note that you need to run with a shell script on BigLab.
Use
make fpga -j4to start the full build. This will take about 20-30 minutes and generate the necessary files that will go into your SD card. Note that we used-j4to build with 4 cpus. If you have more cpus, you can increase this number.-j16is usually the maximum parallel jobs Vitis can handle.Use
make cleanto clean all the generated files.Warning
If you do
make clean, you will lose all the files and the compilation will start from the beginning. You can incrementally build and clean.When modifying only part of the code, you can incrementally compile and build:
Use
make kernel.xclbinto only build the HLS code.Use
make clean-acceleratorsto only clean the HLS code.Use
make hostto only build thevadd.cpphost code.Use
make clean-hostto only clean the generated files for the host code.Use
make packageto generate the SD card files.Use
make clean-packageto clean the generated SD card files.
design.cfgdefines several options for the v++ compiler. Learn more about it here.package.cfgcontains the v++ compiler options for packaging the SD card.xrt.inidefines the options necessary for Vitis Analyzer.vadd.cppandvadd.hcontains the OpenCL host code.krnl_vadd.cppcontains the HLS code.
2.2.3. Run on the FPGA
2.2.3.1. Write the SD Card Image (one time setup)
Once the build has completed, you will see a generated package directory. The package directory contains the following
files that we are interested in:
package/sd_card.img
package/sd_card/BOOT.BIN
package/sd_card/boot.scr
package/sd_card/image.ub
package/sd_card/vadd
package/sd_card/kernel.xclbin
When you are building for the first time, we will write the
package/sd_card.img image to our SD card. You can do that in
several ways:
First put your SD card into the SD card reader and plug it to your computer.
In Ubuntu 20.04, open the
Startup Disk Creator. SelectDisk Imagesfrom the drop down at the bottom right corner and locate thepackage/sd_card.imgfile. Continue to write the image.After it’s done, you can verify that there are two partitions in the SD card now:
the first partition has the files we mentioned above. These are the files that will change every time we build our code.
the second partition contains the Linux rootfs. This will not change.
If you don’t have
Startup Disk Creator, you can use other programs like balenaEtcher or Rufus.
Note
We will only have to write our SD card image once. When we recompile our code, the files that will need to be updated are:
package/sd_card/BOOT.BIN
package/sd_card/boot.scr
package/sd_card/image.ub
package/sd_card/vadd
package/sd_card/kernel.xclbin
We will copy those files to the running board using scp.
If you compiled on BigLab or AWS, you need to first copy
the files to your local machine and then copy it to the board.
We will then reboot the board, which will load the updated
boot files. The boot files contain the bitstream, which
reconfigures the Programmable Logic of the Ultra96. Hence,
we need a reboot. If you copy the files, but don’t do a reboot,
you will see that your program throws an error.
Caution
Make sure you don’t hot plug/unplug the SD card. This can potentially corrupt the SD card/damage the board. Always shut down the device first and then insert/take out the SD card. You can shut down the device by typing “poweroff” in the serial console of the device.
2.2.3.2. Boot the Ultra96
Make sure you have the board connected as shown in Fig. 2.5.
We will use two terminals on our host computer:
the first terminal will be used to copy binaries into the Ultra96
the second terminal will be used to access the serial console of the Ultra96
We will now open the serial console of the Ultra96. You can use any program like
minicom,gtktermorPuTTYto connect to our serial port. We are usingminicomand following is the command we use for connecting to the serial port:sudo minicom -D /dev/ttyUSB1
/dev/ttyUSB1is the port where the Ultra96 dumps all the console output. If you are on Windows, this will be something different, likeCOM4. When you want to get out ofminicom, useCTRL-A Z qAfter you have connected to the serial port, boot the board by pressing the boot switch as shown in Fig. 2.6.
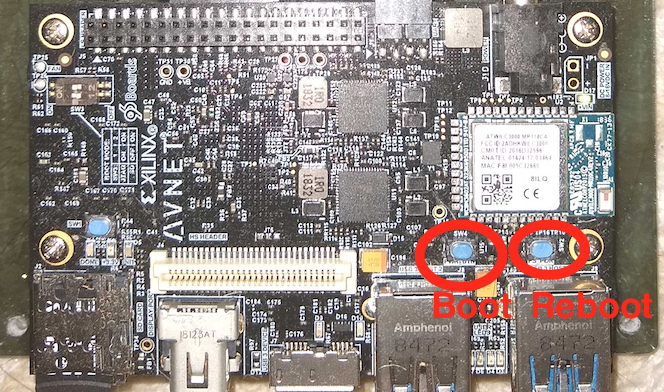
Fig. 2.6 Switch for booting Ultra96
Watch your serial console for boot messages. Following is what ours look like:
�Xilinx Zynq MP First Stage Boot Loader
Release 2020.1   Oct 17 2020  -  06:29:34
NOTICE:  ATF running on XCZU3EG/silicon v4/RTL5.1 at 0xfffea000
NOTICE:  BL31: v2.2(release):v1.1-5588-g5918e656e
NOTICE:  BL31: Built : 20:07:49, Oct 17 2020
U-Boot 2020.01 (Oct 17 2020 - 20:08:47 +0000)
Model: Avnet Ultra96 Rev1
Board: Xilinx ZynqMP
DRAM:  2 GiB
.
.
.
Starting kernel ...
[    0.000000] Booting Linux on physical CPU 0x0000000000 [0x410fd034]
[    0.000000] Linux version 5.4.0-xilinx-v2020.1 (oe-user@oe-host) (gcc version 9.2.0 (GCC)) #1 SMP Sat Oct 17 20:08:16 UTC 2020
[    0.000000] Machine model: Avnet Ultra96 Rev1
[    0.000000] earlycon: cdns0 at MMIO 0x00000000ff010000 (options '115200n8')
[    0.000000] printk: bootconsole [cdns0] enabled
[    0.000000] efi: Getting EFI parameters from FDT:
[    0.000000] efi: UEFI not found.
[    0.000000] Reserved memory: created DMA memory pool at 0x000000003ed40000, size 1 MiB
[    0.000000] OF: reserved mem: initialized node rproc@3ed400000, compatible id shared-dma-pool
[    0.000000] cma: Reserved 512 MiB at 0x000000005fc00000
.
.
.
.
Starting syslogd/klogd: done
Starting tcf-agent: OK
PetaLinux 2020.1 ultra96v2-2020-1 ttyPS0
root@ultra96v2-2020-1:~# The XKEYBOARD keymap compiler (xkbcomp) reports:
> Warning:          Unsupported high keycode 372 for name <I372> ignored
>                   X11 cannot support keycodes above 255.
>                   This warning only shows for the first high keycode.
Errors from xkbcomp are not fatal to the X server
D-BUS per-session daemon address is: unix:abstract=/tmp/dbus-2CuBS4BnDn,guid=63270a6bec61460191859caa5f9022fc
matchbox: Cant find a keycode for keysym 269025056
matchbox: ignoring key shortcut XF86Calendar=!$contacts
matchbox: Cant find a keycode for keysym 2809
matchbox: ignoring key shortcut telephone=!$dates
matchbox: Cant find a keycode for keysym 269025050
matchbox: ignoring key shortcut XF86Start=!matchbox-remote -desktop
dbus-daemon[641]: Activating service name='org.a11y.atspi.Registry' requested by ':1.0' (uid=0 pid=636 comm="matchbox-desktop ")
dbus-daemon[641]: Successfully activated service 'org.a11y.atspi.Registry'
SpiRegistry daemon is running with well-known name - org.a11y.atspi.Registry
[settings daemon] Forking. run with -n to prevent fork
Note that near the end some messages spill, so just press Enter couple of times to see the familiar linux shell:
root@ultra96v2-2020-1:~#
On the serial console, run your code as follows:
cd /mnt/sd-mmcblk0p1
export XILINX_XRT=/usr
./vadd kernel.xclbin
You should see the following output:
root@ultra96v2-2020-1:/mnt/sd-mmcblk0p1# ./vadd kernel.xclbin
Loading: 'kernel.xclbin'
TEST PASSED
We will now enable ethernet connection between our Ultra96 and the host computer, such that we can copy files between the devices. Issue the following command in the serial console:
ifconfig eth0 10.10.7.1 netmask 255.0.0.0
Now in your second console in the host computer, first find out the name that has been assigned to the USB-ethernet device by issuing
ifconfigenx000ec6c4b500: flags=4163<UP,BROADCAST,RUNNING,MULTICAST> mtu 1500 inet 10.10.7.2 netmask 255.0.0.0 broadcast 10.255.255.255 ether 00:0e:c6:c4:b5:00 txqueuelen 1000 (Ethernet) RX packets 213 bytes 32750 (32.7 KB) RX errors 0 dropped 0 overruns 0 frame 0 TX packets 249 bytes 25958 (25.9 KB) TX errors 0 dropped 0 overruns 0 carrier 0 collisions 0 lo: flags=73<UP,LOOPBACK,RUNNING> mtu 65536 inet 127.0.0.1 netmask 255.0.0.0 inet6 ::1 prefixlen 128 scopeid 0x10<host> loop txqueuelen 1000 (Local Loopback) RX packets 570887 bytes 920673672 (920.6 MB) RX errors 0 dropped 0 overruns 0 frame 0 TX packets 570887 bytes 920673672 (920.6 MB) TX errors 0 dropped 0 overruns 0 carrier 0 collisions 0
In our case, the USB-ethernet device is
enx000ec6c4b500. Now issue the following command:sudo ifconfig enx000ec6c4b500 10.10.7.2 netmask 255.0.0.0
We have now assigned IP
10.10.7.1to our Ultra96 and IP10.10.7.2to our USB ethernet device connected to our host computer. You can test the connection by doingping 10.10.7.2from the Ultra96 serial console, and doingping 10.10.7.1from the host computer.Let’s copy a file. Copy the
xrt.inifile from your computer to the/mnt/sd-mmcblk0p1directory of the Ultra96 as follows:scp xrt.ini root@10.10.7.1:/mnt/sd-mmcblk0p1/
The default password of the device is
root(you can setup ssh keys so that you don’t have to type the passwords all the time).Now re-run the program as before. You should now see the generated files:
kernel.xclbin.run_summary
profile_summary.csv
timeline_trace.csv
Copy these files to your computer by issuing the following command. Modify the command with the username of your computer and the directory you want to put the files in.
scp kernel.xclbin.run_summary timeline_trace.csv profile_summary.csv lilbirb@10.10.7.2:/media/lilbirb/research/
You can now use Vitis Analayzer in your host computer to view the trace by doing:
vitis_analyzer ./kernel.xclbin.run_summary
When you modify your HLS code, that will cause the hardware to change, and hence the following files will need to be copied to the
/mnt/sd-mmcblk0p1directorypackage/sd_card/BOOT.BIN package/sd_card/boot.scr package/sd_card/image.ub package/sd_card/vadd package/sd_card/kernel.xclbin
After you copy these files, type
rebootin the serial console and that will reprogram the device. Note that everytime you reboot the device, you will need to issue the following commands:export XILINX_XRT=/usr ifconfig eth0 10.10.7.1 netmask 255.0.0.0
You can put these commands in your
~/.bashrcof the Ultra96 (usevimto edit this file in Ultra96), so that you don’t have to type it all the time.When you only modify your host code, you don’t have to copy any of the files mentioned above and only neeed to copy the OpenCL host binary, which is
vaddin this example. You also don’t need to reboot the device in that case.
This concludes a top-down walk-through of the steps involved in running a hardware function on the Ultra96.